
Being raised on the east coast of the United States I guess I should be used to the snow by now — but I’m not. As a kid, I loved the snow. I loved sledding, snowboarding, and snowball fights.
But now, as an adult, snow just means an inconvenience. It means travel is going to be terrible. It means not being able to drive to the gym. And it means being stuck in the apartment.
That said, I’m taking this snow day on the east coast and writing a blog post on capturing mouse click events with Python and OpenCV.
In this example we’ll click and drag a rectangular Region of Interest (ROI) and crop it from our image. This technique is especially helpful if you are labeling data as input to an image classification algorithm.
So if you’re trying to understand how mouse click events work with Python and OpenCV, then look no further! This blog post will show you exactly that!
OpenCV and Python versions:
In order to run this example, you’ll need Python 2.7 and OpenCV 2.4.X.
Capturing mouse click events with Python and OpenCV
Let’s go ahead and get this example started. Open up a new file, name it click_and_crop.py , and we’ll get to work:
# import the necessary packages
import argparse
import cv2

# initialize the list of reference points and boolean indicating
# whether cropping is being performed or not
refPt = []
cropping = False

def click_and_crop(event, x, y, flags, param):
	# grab references to the global variables
	global refPt, cropping

	# if the left mouse button was clicked, record the starting
	# (x, y) coordinates and indicate that cropping is being
	# performed
	if event == cv2.EVENT_LBUTTONDOWN:
		refPt = [(x, y)]
		cropping = True

	# check to see if the left mouse button was released
	elif event == cv2.EVENT_LBUTTONUP:
		# record the ending (x, y) coordinates and indicate that
		# the cropping operation is finished
		refPt.append((x, y))
		cropping = False

		# draw a rectangle around the region of interest
		cv2.rectangle(image, refPt[0], refPt[1], (0, 255, 0), 2)
		cv2.imshow("image", image)
We’ll start by importing our two necessary packages: argparse for parsing command line arguments and cv2 for our OpenCV bindings.
We also define two global variables on Lines 7 and 8: refPt , which is a list of two (x, y)-coordinates specifying the rectangular region we are going to crop from our image, and cropping , a boolean indicating whether we are in cropping mode or not.
To process the mouse click events we define the click_and_crop callback function on Line 10. Anytime a mouse event happens, OpenCV will relay the pertinent details to our click_and_crop function.
In order for our function to handle the relay, we need to accept 5 arguments:
- event: The event that took place (left mouse button pressed, left mouse button released, mouse movement, etc).
- x: The x-coordinate of the event.
- y: The y-coordinate of the event.
- flags: Any relevant flags passed by OpenCV.
- params: Any extra parameters supplied by OpenCV.
From there we grab reference to our refPt list and cropping flag on Line 12.
We then make a check on Line 17 to see if our left mouse button was pressed. If it was, we record the (x, y)-coordinates of the event and indicate that we are now in “cropping mode”.
At this point we would drag out the rectangular region of the image that we want to crop. After we are done dragging out the region, we release the left mouse button — Line 22 handles when the left mouse button is released and updates the list of points containing our ROI. We also draw the rectangle representing the ROI on Lines 29 and 30.
Now, let’s see how we can use this function to crop an image:
# construct the argument parser and parse the arguments
ap = argparse.ArgumentParser()
ap.add_argument("-i", "--image", required=True, help="Path to the image")
args = vars(ap.parse_args())

# load the image, clone it, and setup the mouse callback function
image = cv2.imread(args["image"])
clone = image.copy()
cv2.namedWindow("image")
cv2.setMouseCallback("image", click_and_crop)

# keep looping until the 'q' key is pressed
while True:
	# display the image and wait for a keypress
	cv2.imshow("image", image)
	key = cv2.waitKey(1) & 0xFF

	# if the 'r' key is pressed, reset the cropping region
	if key == ord("r"):
		image = clone.copy()

	# if the 'c' key is pressed, break from the loop
	elif key == ord("c"):
		break

# if there are two reference points, then crop the region of interest
# from teh image and display it
if len(refPt) == 2:
	roi = clone[refPt[0][1]:refPt[1][1], refPt[0][0]:refPt[1][0]]
	cv2.imshow("ROI", roi)
	cv2.waitKey(0)

# close all open windows
cv2.destroyAllWindows()
We start by parsing our command line arguments on Lines 33-35. We need only a single switch here, --image , which is the path to the image we want to crop. This image is then loaded and cloned on Lines 38 and 39. We make a deep copy of the image so we can draw the rectangular bounding box on Line 29 without destroying the original image.
Lines 40 and 41 handle registering our click_and_crop callback function. We first call cv2.namedWindow to create a window named “image”. And we then set the mouse callback by calling cv2.setMouseCallback , supplying our named “image” window and our click_and_crop callback function.
From here, the rest of this example just ties the pieces together.
We start a loop on Line 44 which (1) displays our image on screen and (2) waits for a keypress.
This is the point where we select the rectangular region we want to crop from the image.
If we press the r key after selecting the region to crop, we reset our cropping
And if we press the c key, then we break from the loop and perform the actual cropping on Lines 59-62.
Finally, we cleanup and close all open windows on Line 65.
OpenCV mouse events in action
Now that we have our example coded up, let’s try it out. Open up a terminal and execute the following command:
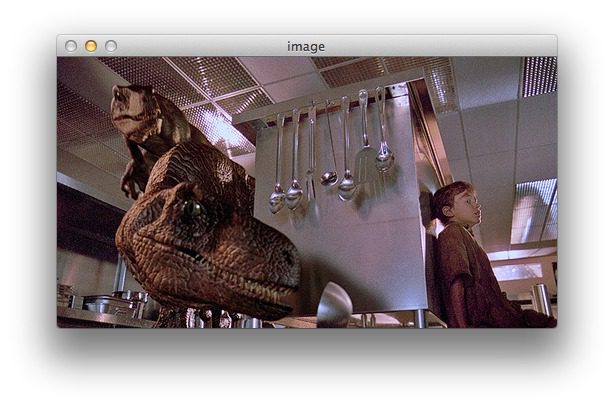
$ python click_and_crop.py --image jurassic_park_kitchen.jpg
You’ll first be presented with the image on your screen:
Select the region you want to crop by clicking, dragging, and releasing:

And finally press the c key to perform the crop:
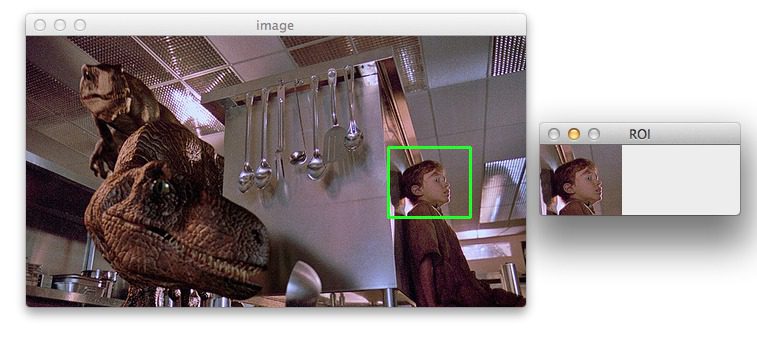
As you can see, we have successfully cropped Tim’s face from the image.
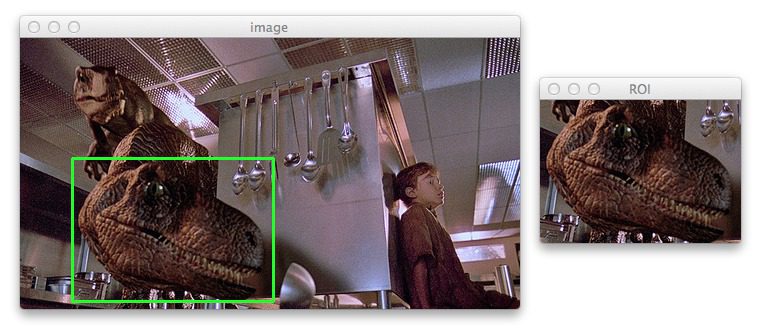
Here is another example where we crop the Velociraptor:
So there you have it — a simple method to capture mouse events to crop an image using Python and OpenCV.
What's next? I recommend PyImageSearch University.

30+ total classes • 39h 44m video • Last updated: 12/2021
★★★★★ 4.84 (128 Ratings) • 3,000+ Students Enrolled
I strongly believe that if you had the right teacher you could master computer vision and deep learning.
Do you think learning computer vision and deep learning has to be time-consuming, overwhelming, and complicated? Or has to involve complex mathematics and equations? Or requires a degree in computer science?
That’s not the case.
All you need to master computer vision and deep learning is for someone to explain things to you in simple, intuitive terms. And that’s exactly what I do. My mission is to change education and how complex Artificial Intelligence topics are taught.
If you're serious about learning computer vision, your next stop should be PyImageSearch University, the most comprehensive computer vision, deep learning, and OpenCV course online today. Here you’ll learn how to successfully and confidently apply computer vision to your work, research, and projects. Join me in computer vision mastery.
Inside PyImageSearch University you'll find:
- ✓ 30+ courses on essential computer vision, deep learning, and OpenCV topics
- ✓ 30+ Certificates of Completion
- ✓ 39h 44m on-demand video
- ✓ Brand new courses released every month, ensuring you can keep up with state-of-the-art techniques
- ✓ Pre-configured Jupyter Notebooks in Google Colab
- ✓ Run all code examples in your web browser — works on Windows, macOS, and Linux (no dev environment configuration required!)
- ✓ Access to centralized code repos for all 500+ tutorials on PyImageSearch
- ✓ Easy one-click downloads for code, datasets, pre-trained models, etc.
- ✓ Access on mobile, laptop, desktop, etc.
Summary
In this blog post we learned how to capture mouse events using OpenCV and Python. While this post did not provide a complete and exhaustive overview of all the mouse events you can capture, it laid the groundwork for what is possible.
This post also demonstrated how you can quickly crop and extract regions of an image, which is especially useful when creating training data for your own custom object detectors.
Download the Source Code and FREE 17-page Resource Guide
Enter your email address below to get a .zip of the code and a FREE 17-page Resource Guide on Computer Vision, OpenCV, and Deep Learning. Inside you'll find my hand-picked tutorials, books, courses, and libraries to help you master CV and DL!

