Today I’ve got a little trick for you, straight out of the PyImageSearch vault.
This trick is really awesome — and in many cases, it completely alleviates the need to tune the parameters to your Canny edge detectors. But before we get into that, let’s discuss the Canny edge detector a bit.
OpenCV and Python versions:
This example will run on Python 2.7/Python 3.4+ and OpenCV 2.4.X/OpenCV 3.0+.
The Canny Edge Detector
In previous posts we’ve used the Canny edge detector a fair amount of times. We’ve used it to build a kick-ass mobile document scanner and we’ve used to find a Game Boy screen in a photo, just two name a couple instances.
The Canny edge detector was developed way back in 1986 by John F. Canny. And it’s still widely used today was one of the default edge detectors in image processing.
The Canny edge detection algorithm can be broken down into 5 steps:
- Step 1: Smooth the image using a Gaussian filter to remove high frequency noise.
- Step 2: Compute the gradient intensity representations of the image.
- Step 3: Apply non-maximum suppression to remove “false” responses to to edge detection.
- Step 4: Apply thresholding using a lower and upper boundary on the gradient values.
- Step 5: Track edges using hysteresis by suppressing weak edges that are not connected to strong edges.
If you’re familiar with the OpenCV implementation of the Canny edge detector you’ll know that the function signature looks like this:
cv2.canny(image, lower, upper)
Where image
is the image that we want to detect edges in; and lower
and upper
are our integer thresholds for Step 4, respectively.
The problem becomes determining these lower and upper thresholds.
What is the optimal value for the thresholds?
This question is especially important when you are processing multiple images with different contents captured under varying lighting conditions.
In the remainder of this blog post I’ll show you a little trick that relies on basic statistics that you can apply to remove the manual tuning of the thresholds to Canny edge detection.
This trick will save you time parameter tuning — and you’ll still get a nice Canny edge map after applying the function.
To learn more about this zero-parameter, automatic Canny edge detection trick, read on.
Zero-parameter, automatic Canny edge detection with Python and OpenCV
Let’s go ahead and get started. Open up a new file in your favorite code editor, name it auto_canny.py
, and let’s get started:
# import the necessary packages import numpy as np import argparse import glob import cv2 def auto_canny(image, sigma=0.33): # compute the median of the single channel pixel intensities v = np.median(image) # apply automatic Canny edge detection using the computed median lower = int(max(0, (1.0 - sigma) * v)) upper = int(min(255, (1.0 + sigma) * v)) edged = cv2.Canny(image, lower, upper) # return the edged image return edged
The first thing we’ll do is import our necessary packages. We’ll use NumPy to for numerical operations, argparse
to parse command line arguments, glob
to grab the paths to our images from disk, and cv2
for our OpenCV bindings.
We then define auto_canny
, our automatic Canny edge detection function on Line 7. This function requires a single argument, image
, which is the single-channel image that we want to detect images in. An optional argument, sigma
can be used to vary the percentage thresholds that are determined based on simple statistics.
Line 9 handles computing the median of the pixel intensities in the image.
We then take this median value and construct two thresholds, lower
and upper
on Lines 12 and 13. These thresholds are constructed based on the +/- percentages controlled by the sigma
argument.
A lower value of sigma
indicates a tighter threshold, whereas a larger value of sigma
gives a wider threshold. In general, you will not have to change this sigma
value often. Simply select a single, default sigma
value and apply it to your entire dataset of images.
Note: In practice, sigma=0.33
tends to give good results on most of the dataset I’m working with, so I choose to supply 33% as the default sigma value.
Now that we have our lower and upper thresholds, we then apply the Canny edge detector on Line 14 and return it to the calling function on Line 17.
Let’s keep moving with this example and see how we can apply it to our images:
# construct the argument parse and parse the arguments ap = argparse.ArgumentParser() ap.add_argument("-i", "--images", required=True, help="path to input dataset of images") args = vars(ap.parse_args()) # loop over the images for imagePath in glob.glob(args["images"] + "/*.jpg"): # load the image, convert it to grayscale, and blur it slightly image = cv2.imread(imagePath) gray = cv2.cvtColor(image, cv2.COLOR_BGR2GRAY) blurred = cv2.GaussianBlur(gray, (3, 3), 0) # apply Canny edge detection using a wide threshold, tight # threshold, and automatically determined threshold wide = cv2.Canny(blurred, 10, 200) tight = cv2.Canny(blurred, 225, 250) auto = auto_canny(blurred) # show the images cv2.imshow("Original", image) cv2.imshow("Edges", np.hstack([wide, tight, auto])) cv2.waitKey(0)
We parse our command line arguments on Lines 20-23. We only need a single switch here, --images
, which is the path to the directory containing the images we want to process.
We then loop over the images in our directory on Line 26, load the image from disk on Line 28, convert the image to grayscale on Line 29, and apply a Gaussian blur with a 3 x 3 kernel to help remove high frequency noise on Line 30.
Lines 34-36 then apply Canny edge detection using three methods:
- A wide threshold.
- A tight threshold.
- A threshold determined automatically using our
auto_canny
function.
Finally, our resulting images are displayed to us on Lines 39-41.
The auto_canny function in action
Alright, enough talk about code. Let’s see our auto_canny
function in action.
Open up a terminal and execute the following command:
$ python auto_canny.py --images images
You should then see the following output:
As you can see, the wide Canny edge threshold not only detects the dolphin, but also many of the clouds in the image. The tight threshold does not detect the clouds, but misses out on the dolphin tail. Finally, the automatic method is able to find all of the dolphin, while removing many of the cloud edges.
Let’s try another image:
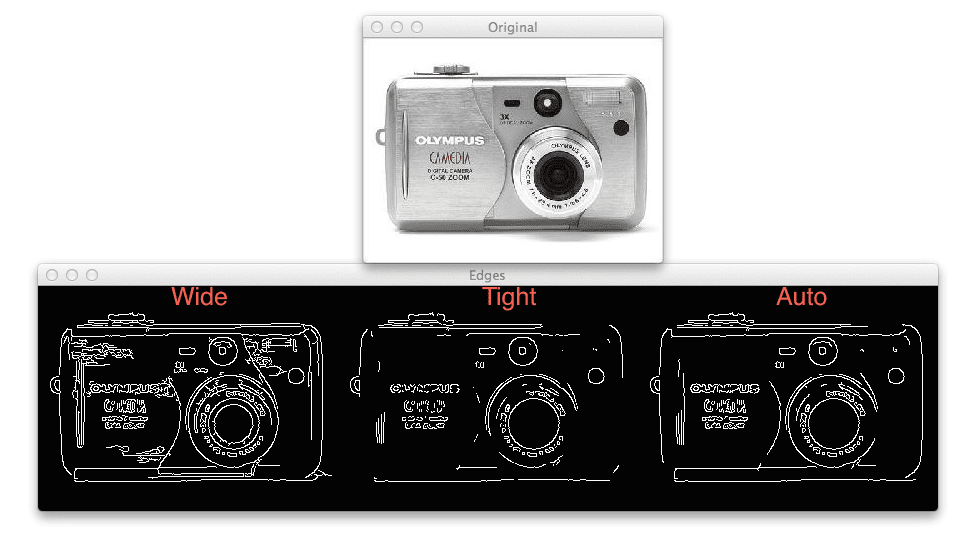
The wide Canny threshold on the left includes high frequency noise based on the reflection of the light on the brushed metal of the camera, whereas the tight threshold in the center misses out on many of the structural edges on the camera. Finally, the automatic method on the right is able to find many of the structural edges while not including the high frequency noise.
One more example:
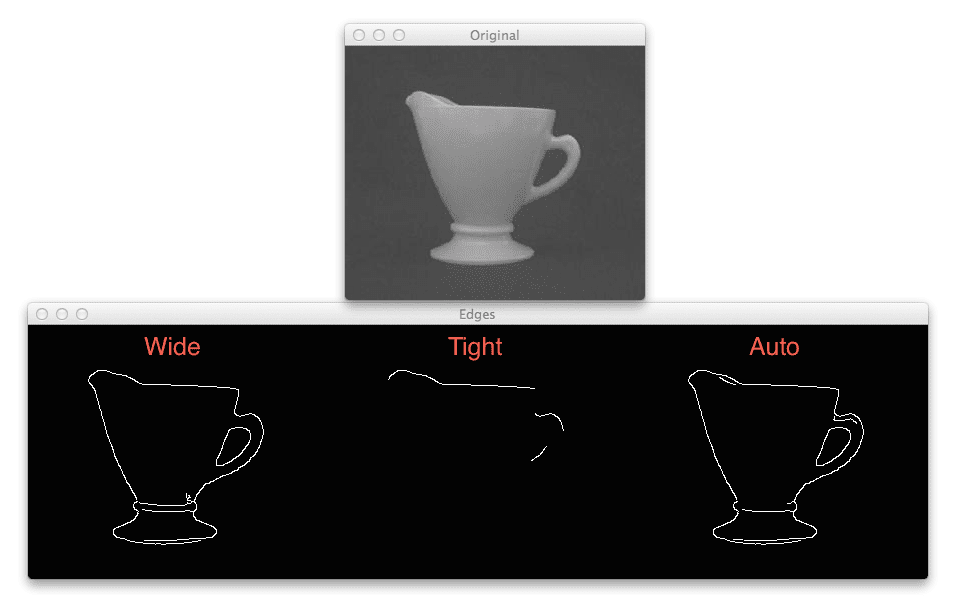
The results here are fairly dramatic. While both the wide (left) and the automatic (right) Canny edge detection methods perform similarly, the tight threshold (center) misses out on almost all of the structural edges of the cup.
Given the examples above, it’s clear that the automatic, zero-parameter version of the Canny edge detection obtains the best results with the least effort.
Note: The three example images were taken from the CALTECH-101 dataset.
What's next? I recommend PyImageSearch University.
30+ total classes • 39h 44m video • Last updated: 12/2021
★★★★★ 4.84 (128 Ratings) • 3,000+ Students Enrolled
I strongly believe that if you had the right teacher you could master computer vision and deep learning.
Do you think learning computer vision and deep learning has to be time-consuming, overwhelming, and complicated? Or has to involve complex mathematics and equations? Or requires a degree in computer science?
That’s not the case.
All you need to master computer vision and deep learning is for someone to explain things to you in simple, intuitive terms. And that’s exactly what I do. My mission is to change education and how complex Artificial Intelligence topics are taught.
If you're serious about learning computer vision, your next stop should be PyImageSearch University, the most comprehensive computer vision, deep learning, and OpenCV course online today. Here you’ll learn how to successfully and confidently apply computer vision to your work, research, and projects. Join me in computer vision mastery.
Inside PyImageSearch University you'll find:
- ✓ 30+ courses on essential computer vision, deep learning, and OpenCV topics
- ✓ 30+ Certificates of Completion
- ✓ 39h 44m on-demand video
- ✓ Brand new courses released every month, ensuring you can keep up with state-of-the-art techniques
- ✓ Pre-configured Jupyter Notebooks in Google Colab
- ✓ Run all code examples in your web browser — works on Windows, macOS, and Linux (no dev environment configuration required!)
- ✓ Access to centralized code repos for all 500+ tutorials on PyImageSearch
- ✓ Easy one-click downloads for code, datasets, pre-trained models, etc.
- ✓ Access on mobile, laptop, desktop, etc.
Summary
In this blog post I showed you a simple trick to (reliably) automatically detect edges in images using the Canny edge detector, without providing thresholds to the function.
This trick simply takes the median of the image, and then constructs upper and lower thresholds based on a percentage of this median. In practice, sigma=0.33
tends to obtain good results.
In general, you’ll find that the automatic, zero-parameter version of the Canny edge detection is able to obtain fairly decent results with little-to-no effort on your part.
With this in mind, why not download the source code to this post and give it a shot on your own images? I would be curious to hear about your results!
Download the Source Code and FREE 17-page Resource Guide
Enter your email address below to get a .zip of the code and a FREE 17-page Resource Guide on Computer Vision, OpenCV, and Deep Learning. Inside you'll find my hand-picked tutorials, books, courses, and libraries to help you master CV and DL!
Hey I just wanted say this is a tremendous post! I’ve implemented something similar to this and it really streamlines processing bulk images.
Also after reading the line:
‘np.hstack([wide, tight, auto])’
I laughed out load because of how simple/awesome this method is for joining images. Do you have any other awesome ‘cheats’ like that one?
Thanks again for a quality blog!
Hi Ryan, thanks so much for the comment and kind words, I really appreciate it 😀 I do have some other little cheats like these scattered across the blog. At some point I should really compile them all into a single post.
You can find something similar here:https://gist.github.com/egonSchiele/756833
Bests
Nice, thanks for sharing!
Thank you for this post. I fully agree with a method that relies on statistics of the gradient intensity and I am sure yours gives convincing results.
Interestingly, the ratio of the thresholds you chose is precisely 2, the value that is usually recommended for hysteresis thresholding. Adjusting a single threshold is not always that easy; adjusting two at a time is a challenge.
I know from experience that textured/noisy areas do pollute the histogram of intensities and can displace the median (think of enlarging a textured area indefinitely). Using the histogram of only those pixels that survive after non-maxima suppression does not fix this, as in textured areas a significant fraction of the pixels do survive. I a still looking for a robust statistic.
Hi Yves, thanks so much for the reply! And yes, I absolutely agree — this is not a “magic bullet” approach. But it does obtain good results (in many cases) with literally no effort. And in the case of textured areas, you’ll probably struggle to tune the Canny thresholds manually as well. Have you tried applying a series of bilateral filters to your images to smooth the texture while still preserving the lines? This could help in your situation.
Hey Yves 😉
I would prefer to take the part of the histogram of interest (in images with background this one has not to be taken in consideration) and use the percentile 5 and 95 as the limit of the distribution.
The Threshold High would be (P95+P5) /2 + 0.33 * (P95-P5) /2
have you read somewhere about the ratio of the thresholds. If so, kindly get me know.
As i need for my project
Indeed, the bilateral filter does a very good job (much better than the median); if I could I would use the non-local means filter, but for its horrible running time. My situation is everybody’s situation, isn’t it: in more than 25 years of practice, I doubt I have ever seen a clean image where edge detection really works 😉
On second thoughts, noise and flat/textured zones are largely dominant in an image (otherwise the image is just a mess), so that edges can be seen as “outlier” pixels. So it could be that the goal of automatic threshold computation is to just capture the distribution of the noise. This is a partly hopeless task as the noise can be correlated to image intensities and textures are location-dependent, and the threshold should be adaptive.
It sounds like you might want to take a look at Local Binary Patterns. You should be able to capture the distribution of edge, flat, and corner regions with a little bit of trial and error.
Is it possible to get the output from edge detection as a series of line functions? I built a v-plotter and would like to draw the results of the edge detection. Thx.
To get the edge map as a series of lines, you would probably have to use something like
cv2.findContours
and then fit a line to each contour.hi adrian,
great post, as usual! did you consider using an automatically calculated threshold (eg otsu)?
Otsu’s method is really awesome, but assumes a bi-modal histogram to get decent threshold results. This method does not assume any knowledge of the distribution and instead uses the median, which is less sensitive to outliers than other statistical methods, to derive the edge thresholds. In practice, it works quite well.
The way I see it, you have exchanged two parameters for a new one + heuristic. So “zero” is a strong word here… 🙂
I have exchanged two parameters that have to be manually set for an optional one that works well on natural images. Yes, it’s still technically a parameter, but it’s an optional one. The real power of
auto_canny
is when you go to apply it to a dataset of images, allowing you to obtain a consistent edge map without hardcode parameters.Is there a way to get all the lines to connect?
What do you mean by “get all the lines to connect”?
The camera’s edges aren’t connected so I would be unable to fill in the camera with say a blur right?
Yes, that would be correct. You can look into morphological operations, specifically the closing operation to help close gaps between lines — but if the gaps are too big, you might have to modify your actual object detection procedure.
Once you do edge detection, how can it be used to find an object?
Once you find edges in your images, you can use the
cv2.findContours
function to find the actual objects that correspond to these edges. For an example of doing object detection with contours, please see this post.Your post on finding contours to detect squares, rectangles, and circles was very simple and straight forward. How would you detect the dolphin in your example above?
If you wanted to detect the actual dolphin, a simple contour approach would not work. You would likely need to train a custom object detector using something like the HOG + Linear SVM framework.
hi
I want apply edge detection with opencv (python) on live video on raspberry pi2 but all samples what i found aplle the edge detect on the image naot real time live video
Are you using a Raspberry Pi camera or a USB camera? If you’re using a Raspberry Pi camera, start here. Once you start looping over the frames of the video stream, you can perform edge detection on them. Once you know how to apply edge detection to a single image, it’s not that different to apply it to a video.
hi
I use rasspberry pi camera and thanks for your link but i dont know how can apply the edge detect on evry frame please send a simple example link about how apply the edge detect on frame of the video
I would suggest starting with this tutorial: Unifying picamera and cv2.VideoCapture into a single class with OpenCV
You can then modify the code inside the loop to do:
I hope that helps!
hi adrian
i use this code for real time edge detect on frame of video and with print command show the matrix of frame but how can i determine the size of matrix of edge detect ?
output from this function imutils.auto_canny(frame)
plese help me this is my important problem
I’m not sure I understand what you mean by “determine size of matrix of edge detect”? If you’re looking to simply display the output of edge detection process, you could do:
cv2.imshow("Edges", imutils.auto_canny(frame))
If you’re looking to get the shape of the image, you can use the
.shape
of the array:print(edge.shape)
If you want to process the edges returned by the edge detection process, you need to use the
cv2.findContours
method.Thannks for your reply
I use the code of your link but when type python [file name].py picamera is not start and show error :videostream is not define
Make sure you have the latest version of
imutils
installed:$ pip install --upgrade imutils --no-cache-dir
This will ensure the latest version is pulled down and installed.
hi
thanks for reply
finally i success apply the edge detct on live video with your code thank you
but i need to metrix of frame and mertix of edge on evry frame how can i solve this problem ?
i want to count the number of object using edge detection
can u help me in the code
Once you have the edges detected, you should use the
cv2.findContours
function which can be used to find the “outlines” of each object in the edge map. This will also enable you to “count” the number of objects in the image. If you’re just getting started with OpenCV and computer vision, I would definitely suggest going through Practical Python and OpenCV, which has a chapter dedicated to counting objects based on thresholding and edge detection.Hi Adrian,
Wouldn’t you want to use the median of the gradient magnitude image rather than the median of the image itself as ‘v’? I’ve found that if I change the Sobel kernel size, the values of the gradient magnitude change, so a threshold set based on the image median would not adapt to that change. Any thoughts?
Thanks!
The median, by definition, is less sensitive to outliers than other aggregates, such as the average. And yes, if you change the size of the Sobel kernel, the more pixels are considered in the convolution. But again, due to the median being less sensitive to outliers, this shouldn’t have a substantial impact. However, that is also worth testing 🙂
After thinking about it further it’s not just that it doesn’t adapt to the size of the Otsu kernel, but rather that the Otsu threshold will be between 0 and 255, and the gradient magnitude image will be valued between 0 and 1500 or so, so the point of my question really was WHICH image to compute statistics on (the original or the gradient magnitude), not so much which statistics to compute.
David
As usual, a wonderful post.
But I’ve also a question. Sometimes is pretty difficult to find the edges ’cause there isn’t a big contrast between the object and the background. I read in another post you suggest to use a series of dilations to close the gaps in the outline.
Could you please to name some dilations we could use? I was using these here: http://docs.opencv.org/3.0-beta/doc/py_tutorials/py_imgproc/py_morphological_ops/py_morphological_ops.html#morphological-ops, but without satisfactory results.
Thanks a lot again!!
To perform dilations and erosions, you’ll need to use the
cv2.dilate
andcv2.erode
functions, respectively. These are examples of morphological operations.Hello! I love your website. It have really helped me with my bachelor’s thesis. However, I would like to ask about those steps for Canny edge detection. Aren’t steps 4 and 5 one and the same?
“Step 4: Apply thresholding using a lower and upper boundary on the gradient values.
Step 5: Track edges using hysteresis by suppressing weak edges that are not connected to strong edges.”
The way I understand it (and according to this: http://users.ecs.soton.ac.uk/msn/book/new_demo/thresholding/), hysteresis thresholding is an advanced type of thresholding, that is using two thresholds instead of one. So it seems to me that Step 4 is useless here. Am I missing something?
Correct, hysteresis is more of an “advanced” type of thresholding, more akin to non-maxima suppression. However, they are two separate steps. The first thresholding steps give you the edge regions. Then you apply hysteresis along each of the thresholded regions, which is essentially non-maxima suppression, and is used to prune the thresholded regions. Step #4 is actually a requirement, the output of which is then fed into hysteresis.
Thank you for you quick response! So Step 5 needs an image with edges and then hysteresis is applied to remove some of them (false positives). But does Step 3 not produce such image? I thought that after applying non-maxima suppresion in Step 3, I get all candidate edges. Is this incorrect?
And second question: If you need two thresholds for Step 4 and two thresholds for hysteresis in Step 5, are they the same pair?
Thank you very much for your time.
My apologies regarding my previous comment, I misspoke regarding the hysteresis step. To clarify:
In Step #3, you’ll apply NMS to get what I would call “edge candidates”. These edge candidates may or may not be edges — we need to apply Step #4 to threshold them based on their gradient values (the threshold values). Since we are using two thresholds, this is the first part of hysteresis. But there is also a second step (Step #5): the connected-component analysis step. This gives us another set of edge candidates. We are pretty confident as to whether or not these regions are actual edges or not, but in order to determine this, we need to track the actual edges and determine how they are connected.
Thank you for your post Adrian, as a beginner i always find your post the easiest to understand and learn.
i have 2 simple questions: first why do we need to convert the image to grayscale before blurring it? i only notice that it seems to take less time for the program to blur a grayscale image than a BGR image, is that all?
Second is that what’s the difference between grayscale and HSV? does converting the image to HSV affect the result? cuz i can’t really see the difference myself 0.0
Hope my English is good enough for you to understand my questions XD
You can blur the image in either the grayscale or the RGB colorspace. Blurring in grayscale is faster since there is only one channel to blur versus the 3 channels in the RGB space. As for the HSV color space, I would suggest reading up on it here.
Dear Adrian,
Thank you for posting this code and detailed explanation.
I ran into this problem ‘auto_canny.py : error : argument -i/ –images is required ‘while using this code.
I called the image to be used but no output was displayed even after waiting for an hour.
What do I have to do?
You need to supply the
--images
command line argument when executing your Python script via the terminal as I did in the blog post:$ python auto_canny.py --images images
Yes, I did i.e # python auto_canny.py –images images/moon.tif
Still giving me the same empty output
If that’s the case then I think your version of OpenCV was compiled without TIFF image support. I would suggest following one of my OpenCV install tutorials.
I have been facing a similar problem. I downloaded the .zip file which contained both, the images and the code. But I’m still getting an empty output.
I’m using Ubuntu 16.04 and working on the CV environment i.e. I have executed the “workon cv” command.
np.hstack([wide, tight, auto])) is the best trick to combine image on single window. Is there any cheats that can combine color and binary image together?
In my opinion
np.hstack
andnp.vstack
are the best ways to horizontally/vertically stack images into a single image. For combining color and gray you neednp.dstack
:Can we use it as an extra feature for the CBIR you taught earlier?
Canny edge detection? Edge detection maps can be used as features, but using Histogram of Oriented Gradients will likely give you better results.
thank you so much . please if i want to detect edges in 45 degree direction not in all direction to know the object oreintation . i want to use canny not sobel what should i do please
You could literally use a diagonal structuring element.
Hey Adrian,
Thanks for the solution for automatic calculation of threshold. I am facing a small problem though. I am working on very large images. Even for working this code I have used Gaussian blur matrix of size (25,25) then only the noise is reducing. But I am getting very small non continuous edges. I think I have to increase the matrix size or some parameters which checks the gradient. I am unable to find that parameter. My intention is to perform perspective transformation and for that I have to obtain exact 4 coordinates automatically. And I cant resize or compress the image as I cant afford the loss of information. So what could be the solution?
How large are your input images? We typically don’t process images that are larger than 600 pixels along their largest dimension. Resize your image to a smaller size and then process it there.
Hey Adrian.
Thank you for your great post. It’s really simple and can be implemented well.
Can you explain more about how you use sigma?
Is this sigma the same as standard deviation on Gaussian filter in Canny algorithm step?
Hi Hannah — no, the sigma value is not the same as your variance/standard deviation (perhaps a better name for this parameter would have been epsilon). I’ve found (empirically) that leaving at 0.33 returns reasonable results across multiple datasets; however, you should consider testing various values and visually examining the results.
Hi Adrian!
This post was very helpful to me. May I know how did you get your sigma value?
I tuned it empirically by running the edge detector on a dataset and visually inspecting the results. I would suggest you to do the same for your own datasets.
You calculated values for an image. But If there is live video streaming, then how we will find the threshold values for canny algorithm??
The value provided is normally a good fit for most datasets. If you are getting non-sense results you’ll want to try different values on your own images/videos and set it manually.
hi, i love your works. i learn edge detection and contour from your video on Youtube. but right now, i have a problem.
i objective is findContour of object that canny detects and then i calculate the area. but when i used findContour right after canny, i found that the findContour just find a line that canny makes. so my question is how i find contour area of the object from canny process (like that dolphine or glass from your example) . thanks.
The cv2.findContours function finds outlines of binarized images, such as Canny edge maps or thresholded images. If you wanted to compute the area of a specific object you would need to ensure you can first localize outline (i.e., boundary) of the object and then call cv2.findContours.
Hi Adrian,
I have to detect rail discontinuity and objet detection rails. Unfortunately, there are a lot of noises (grasses) and I am not able to remove the noises without removing the rail from the image. Do you know which function could I use to detect the continuity or discontinuity of the rails ?
I have already tried color detection to put a mask on the background in order to only detect the obstacle (object) but it means the color of the object must be different from the grass and the rail, so it’s a huge constraint.
I have also tried canny edge funtion and it gives me good results but it detects rails with white broken lines and dotted. So when I use findcontours and drawContours it draws too much and too small contours of the rails and not just 2 rails.
Thanks for your help.
It’s hard to suggest a technique without seeing your Canny edge map but I would suggest using a morphological closing operation to close gaps between the gaps. You might also consider applying a Hough line transform as well.
Hi Adrian, the code works but I can not get the screen output. The printout does not show pictures either.Can you help me?
You mentioned not being able to get the output. Is the script automatically exiting? Are you getting an error?
Hi and thanks a lot for this tutorial,
It is really helping me to take a look of your posts.
I have implemented your solution in C++, upper-lower were always lower than 1.0f.
I figured out that the value are normalized and I need to multiply it by the max value of my grayscale (255).
Best Regards,
Clément
Hello.
I dont now phyton.How can I write this code in java
Hi, Tnx a lot for this grate tutorial…
error: the following arguments are required: -i/–images
I keep receiving the above error…what should I do?
Make sure you read this blog post on command line arguments.
Adrian, thanx for blog. But I have a question. In imutils lib, there is 4-point Perspective Transform, but how to detect circles?
I actually have an entire tutorial dedicated to circle detection. You can find it here.
Hi Adrian, Thanks for the tutorial, i need to calculate actual area of a ball with very high precision, i applied masking and calculate area but masking threshold varies as per ambient light, i need very adaptive system for outdoor, what is a best possible solution for that?
Hi Adrain, I hope you had a great honymoon. I like your tutorials. I have learned a lot from them and often refer back to them often for additional details. I have been programming for many years but I’m new to python. I’m trying to use this function in my code and I get a Type error: Unsupported opperand type(s) for *: ‘float’ and ‘function’. “lower = int(max(0, (1.0 – sigma) * v))” I’m using Python 3. Thanks in advance.
Ken M.
Hey Ken, did you download the source code to this tutorial using the “Downloads” section or did you copy and paste? My guess is that you may have copied and pasted and accidentally introduced an error into the code.
Thanks for the advice. For some strange reason that fixed. I looked over that code with a fine tooth comb and I didn’t see any differences including case. I guess some strange charecter got in there some how.
Congrats on resolving the issue, Ken!
Hey adrian,
first of all thanks for putting this out there. i have a question regarding using autocanny on things that already have lines drawn on them- but the lines are too weak for threshold or sharpening to bring them out without over sharpening or darkening the rest of the lines, which makes me do it by hand which is quite tedious. when i put such an image (usually I will be working with grayscale) into autocanny it still will often recognize the line- the problem is that even if my picture’s line is fairly thin, I now get two lines, where I would like instead to get one line. is there a way to use this to recognize where a segment is so thin, it is itself a line vs a thing that needs out-lining? An example that I am working on currently is that I have a library of screenshots of coloring book pages, which need crisp blacks and whites to be able to be a coloringbook one could easily fill sections of in an image editor, but I have other situations where I have run into this same problem (old or poorly scanned illustrations, partially oulined art, etc).
p.s. I am using Photoshop CC 2019 and Gimp 2.8.14 with G’MIC in case that makes any difference to you
Do you have any example images of what you’re working with? It would be helpful to see the images themselves before recommending a technique to try.
Hi Adrian! Great Work! Actually treshold values are kind of a nightmare. How did you reached the sigma 0.33 value?
Any advice for finding doors from a random image?
Thanks in advance.
The sigma value of 0.33 worked well for me in a variety of projects which is why I used it. For detecting doors you should consider training your own object detector. Do you have any prior experience in CV or DL? That would be helpful to know before recommending a path forward.
Hi, Adrian. Thank you very much for The Tutorial. I want to fill the inside after I detect the edge. So I do binary masking automatically. How can I do this?
You can use the “cv2.findContours” function to find the outline of the edge and then “cv2.drawContours” function to fill in the edge. If you don’t know how to use those functions you should refer to Practical Python and OpenCV which will teach you how to use them.
Hi Adrian, Great post as usual
I want to do something similar by using the imutils VideoStream. How can i do that? Thank you in advance
There are a number of tutorials here on PyImageSearch that use VideoStream — use any of them as a template. Then apply the “imutils.auto_canny” function to each of the frames.
Hi! First of all, wonderful blog! It is rare to find blogs which are meant for people with some experience in programming but without all the technical background knowledge.
It seems to work pretty great for me, but I was wondering if there is an in-built function to measure the length of the edges? I have been trying to set up a function on my own but those often involve nested loops and take quite a time to run…
If you can extract an individual edge you can find the extreme points on it and compute the euclidean distance between the points, giving you the length.
Hello Adrian,
post is awesome! I think you could help me with my problem. I have similar idea like your, but you are used auto (33%) for threshold. My idea is to use machine learning (hyperparameter optimization) for thresholds. I have database with 300 values of threshold (and i will collect more) and for each values i calculate F measure (F1 score). So, i want to find best values for thresholds from database using ML and hyperparameter optimization. I have Groundtruth images all images.
Thanks Adrian. Great post! In fact, the algorithm works well for most images, but I also found examples where I am not happy with the result. So, I have been adjusting thresholds manually, and ended up confused as to what the valid range for upper and lower threshold is.
Auto-canny will only compute threshold values in the 0..255 range. However, the strongest edges in my sample image have threshold values 800.
Questions:
– The internal gradient image that cv2.Canny() works with does not seem to be uint8 grayscale image. Or is it, and I am missing something?
– Is it possible to access the gradient image that cv2.Canny(…) works with. I would like to determine the min and max values of that gradient image, or ideally, compute a histogram in order to select the thresholds.
Any idea if this is possible? Thanks.