Wow, last week’s blog post on building a basic motion detection system was awesome. It was a lot of fun to write and the feedback I got from readers like yourself made it well worth the effort to put together.
For those of you who are just tuning it, last week’s post on building a motion detection system using computer vision was motivated by my friend James sneaking into my refrigerator and stealing one of my last coveted beers. And while I couldn’t prove it was him, I wanted to see if it was possible to use computer vision and a Raspberry Pi to catch him in the act if he tried to steal one of my beers again.
And as you’ll see by the end of this post, the home surveillance and motion detection system we are about to build is not only cool and simple, but it’s also quite powerful for this particular goal.
Today we are going to extend our basic motion detection approach and:
- Make our motion detection system a little more robust so that it can run continuously throughout the day and not be (as) susceptible to lighting condition changes.
- Update our code so that our home surveillance system can run on the Raspberry Pi.
- Integrate with the Dropbox API so that our Python script can automatically upload security photos to our personal Dropbox account.
We’ll be looking at a lot of code into this post, so be prepared. But we’re going to learn a lot. And more importantly, by the end of this post you’ll have a working Raspberry Pi home surveillance system of your own.
You can find the full demo video directly below, along with a bunch of other examples towards the bottom of this post.
Update: 24 August 2017 — All code in this blog post has been updated to work with the Dropbox V2 API so you no longer have to copy and paste the verification key used in the video. Please see the remainder of this blog post for more details.
Before we start, you’ll need:
Let’s go ahead and get the prerequisites out of the way. I am going to assume that you already have a Raspberry Pi and camera board.
You should also already have OpenCV installed on your Raspberry Pi and be able to access your Raspberry Pi video stream using OpenCV. I’ll also assume that you have already read and familiarized yourself with last week’s post on a building a basic motion detection system.
Finally, if you want to upload your home security photos to your personal Dropbox, you’ll need to register with the Dropbox Core API to obtain your public and private API keys — but having Dropbox API access it not a requirement for this tutorial, just a little something extra that’s nice to have.
Other than that, we just need to pip-install a few extra packages.
If you don’t already have my latest imutils package installed, you’ll want to grab that from GitHub or install/update it via pip install --upgrade imutils
And if you’re interested in having your home surveillance system upload security photos to your Dropbox, you’ll also need the dropbox package: pip install --upgrade dropbox
Note: The Dropbox API v1 is deprecated. This post and associated code download now works with Dropbox API v2.
Now that everything is installed and setup correctly, we can move on to actually building our home surveillance and motion detection system using Python and OpenCV.
So here’s our setup:
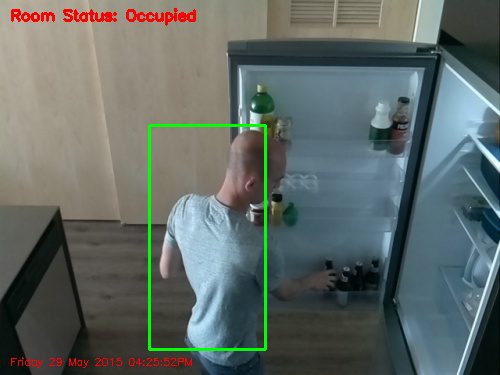
As I mentioned last week, my goal of this home surveillance system is to catch anyone who tries to sneak into my refrigerator and nab one of my beers.
To accomplish this I have setup a Raspberry Pi + camera on top of my kitchen cabinets:
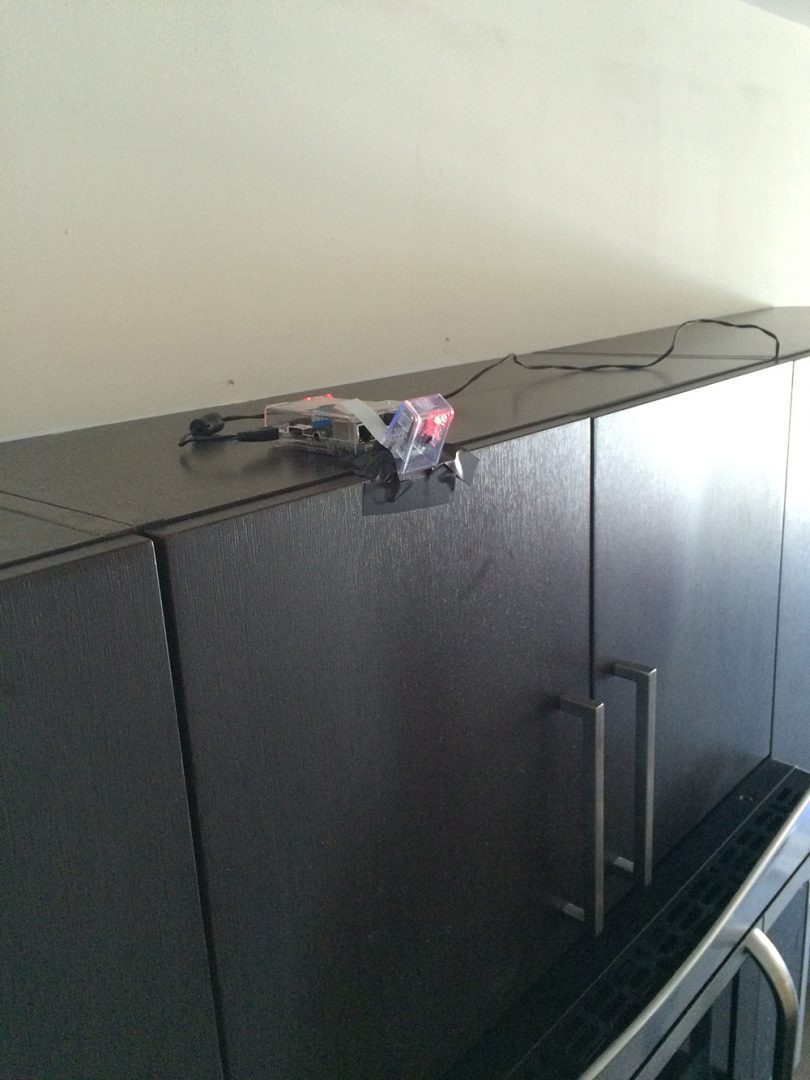
Which then looks down towards the refrigerator and front door of my apartment:
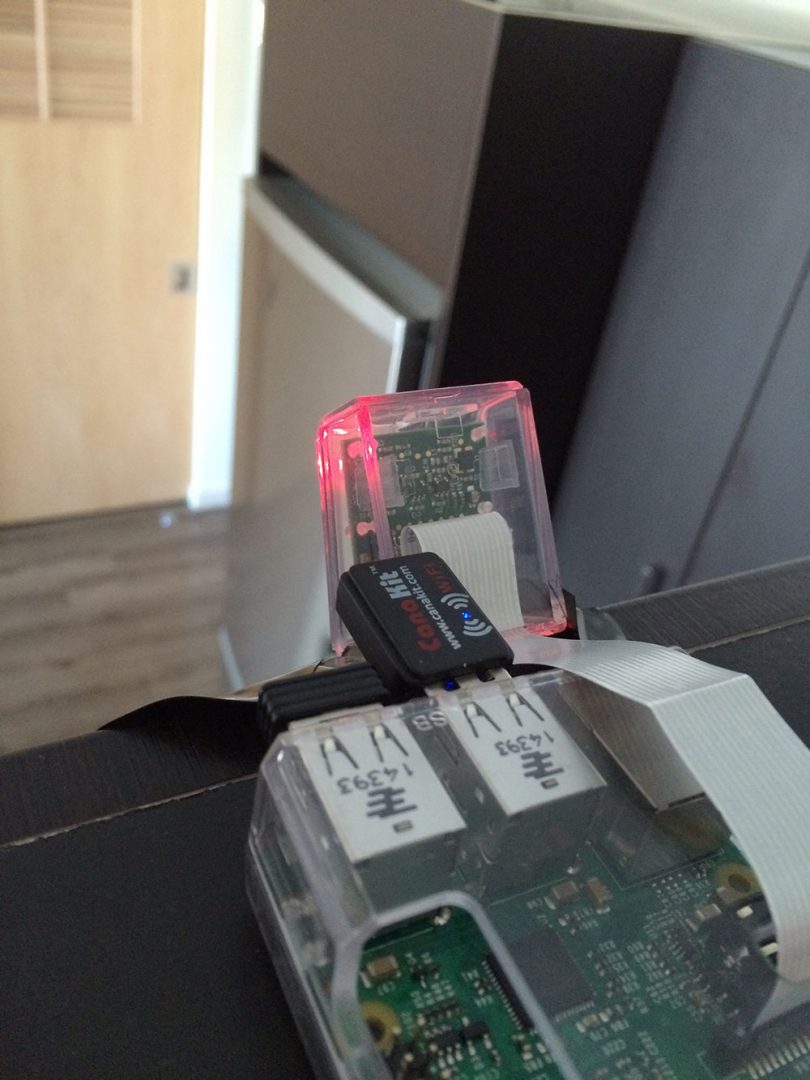
If anyone tries to open the refrigerator door and grab one of my beers, the motion detection code will kick in, upload a snapshot of the frame to my Dropbox, and allow me to catch them red handed.
DIY: Home surveillance and motion detection with the Raspberry Pi, Python, and OpenCV
Alright, so let’s go ahead and start working on our Raspberry Pi home surveillance system. We’ll start by taking a look at the directory structure of our project:
|--- pi_surveillance.py
|--- conf.json
|--- pyimagesearch
|    |--- __init__.py
|    |--- tempimage.py
Our main home surveillance code and logic will be stored in pi_surveillance.py . And instead of using command line arguments or hardcoding values inside the pi_surveillance.py file, we’ll instead use a JSON configuration file named conf.json .
For projects like these, I really find it useful to break away from command line arguments and simply rely on a JSON configuration file. There comes a time when you just have too many command line arguments and it’s just as easy and more tidy to utilize a JSON file.
Finally, we’ll define a pyimagesearch package for organization purposes, which will house a single class, TempImage , which we’ll use to temporarily write images to disk before they are shipped off to Dropbox.
So with the directory structure of our project in mind, open up a new file, name it pi_surveillance.py , and start by importing the following packages:
# import the necessary packages
from pyimagesearch.tempimage import TempImage
from picamera.array import PiRGBArray
from picamera import PiCamera
import argparse
import warnings
import datetime
import dropbox
import imutils
import json
import time
import cv2

# construct the argument parser and parse the arguments
ap = argparse.ArgumentParser()
ap.add_argument("-c", "--conf", required=True,
	help="path to the JSON configuration file")
args = vars(ap.parse_args())

# filter warnings, load the configuration and initialize the Dropbox
# client
warnings.filterwarnings("ignore")
conf = json.load(open(args["conf"]))
client = None
Wow, that’s quite a lot of imports — much more than we normally use on the PyImageSearch blog. The first import statement simply imports our TempImage class from the PyImageSearch package. Lines 3-4 import classes from picamera that will allow us to access the raw video stream of the Raspberry Pi camera (which you can read more about here). And then Line 8 grabs the Dropbox API. The remaining import statements round off the other packages we’ll need. Again, if you have not already installed imutils , you’ll need to do that before continuing with this tutorial.
Lines 15-18 handle parsing our command line arguments. All we need is a single switch, --conf , which is the path to where our JSON configuration file lives on disk.
Line 22 filters warning notifications from Python, specifically ones generated from urllib3 and the dropbox packages. And lastly, we’ll load our JSON configuration dictionary from disk on Line 23 and initialize our Dropbox client on Line 24.
Our JSON configuration file
Before we get too further, let’s take a look at our conf.json file:
{
	"show_video": true,
	"use_dropbox": true,
	"dropbox_access_token": "YOUR_DROPBOX_KEY",
	"dropbox_base_path": "YOUR_DROPBOX_PATH",
	"min_upload_seconds": 3.0,
	"min_motion_frames": 8,
	"camera_warmup_time": 2.5,
	"delta_thresh": 5,
	"resolution": [640, 480],
	"fps": 16,
	"min_area": 5000
}
This JSON configuration file stores a bunch of important variables. Let’s look at each of them:
show_video: A boolean indicating whether or not the video stream from the Raspberry Pi should be displayed to our screen.use_dropbox: Boolean indicating whether or not the Dropbox API integration should be used.dropbox_access_token: Your public Dropbox API key.dropbox_base_path: The name of your Dropbox App directory that will store uploaded images.min_upload_seconds: The number of seconds to wait in between uploads. For example, if an image was uploaded to Dropbox 5m 33s after starting our script, a second image would not be uploaded until 5m 36s. This parameter simply controls the frequency of image uploads.min_motion_frames: The minimum number of consecutive frames containing motion before an image can be uploaded to Dropbox.camera_warmup_time: The number of seconds to allow the Raspberry Pi camera module to “warmup” and calibrate.delta_thresh: The minimum absolute value difference between our current frame and averaged frame for a given pixel to be “triggered” as motion. Smaller values will lead to more motion being detected, larger values to less motion detected.resolution: The width and height of the video frame from our Raspberry Pi camera.fps: The desired Frames Per Second from our Raspberry Pi camera.min_area: The minimum area size of an image (in pixels) for a region to be considered motion or not. Smaller values will lead to more areas marked as motion, whereas higher values ofmin_areawill only mark larger regions as motion.
Now that we have defined all of the variables in our conf.json configuration file, we can get back to coding.
Integrating with Dropbox
If we want to integrate with the Dropbox API, we first need to setup our client:
# check to see if the Dropbox should be used
if conf["use_dropbox"]:
	# connect to dropbox and start the session authorization process
	client = dropbox.Dropbox(conf["dropbox_access_token"])
	print("[SUCCESS] dropbox account linked")
On Line 27 we make a check to our JSON configuration to see if Dropbox should be used or not. If it should, Line 29 authorizes our app with the API key.
At this point it is important that you have edited the configuration file with your API key and Path. To find your API key, you can create an app on the app creation page. Once you have an app created, the API key may be generated under the OAuth section of the app’s page on the App Console (simply click the “Generate” button and copy/paste the key into the configuration file).
Home surveillance and motion detection with the Raspberry Pi
Alright, now we can finally start performing some computer vision and image processing.
# initialize the camera and grab a reference to the raw camera capture
camera = PiCamera()
camera.resolution = tuple(conf["resolution"])
camera.framerate = conf["fps"]
rawCapture = PiRGBArray(camera, size=tuple(conf["resolution"]))

# allow the camera to warmup, then initialize the average frame, last
# uploaded timestamp, and frame motion counter
print("[INFO] warming up...")
time.sleep(conf["camera_warmup_time"])
avg = None
lastUploaded = datetime.datetime.now()
motionCounter = 0
We setup our raw capture to the Raspberry Pi camera on Lines 33-36 (for more information on accessing the Raspberry Pi camera, you should read this blog post).
We’ll also allow the Raspberry Pi camera module to warm up for a few seconds, ensuring that the sensors are given enough time to calibrate. Finally, we’ll initialize the average background frame, along with some bookkeeping variables on Lines 42-44.
Let’s start looping over frames directly from our Raspberry Pi video stream:
# capture frames from the camera
for f in camera.capture_continuous(rawCapture, format="bgr", use_video_port=True):
	# grab the raw NumPy array representing the image and initialize
	# the timestamp and occupied/unoccupied text
	frame = f.array
	timestamp = datetime.datetime.now()
	text = "Unoccupied"

	# resize the frame, convert it to grayscale, and blur it
	frame = imutils.resize(frame, width=500)
	gray = cv2.cvtColor(frame, cv2.COLOR_BGR2GRAY)
	gray = cv2.GaussianBlur(gray, (21, 21), 0)

	# if the average frame is None, initialize it
	if avg is None:
		print("[INFO] starting background model...")
		avg = gray.copy().astype("float")
		rawCapture.truncate(0)
		continue

	# accumulate the weighted average between the current frame and
	# previous frames, then compute the difference between the current
	# frame and running average
	cv2.accumulateWeighted(gray, avg, 0.5)
	frameDelta = cv2.absdiff(gray, cv2.convertScaleAbs(avg))
The code here should look pretty familiar to last week’s post on building a basic motion detection system.
We pre-process our frame a bit by resizing it to have a width of 500 pixels, followed by converting it to grayscale, and applying a Gaussian blur to remove high frequency noise and allowing us to focus on the “structural” objects of the image.
On Line 60 we make a check to see if the avg frame has been initialized or not. If not, we initialize it as the current frame.
Lines 69 and 70 are really important and where we start to deviate from last week’s implementation.
In our previous motion detection script we made the assumption that the first frame of our video stream would be a good representation of the background we wanted to model. For that particular example, this assumption worked well enough.
But this assumption is also easily broken. As the time of day changes (and lighting conditions change), and as new objects are introduced into our field of view, our system will falsely detection motion where there is none!
To combat this, we instead take the weighted mean of previous frames along with the current frame. This means that our script can dynamically adjust to the background, even as the time of day changes along with the lighting conditions. This is still quite basic and not a “perfect” method to model the background versus foreground, but it’s much better than the previous method.
Based on the weighted average of frames, we then subtract the weighted average from the current frame, leaving us with what we call a frame delta:
delta = |background_model – current_frame|
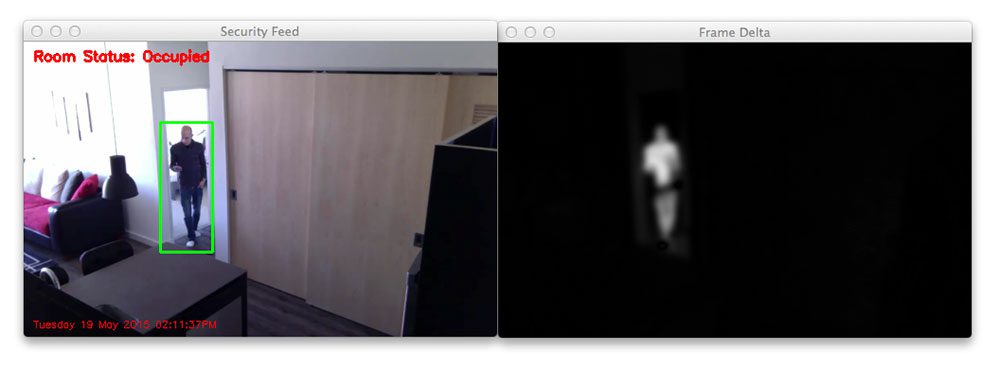
We can then threshold this delta to find regions of our image that contain substantial difference from the background model — these regions thus correspond to “motion” in our video stream:
# threshold the delta image, dilate the thresholded image to fill
# in holes, then find contours on thresholded image
thresh = cv2.threshold(frameDelta, conf["delta_thresh"], 255,
cv2.THRESH_BINARY)[1]
thresh = cv2.dilate(thresh, None, iterations=2)
cnts = cv2.findContours(thresh.copy(), cv2.RETR_EXTERNAL,
cv2.CHAIN_APPROX_SIMPLE)
cnts = imutils.grab_contours(cnts)
# loop over the contours
for c in cnts:
# if the contour is too small, ignore it
if cv2.contourArea(c) < conf["min_area"]:
continue
# compute the bounding box for the contour, draw it on the frame,
# and update the text
(x, y, w, h) = cv2.boundingRect(c)
cv2.rectangle(frame, (x, y), (x + w, y + h), (0, 255, 0), 2)
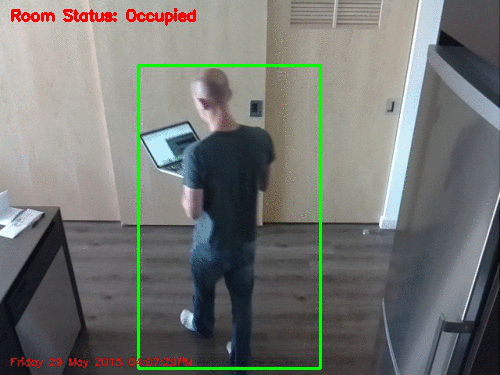
text = "Occupied"
# draw the text and timestamp on the frame
ts = timestamp.strftime("%A %d %B %Y %I:%M:%S%p")
cv2.putText(frame, "Room Status: {}".format(text), (10, 20),
cv2.FONT_HERSHEY_SIMPLEX, 0.5, (0, 0, 255), 2)
cv2.putText(frame, ts, (10, frame.shape[0] - 10), cv2.FONT_HERSHEY_SIMPLEX,
0.35, (0, 0, 255), 1)
To find regions in the image that pass the thresholding test, we simply apply contour detection. We then loop over each of these contours individually (Line 82) and see if the pass the min_area test (Lines 84 and 85). If the regions are sufficiently larger enough, then we can indicate that we have indeed found motion in our current frame.
Lines 89-91 then compute the bounding box of the contour, draw the box around the motion, and update our text variable.
Finally, Lines 94-98 take our current timestamp and status text and draw them both on our frame.
Now, let’s create the code to handle uploading to Dropbox:
	# check to see if the room is occupied
	if text == "Occupied":
		# check to see if enough time has passed between uploads
		if (timestamp - lastUploaded).seconds >= conf["min_upload_seconds"]:
			# increment the motion counter
			motionCounter += 1

			# check to see if the number of frames with consistent motion is
			# high enough
			if motionCounter >= conf["min_motion_frames"]:
				# check to see if dropbox sohuld be used
				if conf["use_dropbox"]:
					# write the image to temporary file
					t = TempImage()
					cv2.imwrite(t.path, frame)

					# upload the image to Dropbox and cleanup the tempory image
					print("[UPLOAD] {}".format(ts))
					path = "/{base_path}/{timestamp}.jpg".format(
					    base_path=conf["dropbox_base_path"], timestamp=ts)
					client.files_upload(open(t.path, "rb").read(), path)
					t.cleanup()

				# update the last uploaded timestamp and reset the motion
				# counter
				lastUploaded = timestamp
				motionCounter = 0

	# otherwise, the room is not occupied
	else:
		motionCounter = 0
We make a check on Line 101 to see if we have indeed found motion in our frame. If so, we make another check on Line 103 to ensure that enough time has passed between now and the previous upload to Dropbox — if enough time has indeed passed, we’ll increment our motion counter.
If our motion counter reaches a sufficient number of consecutive frames (Line 109), we’ll then write our image to disk using the TempImage class, upload it via the Dropbox API, and then reset our motion counter and last uploaded timestamp.
If motion is not found in the room (Lines 129 and 130), we simply reset our motion counter to 0.
Finally, let’s wrap up this script by handling if we want to display the security stream to our screen or not:
	# check to see if the frames should be displayed to screen
	if conf["show_video"]:
		# display the security feed
		cv2.imshow("Security Feed", frame)
		key = cv2.waitKey(1) & 0xFF

		# if the `q` key is pressed, break from the lop
		if key == ord("q"):
			break

	# clear the stream in preparation for the next frame
	rawCapture.truncate(0)
Again, this code is quite self-explanatory. We make a check to see if we are supposed to display the video stream to our screen (based on our JSON configuration), and if we are, we display the frame and check for a key-press used to terminate the script.
As a matter of completeness, let’s also define the TempImage class in our pyimagesearch/tempimage.py file:
# import the necessary packages
import uuid
import os

class TempImage:
	def __init__(self, basePath="./", ext=".jpg"):
		# construct the file path
		self.path = "{base_path}/{rand}{ext}".format(base_path=basePath,
			rand=str(uuid.uuid4()), ext=ext)

	def cleanup(self):
		# remove the file
		os.remove(self.path)
This class simply constructs a random filename on Lines 8 and 9, followed by providing a cleanup method to remove the file from disk once we are finished with it.
Raspberry Pi Home Surveillance
We’ve made it this far. Let’s see our Raspberry Pi + Python + OpenCV + Dropbox home surveillance system in action. Simply navigate to the source code directory for this post and execute the following command:
$ python pi_surveillance.py --conf conf.json
Depending on the contents of your conf.json file, your output will (likely) look quite different than mine. As a quick refresher from earlier in this post, I have my Raspberry Pi + camera mounted to the top of my kitchen cabinets, looking down at my kitchen and refrigerator — just monitoring and waiting for anyone who tries to steal any of my beers.
Here’s an example of video being streamed from my Raspberry Pi to my MacBook via X11 forwarding, which will happen when you set show_video: true :
And in this video, I have disabled the video stream, while enabling the Dropbox API integration via use_dropbox: true , we can see the results of motion being detected in images and the results sent to my personal Dropbox account:
Here are some example frames that the home surveillance system captured after running all day:
And in this one you can clearly see me reaching for a beer in the refrigerator:
If you’re wondering how you can make this script start each time your Pi powers up without intervention, see my post on Running a Python + OpenCV script on reboot.
Given my rant from last week, this home surveillance system should easily be able to capture James if he tries steal my beers again — and this time I’ll have conclusive proof from the frames uploaded to my personal Dropbox account.
What's next? I recommend PyImageSearch University.

30+ total classes • 39h 44m video • Last updated: 12/2021
★★★★★ 4.84 (128 Ratings) • 3,000+ Students Enrolled
I strongly believe that if you had the right teacher you could master computer vision and deep learning.
Do you think learning computer vision and deep learning has to be time-consuming, overwhelming, and complicated? Or has to involve complex mathematics and equations? Or requires a degree in computer science?
That’s not the case.
All you need to master computer vision and deep learning is for someone to explain things to you in simple, intuitive terms. And that’s exactly what I do. My mission is to change education and how complex Artificial Intelligence topics are taught.
If you're serious about learning computer vision, your next stop should be PyImageSearch University, the most comprehensive computer vision, deep learning, and OpenCV course online today. Here you’ll learn how to successfully and confidently apply computer vision to your work, research, and projects. Join me in computer vision mastery.
Inside PyImageSearch University you'll find:
- ✓ 30+ courses on essential computer vision, deep learning, and OpenCV topics
- ✓ 30+ Certificates of Completion
- ✓ 39h 44m on-demand video
- ✓ Brand new courses released every month, ensuring you can keep up with state-of-the-art techniques
- ✓ Pre-configured Jupyter Notebooks in Google Colab
- ✓ Run all code examples in your web browser — works on Windows, macOS, and Linux (no dev environment configuration required!)
- ✓ Access to centralized code repos for all 500+ tutorials on PyImageSearch
- ✓ Easy one-click downloads for code, datasets, pre-trained models, etc.
- ✓ Access on mobile, laptop, desktop, etc.
Summary
In this blog post we explored how to use Python + OpenCV + Dropbox + a Raspberry Pi and camera module to create our own personal home surveillance system.
We built upon our previous example on basic motion detection from last week and extended it to (1) be slightly more robust to changes in the background environment, (2) work with our Raspberry Pi, and (3) integrate with the Dropbox API so we can have our home surveillance footage uploaded directly to our account for instant viewing.
This has been a great 2-part series on motion detection, I really hope you enjoyed it. But we’re honestly only scratching the surface on motion detection/background subtraction — this will most certainly not be the last time we cover it on the PyImageSearch blog. So if you want to keep up to date regarding new posts on PyImageSearch, I would definitely recommend signing up for the PyImageSearch Newsletter at the bottom of this page.
And finally, if you enjoyed this tutorial, please consider sharing it with others!

Download the Source Code and FREE 17-page Resource Guide
Enter your email address below to get a .zip of the code and a FREE 17-page Resource Guide on Computer Vision, OpenCV, and Deep Learning. Inside you'll find my hand-picked tutorials, books, courses, and libraries to help you master CV and DL!

Your proyects are awesome. They inspire me.
Keep it up!
Thanks Cristian!
so do we need the wifi dongle to make this work or what?
I am just curious
The Raspberry Pi 2 would require a WiFi dongle. The Pi 3 ships with WiFi built-in. Otherwise you could use an ethernet cable. Please note that an internet connection is only required if you want to upload individual frames to Dropbox.
I got a problem
after they print ” [info]warming up”
it shows
illegal instruction .
I don’t know why.
How are you accessing your webcam? Is it a USB webcam? Or an RPi camera module?
I will do a project that for human detection on Raspebbery Pi 4. Would will work? I can apply your code for human detection? I will use raspberry model B, picamera with infrared (night vision).
Hey Adrian-
What version Pi are you using? What is the oldest version Pi that you think could be used for this project? I would envision trying to set up multiple cameras at my home (I think 4, for the number of entry points into my home) and as a DIY solution I would try to get the oldest/cheapest version Pi that would still be effective 24/7.
Thanks for posting this! It inspires me to get involved with projects like this!
Hey Andy, no worries — I updated your previous comment so it reads correctly 🙂
I am using the Raspberry Pi 2 for this project. You might be able to get away with the B+ for this, but I would really recommend against it. The Pi 2 is substantially faster (4 cores and 1gb of RAM) and is well worth it. In reality, a Pi 2 will cost you $35, along with a camera module per each, so you’re probably looking at $60 per system, which isn’t too bad.
Thanks for the great tutorial. it’s very informative and very well explained.
Thanks so much Berkay, I’m glad you found it helpful! 🙂
As always a great tutorial.
Though instead of copy-pasting the url for the dropbox auth, you could let python handle that as well with webbrowser.open()
🙂
Good point. I was using X11 at that point, so launching a browser over X11, even on a local network, can be quite slow, hence I went with the copy-and-paste solution. Definitely not the most elegant solution, but it worked!
Hi Adrian,
This is a great post!
Recently I am trying to make a little surveillance system and have read plenty of your tutorials.
I have a rough idea that 1) using the frame difference method you mentioned here and last week for initializing the search area; 2) implement OpenCV default hog human detection method around the initialization area and find the bounding box of human beings as the input box in step 3; 3) using the dlib library correlation tracker to track the detected people.
Will this work or not and is there any suggestions to improve the surveillance performance to make it robust?
Thanks again for your wonderful tutorials!
Hi Alex — thanks so much, I’m glad you enjoyed the post!
So in general, the solution to your surveillance system will depend on (1) what gives you the best results, and (2) how complicated you want to make it. Using HOG requires training your own custom object detector which can non-trivial, especially if you are just getting started in computer vision and machine learning. Furthermore, this classifier would only really work to detect what you trained it to detect — it wouldn’t be able to detect true “motion” for arbitrary objects in a video stream.
That said, I think you’re on the right track. You want to use some basic motion detection, followed by more advanced methods for tracking the bounding box. I don’t think dlib’s correlation tracker has Python bindings, but I know this one for OpenCV does.
Dlib just added a Python binding for correlation tracker, see https://github.com/davisking/dlib/blob/master/python_examples/correlation_tracker.py
Nice, thanks for passing this along Tim! I’m really excited to play around with it.
Adrian and everyone else here. Does anyone know of sample applications for installing and then calling either DLIB or the MOSSE.PY mentioned above? I’m ready to get the tracking side of this working well. I have detection working pretty well, but now need to go to the next level.
When I run the MOSSE.PY standalone, it never seems to allow me to draw the rectangles needed to track an object. I’d like to pass an object to it for tracking, but am not sure how.
And on DLIB, I am not sure how to best install into the virtual environment being used here (Workon CV).
Adrian, please write a new blog post on this!!!! (grin)
If anyone has experience, please comment. Thanks
I’ve used the dlib tracker with success in many applications. I’ll add doing a post on installing dlib, along with a post on how to do track with dlib to my queue.
Is it possible to extend it to night surveillance camera as well? Using this night vision camera? Without adding more custom code?
http://s.aliexpress.com/rM3eqaa2
Hi Alex, I have made similiar project. With some modification, I combine Adrian’s scripts with OpenCV peopledetect.py sample. I perform HOG human detection when the contours found (countour>0). Need 2-3 seconds to get result from HOG human detection for every frame loop. Not very efficient, but it’s enough for my case. I use Raspberry Pi 2 with Pi Camera.
Sorry for my bad english.
I think your work will be helpful for me so. If you can provide the sample code and the command. It will be great.
you can contact me on EMAIL REMOVED
Hi Adrian,
Thank you for works, it’s very interesting,
If I don’t use Pi Camera but another usb webcam,
Is this OK ? how about a usb hub for multi webcam ?
Hi Quan, if you have a USB webcam you can certainly use this code. You’ll just need to modify the code that actually grabs the frames from the camera to use the
cv2.VideoCapturefunction like in this post.It looks like really fun to play with (ok, it costed me already an extra Raspberry2B & cam … My A&B wouldn’t do it properly I think, and my 2B was in use already)… I got this even working, which is of course easy with this much details… But instead of writing pictures, I would like to combine the “compromising” pictures into a video… either one for the whole running time or for each “occupied session”.
It doesn’t look as I can use VideoWriter for rawCapture frames … Would there be an option? And if so, what function should I look at?
Hi Alain. Indeed, I would definitely suggest using the B+ or the Pi 2 for this example. You’ll get much better results with the Pi 2 since it’s much faster than the B+. As for your question, you can certainly use the
cv2.VideoWriter. Take a look at Line 57:frame = f.array. Theframevariable is simply a NumPy array which you can pass to thecv2.VideoWriter.Thanks Adrian,
I found after I wrote the question, an example with the writing of ‘raw’ pictures … But not as clear as yours … I hope I find time to implement this in the next days (and follow the basic advice … RTFM :)) … But I don’t have enough network ports in my living room to do all I need to right now…
BR
Alain
OK … Found one of my errors already … I was trying to write “frame” to the file, but that one was modified already, and not writing at all … using f.array works, I now added a frame_2 (which is a copy of frame), so I could add the timestamp … but now play-time is over … Time to do something useful … but this will be continued…
Hi Alain, did you ever get this solved? I need to do the same thing – capture video of my dog when he’s playing around. I’ll be poking around but if you already have the code written, would love to borrow because I’m a python and rPi newbie.
I’m a beginner to the RPi, Python and OpenCV and find your blog posts really helpful! So thank you.
Maybe I am being silly, but is there anything that should be included in the project directory/pyimagesearch/__init__.py file?
Technically no, the
__init__.pyfile indicates that thepyimagesearchdirectory is a Python module that can be imported into a script. There are special commands you can put in the__init__.pyfile, but its real purpose is to indicate the Python interpreter that the directory is a module.Aah, I see. Thanks for replying.
I’m going to take this further and try to implement a human detection/ known person recognition feature. I’ll do some more research.
The pi-in-the-sky goal would be getting some crude navigation going using computer vision for a RPi robot 🙂
Hi Adrian,
Again your work is amazing, I have a question, the camera that you are using works during night???
Thanks for your time and work.
Hey Jose, thank you for such a kind compliment 🙂 The camera I am using does not work well at night. For that you’ll want an IR (infrared) camera.
Welp, got it working. You write wonderful tutorials. I just *really* need to pay attention to details. Is there any way to customize this script so that I don’t have to re-authenticate to the API everytime?
Hey Mike, awesome job getting it working, I’m very excited for you! As for the re-authentication, I’m not sure about that one. I have really only used the Dropbox API for this particular example, so you might want to chat with a more experienced Dropbox developer.
I would like to know if you have ever tinkered with adding audio to the video or what recommendation you might have to address audio.
Hi Adrian, thanks for the great tutorial!
I am new to Raspberry Pi and have what is probably a really silly question. I keep getting an error ” No JSON object could be decoded”, even though I have the complete conf.json file in the folder with pi_surveillance.py. Any ideas what I’m doing wrong? Any help would be greatly appreciated.
Hey Grant, that’s definitely quite the strange error message! Did you download the source code to this post or did you copy and paste it into your editor? There is a chance that the copying and pasting might introduce some extra characters. As for debugging the error, I think this StackOverflow thread should be helpful.
Thanks Adrian, I copy and pasted rather than downloading the source code. After downloading it, everything worked wonderfully! Thanks for the help!
Hi,
These are great tutorials!
I don’t understand what the rawCapture variable is for. It seems all the work is done with the frame variable taken from f.array. Do rawCapture and frame point to the same thing and rawCapture.truncate(0) is just used to clear it?
The
rawCapturevariable actually interfaces with the Raspberry Pi camera and determines the format of the image that is grabbed from the sensor (in this case, in BGR order). Without usingrawCapturethecapture_continuouswouldn’t know how to grab the frame from the camera sensor.Mr Adrian
thanksfor this tutorial, When run this program, this want “Enter auth code here:” what is this?
If you want to use the Dropbox API integration (so that images can be uploaded to your personal Dropbox account), you need to enter your Dropbox API credentials in the .json file, followed by supplying an authorization code. If you do not want to use the Dropbox API integration, just set the Dropbox variables in the .json file to
null:"dropbox_key": null,
"dropbox_secret": null,
"dropbox_base_path": null,
I have done both with and without Dropbox, but i am curious – is it possible to hard code the auth code so that I don’t have to use a web browser to start it every time?
Hey Robert, that’s a great question — the answer is that I’m honestly not sure. This project was the first time I had used the Dropbox API. I would check the Dropbox API documentation and look for alternative authorization methods.
Hey Robert,
This might be a few months too late, but I was having the same issue and figured out how to solve it.
1. The first step is to understand all of the codes that you’re getting from Dropbox.
When you paste the Dropbox link into your browser, enter your email and password, they give you an auth code which is a temporary and can only be used once. You enter this into the command line and the code pulls your access token and uses it to link to your account. The access token never changes and this is what you need to use.
2. Now you need to find out what your access token actually is.
I did this by adding a line of code that says:
print accessToken
You’ll have to run the program again, copy the link into your browser, get the auth code, etc. Once you’ve done that all again it should spit out your access Token and save it.
3. Hard code the access token into the code.
Comment out the lines that reference the auth code (so you don’t have to deal with those dang auth codes any more)
Add in a line to define the access token.
Here’s what my final code looked like…
if conf["use_dropbox"]:
	# connect to dropbox and start the session authorization process
	flow = DropboxOAuth2FlowNoRedirect(conf["dropbox_key"], conf["dropbox_secret"])
	# print "[INFO] Authorize this application: {}".format(flow.start())
	# authCode = raw_input("Enter auth code here: ").strip()

	# finish the authorization and grab the Dropbox client
	# (accessToken, userID) = flow.finish(authCode)
        accessToken = ("Jcbiuehr2hfiuefoiuwerhf9377h4....")
	client = DropboxClient(accessToken)
	print "[SUCCESS] dropbox account linked"
Hope this helped!
Awesome, thanks for sharing Danny!
hi danny – i’m having the same issue. where did you put
print accessToken
Hi Michael – I put it at the end of this section of code so it looked like this:
if conf["use_dropbox"]: # connect to dropbox and start the session authorization process flow = DropboxOAuth2FlowNoRedirect(conf["dropbox_key"], conf["dropbox_secret"]) # print "[INFO] Authorize this application: {}".format(flow.start()) # authCode = raw_input("Enter auth code here: ").strip() # finish the authorization and grab the Dropbox client # (accessToken, userID) = flow.finish(authCode) accessToken = ("Jcbiuehr2hfiuefoiuwerhf9377h4....") client = DropboxClient(accessToken) print "[SUCCESS] dropbox account linked" print accessTokenThanks for sharing Danny. In general, I would recommend commenting out that entire section or even deleting it if you do not want to use the Dropbox API.
Another way to get your access token is:
Go to your app’s info page
Scroll down to: “Generated access token” icon and click on it to obtain your access token. You will be seeing the warning says:
This access token can be used to access your account (your dropbox account) via the API. Don’t share your access token with anyone
Late to the party, actually here looking for something else, noticed you responded…forever ago. Thank you so much for this! It worked flawlessly! Excellent work my friend.
HI danny I already done this, and it’s working but in just first run after that i cannot upload the image captured, why?? any help? Thanks
Thanks, It saved my project.
Thanks so much
Hi Danny
thanks for your sharing. but when I put the same code like yours, it comes out error message
accessToken(“fdpNK91….”)
IndentationError: unexpected indent
am I right to put my access token here?
and should I keep my dropbox broser on
Please make sure you are using the “Downloads” section of this blog post to download the source code. It seems that you are copying and pasting the code and likely introduced a indentation error.
Even after doing what you said above, am still not able to run the program. It still asks for the auth code. What to do now??
please help
Mr.Adrain
Thank you for the tutorial I learned a lot.
I’m trying to create a system which will track people moving in a corridor and identify the ones spending too much time in the given area using a raspberry pi. Currently I’m thinking about using camshift+kalman filters. Can you give me some advise please? It would be much appreciated. thank you.
Obviously, the first step is to perform some sort of motion detection to determine where people are moving in the corridor. From there, you I would probably suggest optical flow. A better choice could be correlation based methods such as MOSSE. Once you have (1) detected the person, and (2) started the tracking, it’s fairly trivial to start a timer to keep track of the amount of time a person spends in the corridor.
mr.Adrain
Thank you for your advise. So basically what I have to do is use background subtraction to detect motion and when people are detected use correlation based method(mosse) to track them .Am I correct? and can I track multiple people using this method?
(I’m fairly new to this field.) thank you!!!
Yep, that’s the general idea! Correlation based methods require an initial bounding box, so you’ll utilize motion detection to grab that initial bounding box and then pass it on to your tracker, whether that’s optical flow, correlation, etc. And if you’re new to computer vision and OpenCV, I would definitely suggest taking a look at Practical Python and OpenCV + Case Studies, it will definitely help you jumpstart your computer vision education.
mr.Adrian
Thank you so much for your advise. I will definitely go through the links you provided. Keep up the good work. 🙂
Mr Adrian, I use Webcam logitech C615 for more advantage in quality frames, but this coding for PiCamera, I change line 5 “from picamera.array import PiRGBArray” to “from camera.array import PiRGBArray” , follow this error “No module named camera array”
I know that the captchar frames (line 54)need to work properly. HELP ME TO DOING.
regards.
If you are using a Logitech camera rather than the Raspberry Pi camera, then you will not be able to use the
picameramodule to access the frames of the video feed. Instead, you’ll have to use thecv2.VideoCapturefunction as detailed in this post.Great tutorial. I’ve tried it at my office. Perfectly works. Thanks Adrian.
I’m glad it worked for you Asha! 🙂
I am curious if it is possible to get this running headless. I have tried via SSH with the video not being displayed, but the program is shut down upon exiting the session. Could this be done via xrdp?
This should be possible to run headless provided your camera is connected. You could always SSH into the Pi, start the script, and then push it to the background so it’s still running before exiting your session. You could also start the script on reboot using a cronjob.
Dear Mr.Adrian,
Great tutorial.Thank you. I have a small request. Would you be able to do a small tracking example based on correlation filters such as dlib or MOSSE to track multiple objects? I have being trying to do so for a while now with no luck.
Absolutely! Doing a post on correlation filters is very, very high up on my priority list!
If I don’t want to store video in Dropbox than wt was the changes in code
This question has been addressed multiple times in the comments section. Please read the comments before posting. You simply need to comment out the dropbox import, the code used to connect to the Dropbox API, and the actual upload code.
If you don’t want to have the camera LED active then add…
# camera led
disable_camera_led=1
To the config.txt and the LED will no longer be active
Nice, thanks for the tip Scott!
where is the config.txt file? can this disable_camera_led variable go into the conf.json file?
It should be located in
/boot/config.txt. There should also be an option in there that allows the LED to be disabled. Once you modify it, you’ll need to reboot your Pi. This configuration (since it’s a boot configuration) cannot go into theconf.jsonfile.This is awesome, great tip Scott!
Mr. Adrian,
After performing background subtraction is there a way to create a “fixed size bounding box” instead of using the looping over contours method mentioned here? So it can be passed to the dlib tracker? Any advise would be a great help. Thank you.
Hey Nipuna, I’m not sure what you mean by a “fixed size bounding box”. If you have the initial bounding box that should be enough to pass into the dlib correlation tracker, no?
sorry mr.adrian. my mistake. yes , What I want to know is how to create the intial bounding box. Is using the contour method the only way or is there another way to create the bounding box?
The actual bounding box is created via the
cv2.findContoursandcv2.boundingRectfunctions. If you can obtain the bounding box for an object you want to track, you can then pass it on to something like MOSSE or dlib without too much of an issue.Thank you mr.adrain. Can I use this implementation of MOSSE
https://github.com/Itseez/opencv/blob/master/samples/python2/mosse.py
directly for tracking?
Yes, that implementation of MOSSE does indeed work.
Thank you Mr.Adrain. You have helped a lot. I looked at your case studies bundle and learned a lot in a small amount of time. I regret not having a look at it sooner , then I would have been able to save a lot of time I spent on searching the web about image processing. Thank you.
I’m glad myself and the Practical Python and OpenCV + Case Studies books were able to help! 🙂
Thanks a lot Adrian, this is a great tutorial and it helped me (as a python novice) immensely!
I integrated the flask html streaming from
http://www.chioka.in/python-live-video-streaming-example/
and
http://blog.miguelgrinberg.com/post/video-streaming-with-flask
and would like to share.
Very nice Martin! I had to remove the code from the bottom of the comment since the formatting got messed up. Can you please create a GitHub Gist for the code and link it by replying to this comment?
Hi Martin,
Do you have the code for this? I’m attempting to do the exact same thing, your code would help.
Thanks!
Great work on these tutorials, worked through the pi-camera and opencv installation and setup without a hitch.
I like your implementation of the dropbox oauth2 process, but made a small change that allows the generated access token to be stored in a text file or in the conf.json. Here’s the file on github for saving the token in the JSON: https://github.com/levybooth/pi_surveillance_auth/blob/master/pi_surveillance_auth.py
Note that I added: import os.path to the list of imports, and changed the path for saving the images on line 144.
Thanks again for your excellent courses – so far they’re the only walk-through of opencv with the pi camera module that actually worked for me.
David,
Thanks for the mods that allow permanent storage of the access token. Does it ever need to be refreshed or is it truly permanent once stored in conf.json?
Thanks
Andrew
Hello Adrian,
While writing this code, I initially tried writing this code by hardcoding the values in the json file (I also didn’t want to use dropbox) and I kept getting a syntax error on line 139 (the “if conf[“show_video”]” part. Then I tried writing the json part in IDLE, but I’m not sure if thats the correct way to write a json file. I was wondering what workaround there is to the json file, if not, then how to properly write the json file.
Thank you in advance.
The easiest way to get around the JSON file is to just hardcode the values into the code. The JSON file is just meant to make configuration easier — but if you do not want any configuration (and no Dropbox), just hardcode the variables.
Secondly, I would suggesting downloading the code to the post instead of writing it out line-by-line. Writing it out is a great exercise and something that can help you learn a new language or a technique, but for this problem, it would be best to download the code and having a working “standard” that you can base your modifications off of.
Hello,
thanks for the project.
Is there a way to integrate the Dropbox permanently, without requesting a auth code all the time I start the programm?
Hi Thomas, that’s a great question, thanks for asking. I honestly do not know the answer to that question off the top of my head. This project was the first time I had used the Dropbox API. I would suggest going through the Core API and seeing what other functions are available.
Thomas,
I used the dropbox-uploader script listed on this site … It maintains the API key so that you don’t have to request each time.. http://raspberrypitutorials.themichaelvieth.com/tutorials/raspberry-pi-surveillance-camera-dropbox-upload/
Hey Guys
I turned off Dropbox integration and am using the other Dropbox uploader script, how do I configure where the images are being saved? I have a shared folder on my desktop that is synced via cron regularly and would like them to go there.
Another great feature would be to have an email notification when motion is triggered, can anyone give any tips on that? I’m new to Pi and Python 🙂
Thanks for the awesome tutorial and script btw Adrian 🙂
Thanks for the great tutorial!
I am facing an issue in letting the python script run on cronjob. I would like it to run every single time the Rpi reboots, without the aid of a monitor.
I have created a launcher.sh in my /home/pi directory.
——————————————————————–
#!/bin/bash
# launcher.sh
# activate the cv environment ,then execute the python script
cd /home/pi
source ~/.profile && workon cv
python /home/pi/pi_surveillance.py –conf conf.json
——————————————————————–
Then I add on the reboot command at crontab on the last line.
$ sudo crontab -e
——————————————————————–
@reboot bash /home/pi/launcher.sh
——————————————————————–
But to no avail, it gives this error.
stdin: is not a tty
Traceback (most recent call last):
File “/home/pi/pi_surveillance.py”, line 13, in
import imutils
File “/usr/local/lib/python2.7/dist-packages/imutils/__init__.py”, line 5, in$
from convenience import translate
File “/usr/local/lib/python2.7/dist-packages/imutils/convenience.py”, line 7,$
import cv2
ImportError: No module named cv2
Anyone has any idea to make it work? Thanks in advance.
Hey Darius, it looks like your cronjob is running as root where the
cvvirtual environment does not work. You have two options to resolve this. The first is to create thecvvirtual environment for therootuser. The second option is to modify yourlaunch.shscript to switch to thepiat the top of the file.Thanks for the advice! But now, I face with another problem which I am not too sure about.
I have created a cron log for debugging purposes. Now, it reflects this instead:
Traceback (most recent call last):
File “/home/pi/pi_surveillance.py”, line 28, in
conf = json.load(open(args[“conf”]))
IOError: [Errno 13] Permission denied: ‘conf.json’
I am pretty sure I have granted permission to all the files. Any solution will be much appreciated!! Thanks!
The user executing the script that is trying to access the
conf.jsonfile does not have access to read it. You should use chown to switch ownership of the user. A completely terrible hack would be to give full permissions to everyone on the file usingchmod 777 conf.json. I would suggest reading up on Unix file permissions before proceeding any further.The solution I adopted is to activate the user’s crontab, rather than root’s. That way the virtual environment can be initiated as if the user logs in.
This small change to Darius’ method helped install a background process that survives reboot.
$ crontab -e -u pi
where pi is the user name. The rest of the steps are largely as his.
Nice, thanks for sharing Eli! 🙂
Hey Adrian
Great tutorial 🙂 If we dont use Dropbox (because of the need to re-authenticate), how do we make the script save the image to a folder instead?
I see you do this:
if conf[“use_dropbox”]:
# write the image to temporary file
t = TempImage()
cv2.imwrite(t.path, frame)
Could you have an else that sets a path maybe from the conf json and writes the image there?
Cheers
Hey Lucas, as you suggested, I would just have an
elsestatement and then have a configuration that points to the directory where images should be saved. From there, all you need to do is generate the filename and write it to file usingcv2.imwrite.Hi Andrew,
Firstly i would like to say thanks for a great site. i have spent many hours on it during the last few days getting to grips with image collection and raspberry pi.
What a great resource.
Lucas, i am new to python(been developing in php for years off an on though, so am familiar with programming) to answer you question i modified Andrew’s script so right after the t.cleanup() in the dropbox block i do an else and then write the frame out to a local/network path.
here is code
else:
        path = "{base_path}/{timestamp}.jpg".format(
                base_path=conf["file_base_path"], timestamp=ts)
#                                        client.put_file(path, open(t.path, "rb")))
        cv2.imwrite(path, frame)
Add the file_base_path to the json configuration file(use forward slashes instead of backslashes as python will convert them to backslashes, saves having to escape them).
It’s Adrian, actually 😉 But thanks for sharing your code.
Yea, realised that after i had replied to the post, duh 🙂
Het Adrian, I have found my errors. Now it can boot up with cronjob!
But when motion is detected and it starts to upload to the dropbox client.
It comes up with the error:
Traceback (most recent call last):
File “/home/pi/pi_surveillance.py”, line 138, in
client.put_file(path, open(t.path, “rb”))
IOError: [Errno 13] Permission denied: ‘.//88eec3c0-5b20-406f-9d68-49bd941a7410.jpg’
I was thinking it was probably because the absolute path should be declared, since I am running on cronjob.
But I have no idea how do u change the t.path to the absolute path. Needs some enlightenment!
Thanks!
The reason you are getting that error is because your account does not have permission to create a file under that directory. I would suggest reading up on Unix file permissions before you continue. Alternatively, you might be able to get away with modifying the
TempImageline to look something like this:t = TempImage(basePath="/tmp/")The
/tmpdirectory should be writeable without any file permission changes.A MILLION THANKS!! YOU ARE REALLY AMAZING!!
pi@raspberrypi ~/pi-home-surveillance $ python pi_surveillance.py –conf conf.json
Traceback (most recent call last):
File “pi_surveillance.py”, line 6, in
from dropbox.client import DropboxOAuth2FlowNoRedirect
ImportError: No module named dropbox.client
Can you please help me sort out this error ..
thanks in advance
You need to install the
dropboxPython package first:$ pip install dropboxI’m having the same problem as Bhuvan. I’ve already installed pip install dropbox.
Make sure you’re installing it into the same Python virtual environment you’re using for OpenCV as well. For example,
sir whrere to find dropbox path
and my capturing stops as soon as “occupied” occures on image and only one image is stored . what to do to have cantinous capture of images and storing of occupied images
plz help sir
The problems is caused by old version of urllib3. You need to download the pip via Github and update your urllib3. I faced this problems because my pip cannot upgrade the urllib3 it written there owned by OS. Anyways, i managed to solved it this ways.
Hi Sky,
i am currently facing the same problem. However, i did not understand completely how you solved this problem. Did you update pip by installing itself from github, or did you get the urllib3 from github?
Your help would be much appreciated.
Anyone get a solution to this? i’ve install everything in the same virtual environment and still getting an error here. so close yet so far!!!
Do you still need a solution?
Same here. I’ve run the dropbox install within the virtual environment and done the same with urllib3, but still the same error as Bhuvan. Any ideas on what I could try next?
I would suggest updating to the latest version of the Dropbox library to see if that resolves the issue:
$ pip install --upgrade dropboxIf you are using Python virtual environments make sure you access them first.
Never mind – was still using old version I downloaded before August 2017. Redownloaded and working well, thanks very much.
I was wondering if you are aware of some code that would allow to check for motion in a specific ROI within a live video ? I am not sure what would be the best way to do it.
Thanks
If you want to detection motion within only a specific ROI, there are two ways to do it. The first way is to perform NumPy array slicing to crop the region of the image you want to check for motion — then you apply motion detection to only the cropped image, not the entire image.
Another option is to perform motion tracking on the entire image, and then check the bounding boxes of the contours. If they fall into the (x, y)-coordinates of your ROI, then you know there is motion in your specific region.
Thanks for these advice. I will try that. I’m quite novice with python and programming in general so your website and advice are greatly appreciated !
Thank you for tutorial!
the 2 line in ‘pi_surveillance.py’
no module named pyimagesearch.tempimage
is there any other package that i have to install?
I installed imutils and dropbox.
I made a folder ‘pyimagesearch’ and created a file ‘tempimage.py’ in it
Download the source code using the form at the bottom of this page. You will receive a .zip file of the source code download that includes the
pyimagesearchmodule.The zip file I downloaded does not include the full directory structure, it only includes the main pi_surveillance.py and json files, but no pyimagesearch module (so no init or tempimage files). Am I missing something? I keep getting the error for missing the pyimagesearch module. Please help, thanks.
Hi Chris — I just checked the .zip of the download. It does indeed include the
conf.json,pi_surveillance.py, andpyimagesearchfiles and directories. Perhaps you accidentally deleted the directory? I would suggest re-downloading the .zip archive.hi Adrian, how many files will be after extracting in zip file
plz tell what are things required to edit in downloaded code
it is showing something like maxretry error and new connection error
Hey Sahil — this sounds like you have a problem with your internet connection. Please ensure you have a strong connection and retry the download.
Thank you so much for all your hard work!I followed your tut and finally I finished my own surveillance system,cheers!
Awesome, glad to hear it! 😀
Hi Adrian,
This is looks awesome. Seems like I can use it for a pet project.
BTW, do you have any idea how to adapt the code to use webcam, instead of the Raspberry Pi camera module?
I use a Logitech C170 webcam, and your other code:
https://www.pyimagesearch.com/2015/05/25/basic-motion-detection-and-tracking-with-python-and-opencv/
Works nicely.
This one doesn’t, though.
Thank you 🙂
Indeed, this code is meant for the Raspberry Pi camera which uses the
picameramodule. Thepicameramodule (obviously) is only compatible with the Raspberry Pi camera.Luckily, switching it over to use a normal webcam is very simple — checkout the sister post to this one here. All it really amounts to is changing some boilerplate code related to
cv2.VideoCapture.Hello Adrian
The tutorials you write is just Amazing. Thank you very much.
When I run your code Adrian, I see that the processor is only running at mostly 25% and I am getting quite a lag in real time.
Adrian I am wondering since I have B+ model that has 4 cores is this program running on just one or should it be adapted with multi processing to run on all 4 cores?
Thank you very much Andre, I’m glad you are enjoying the tutorials!
Which B+ model are you running? The original B+ model had only one core, whereas the Pi 2 has four cores. If I were to make use of multiple cores for this project, I would give a core entirely to performing the “movement detection” allowing the frames from the camera to be read in a non-blocking fashion. That would take a considerable amount of hacking on the codebase, but it certainly could be done.
Cool, I will give it a go. I made a mistake, yes I am using the Pi 2.
Good.Thank you.
Thanks for tutorial.
How to fix this problems:
1. (cv)pi@raspberrypi ~ $ ~/.profile
-bash: /home/pi/.profile: Permission denied
2. (cv)pi@raspberrypi ~ $ sudo python test_image.py
(Image:3311): Gtk-WARNING **: cannot open display:
Thanks.
1. Are you trying to edit it or reload it? You need to supply a command, such as
vi ~/.profileorsource ~/.profile2. You should enable X11 forwarding when you login to your pi:
ssh -X pi@your_ip_addressGtk-WARNING **: cannot open display:
how can we solve this one(i tried ssh -X pi@ipaddress but not worked)
Thanks, ok for the first question, but as for your second answer, it didn’t work.
I have Windows 10 and Putty of course.
I’m not a Windows users so unfortunately I’m not sure how to enable X11 forwarding on Windows and Putty. However, there has been some discussion about it over in the comments section of this post, so I would start there.
Hi Adrian, I’m enjoying this project, but need your help diagnosing this error message just after launching:
Traceback (most recent call last):
File “sophiecam.py”, line 105, in
cv2.CHAIN_APPROX_SIMPLE)
ValueError: too many values to unpack
It sounds like you’re using OpenCV 3. This blog post was meant to be used with OpenCV 2.4. But you can change the
cv2.findContoursline to be:cnts = cv2.findContours(thresh.copy(), cv2.RETR_EXTERNAL, cv2.CHAIN_APPROX_SIMPLE)[-2]And that will make it compatible with both OpenCV 3 and OpenCV 2.4.
EDIT: Below follows a much better method to access contours, regardless of which version of OpenCV you are using:
Thanks Adrian, I’ll try that tonight. So you and others know how I wound up with OpenCV 3, I’m new at this and started following the steps at the top of this tutorial with:
“Let’s go ahead and get the prerequisites out of the way. I am going to assume that you already have a Raspberry Pi and camera board.
You should also already have OpenCV installed on your Raspberry Pi…”
That link led to: “Install OpenCV and Python on your Raspberry Pi 2 and B+” with an UPDATE: “I have just released a brand new tutorial that covers installing OpenCV 3…”
So thinking “newer is better”, I went down that path, but ended in the ValueError message. I’m really glad it’s easy to make it compatible with both OpenCV versions!
That worked, “Occupied” image uploaded to Dropbox server! But Dropbox wouldn’t sync with my Windows PC because the date_timestamp.jpg filename had colons. Replaced colon with dash in ts=timestamp formating command.
Next: WiFi, Static IP, launch from boot, live video stream to phone, SMS alerts
Nice, congrats on getting it to work 🙂
Adrian, I got WiFi and a static IP to work, and am now wondering how you would approach adding a live video stream to an IP port? I found this link, but not sure… :http://stackoverflow.com/questions/5825173/pipe-raw-opencv-images-to-ffmpeg The pipe to VLC approach sounds the most reliable.
I want to stick with OpenCV and your planned features. TIA
Hey Tom, I’ll be honest — I have not tried to setup video streaming from the Pi to another system who then reads in the frames and processes them. I’ll look into and perhaps try to do a post on it in the future.
hey Tom Kiernan, did you manage to get it to stream to vlc?
Hi Adrian,
thank you for the tutorial!
using CV3 I still get the error:
(cv)pi@d3:~/Downloads/pi-home-surveillance $ python pi_surveillance.py --conf conf.json
Traceback (most recent call last):
  File "pi_surveillance.py", line 88, in
    cv2.CHAIN_APPROX_SIMPLE)[-2]
ValueError: need more than 0 values to unpack
What might be wrong?
Kind Regards:
Martin
This blog post was meant to run with OpenCV 2.4, hence the error message. Please see my reply to Tom Kiernan above to fix the error. Additionally, be sure to read this post.
Hi Adrian,
you fixed it! Thank you.
this worked:
(_, cnts, _) = cv2.findContours(thresh.copy(), cv2.RETR_EXTERNAL, cv2.CHAIN_APPROX_SIMPLE)this did not work:
cnts = cv2.findContours(thresh.copy(), cv2.RETR_EXTERNAL, cv2.CHAIN_APPROX_SIMPLE)[-2]Kind regards:
Martin
Were you getting an error for the second one? Because the code does the exact same thing, only with list slicing.
Adrian, same thing for me. Your suggestion for Tom did not work but Martin’s code did. Everything else is 100% your code.
btw, really really nice work on this and every other post I’ve seen of yours.
The opencv 3 documentation lists the following for findContours()
Python: cv2.findContours(image, mode, method[, contours[, hierarchy[, offset]]]) → image, contours, hierarchyWhy did you add the ‘[-2]’ ?
In an experiment to make it compatible with OpenCV 2.4 + OpenCV 3, which logically did not work out 🙂 This is how I suggest grabbing contours irrespective of your OpenCV version:
That works for my opencv 3 install. Thanks!
No problem, happy to help!
Hi Adrian,
The code above is throwing the following error :
Traceback (most recent call last):
File “pi_surveillance.py”, line 90, in
cnts = cv2.findContours(edged.copy(), cv2.RETR_EXTERNAL, cv2.CHAIN_APPROX_SIMPLE)
NameError: name ‘edged’ is not defined
When I change it to the first suggestion you had on how to make the code compatible with OpenCV 3 which is as follows, it works!
cnts = cv2.findContours(thresh.copy(), cv2.RETR_EXTERNAL, cv2.CHAIN_APPROX_SIMPLE)[-2]
Any ideas why I’m having this trouble? Since I have a working solution this question is more academic than anything.
Thanks much for all your support. Regards,
Kerem
Hi Kerem:
My original comment was incorrect. I actually suggest the following method for the
cv2.findContoursreturn tuple to compatible with both OpenCV 2.4 and OpenCV 3:You can read more about the change to
cv2.findContoursbetween OpenCV versions in this blog post.I’ve just test this with OpenCV 3 and Python 3.4.2
in addition the print function has been changes
Other than the
printfunction, thecv2.findContourschange mentioned above should be the only changes to convert the code from OpenCV 2.4 to OpenCV 3.This is just what I have been waiting for a long time. Any ideas how to make a trigger that starts recording from an event ? I only want to record when there are a burgler and not when I am at home. I have been thinking to use a microphone triggeret from my alarm system ( read the noise that the siren produces) to start taking pictures.
Only recording when a specific event happens would be straight forward. Just modify the
if on Line 107 to beif text == "Occupied" and YOUR_EVENT:where you can define whatever criteria you want for the event to trigger.Hello again, now I found out how to implement a microphone. That you to FabLab RUC. The microphone that I have ordered is Microphone Sensor High Sensitivity Sound Detection Module For Arduino AVR PIC. I will keep you posted
This is truly awesome! I got this working tonight! A logical extension of this would be to add scheduling constraints in conf.json (so that the capture is only performed on certain days, during certain times). For example, I want to keep surveillance on jewelry in a bedroom, but not when my wife is getting dressed (which usually happens around 6AM on weekdays, and 7AM on weekends).
I am going to investigate launching this script via cron and killing it off somehow. Not sure how this will work since it is running in a virtual python environment.
Thanks for writing!
Andrew
Great suggestion Andrew!
Here is my solution for starting the script at 8AM on weekdays only, and then killing it after 9 hours (approximately 5PM). Also, I used Scott’s method of storing the Dropbox auth code in conf.json.
The key is the use of the timeout command, which will kill the process after x hours:
Here is my
/etc/crontab:Thanks for sharing Andrew!
Adrian –
Your work is great! Thanks for providing all of the basics and guidance.
I’m developing an animatronic scarecrow for halloween. I will be using the motion detection to trigger a sequence of other effects running on another pi. I would like to be able to count the number of people in the frame to alter the behavior of the scarecrow. Exact numbers aren’t needed. I also want to track the direction of the motion so that I can move the scarecrow’s head to follow the “primary” object moving in the frame.
I’m thinking that it will be best to keep the camera fixed so we don’t introduce additional variables into the motion detection routines. What are your thoughts on how to estimate the object’s distance from the camera? I would need that in order to triangulate it’s position in the frame to calculate the pan & tilt for the head.
I’d love your insight and any advice you have.
Hey Cameron — I love the idea of using the Pi for Halloween. Here are some tips to point you in the right direction:
1. Use the
len(cnts)to get an approximate number of regions detected containing motion. These may or may not be people, but it will be a good estimate.2. As for as determining the primary direction of movement, take a look at this post.
3. Calculating the distance to an object is also straightforward.
Hi, Adrian,
I would like to know if it possible to write to Dropbox (or somewhere else) video, not pictures?
For example: start recording when state is occupied and check every minute if state is still occupied, when proceed recording, else if unoccupied, stop recording.
Thanks
You can certainly upload any arbitrary data type to Dropbox, it is not specific to pictures. I don’t have a tutorial related to saving actual video streams to file, but that’s something I can cover on the PyImageSearch blog in the future.
Did you do this? I’m looking like crazy for a video streaming and recording but no one seems to have found a solution
I covered how to write video clips to disk here.
Is there a cv function which allows me to look exclusively at one specific part of the cameras video? For example I want one python script look at the left half and another one on the right half of the screen. I checked the cv2.rectangle but it just draws instead of “cropping” (?). Thanks
You bet, all you need is to use simple NumPy array slicing. See the “cropping” section towards the bottom of this post.
Hello Adrian, I’m new in Raspberry Pi and Python. Based of what i’m reading, the idea of drawing the box in the object subjected to motion is first we capture the frame then using background subtraction etc2 till drawing contours and drawing the box around the contours right?
what if i want to build this kind of system
so basically i want to integrate it with PIR
first when there’s a movement captured by PIR (human body in this case), my raspi will capture 1 image then capture 10s of video . after that the image and video will be sent to specific email address notifying intruder or motion. so if i want to do the subtraction and drawing the contours within the video, is it possible? or it is only possible if we capture if per frame? thanks
Your intuition is correct — background subtraction must be performed first before we can find contours and draw a bounding box.
Your project is also 100% possible. I simply saved a single frame to disk which was then uploaded to Dropbox.You could also save a video file by writing each frame to the file, that’s absolutely possible. I don’t have any tutorials on writing frames to video files, but I’ll be sure to do one in the future.
did we use videowriter module in opencv? so basically I change the part of Uploading file in dropbox to writing frame to video file using videowriter?
Yep, that is correct!
if you are not busy, can you give me the snippets of taking each frame while looping and insert each of them in the video? i’m trying every move possible but i’m kind of stuck (python newbie here hehe)
As I said, I don’t have any code ready for that right now — I’ll be sure to do a tutorial on video writing in the future.
Hello Adrian,
Your post has been very useful. Will it be possible to get a link to purchase the components required for this project? So that i dont purchase a non-compatible camera module and all that. I am new to raspberry pi. & I will be very grateful if you could help me with that(via my email).
Hey Adams — I actually provide links to the Pi and camera modules I used inside this post.
Instead of motion you can also use Kerberos.io, it’s also open-source and a lot more user friendly to install and configure. You can find more information on the website.
Thank you for this very good tutorial,
How can I record voice that hapen y the area of video survillance?
Best regards
Please see my reply to Alain above. I’ll be covering how to write clips to video files in a future PyImageSearch blog post.
I am new to opencv and thanks for your tutorial.
I follow your steps to bring up in model B. It woks perfectly.
Look forward to your future opencv application.
Fantastic, I’m happy to hear it worked for you! 😀
Hi, master!!
I want to turn on a red LED (using the GPIO) when motion is detected. How can I do that?
I’m a noob!
Cheers!
disable_camera_led=1 in /boot/config.txt
That wasn’t my question. I want to connect a LED using the GPIO, like this https://projects.drogon.net/wp-content/uploads/2012/06/1led_bb1.jpg
hi, Diocletian, have you figure it out? coz I have the same issue with you
Is there any way to move this processing on to the GPU?
Unfortunately not for this particular algorithm (or for the Pi in particular). But you can compile OpenCV itself with OpenCL/CUDA support on your laptop or desktop and leverage the GPU there.
Thank you very much Adrian! This is really an awesome and comprehensive tutorial. You explained all the details about the techniques and the improvement method which I enjoy most. I finished reading your book which is very practical and get this home surveillance project done.
Nice work Fang! I’m glad the book and tutorials were helpeful 🙂
i have problem when i try python pi_surveillance.py –conf conf.json
File "pi_surveillance.py", line 34
print "[INFO] Authorize this application: {}".format(flow.start())
                                                                 ^
SyntaxError: invalid syntax
i use the code that i downloaded from download code segment via email
It looks like you are using Python 3. The code for this post was intended for Python 2.7, not Python 3. That said, you can make the code compatible by doing a few things, namely changing the print statement to a print function:
print("[INFO] Authorize this application: {}".format(flow.start()))You’ll need to do this for every print statement in the code.
How can I use this without the use of dropbox? Im a newbie on python and opencv.
Just simply comment out any code related to Dropbox.
Hi Adrian,
Thanks for posting this project. I put it together and enjoyed the process of doing so. The instructions are detailed and well written.
My one small suggestion would be to make the code compatible with OpenCV3.0.0. The modifications are in the Q&A, but having it in the main body of the message would be useful.
I look forward to your blog where we have a choice of recording video snippets rather than just pictures.
Thanks for the feedback Sidd. I’m still trying to figure out how to handle the OpenCV 2.4 => OpenCV 3 conversion. As my blog post coming out on Monday will explain, the vast majority of users are still using OpenCV 2.4. It makes it a bit challenging to support both versions.
Is this project supports any alarm system so that it can notify the owner in case of intrusion detection before uploading the photo to the dropbox.
You could certainly update the code to trigger an alarm.
Hey Adrian, I’d like to know if it would be possible to find the numbers of contours programatically.
I tried many ways to implement that, but I couldn’t get a precise output.
I just need to get the numbers of contours that are being displayed, for example, if 2 people walk apart from each other, it displays 2 contours, but when I try to display that, I get a much higher number using len(cnts)
In this particular case, using the number of contours detected isn’t the best method to “count” the number of moving people in the image. If you take a look at the thresholded image from the motion detection step you’ll notice that many parts of the person are actually disconnected. You could try using morphological operations to close these gaps, having only a single “blob” per person. Otherwise, you might want to look into training custom object detectors or depending on your case, use the people detector supplied with OpenCV.
Many thanks for this and related projects.
I have eventually managed to get this working. I applied the mod
“cnts = cv2.findContours(thresh.copy(), cv2.RETR_EXTERNAL, cv2.CHAIN_APPROX_SIMPLE)[-2] ”
that you mention above to get it to work with Open CV3. Also changed the colons to dashes in the ts=timestamp formating command that was also mentioned above to make it work with windows). I also rotated the image 180 degrees before saving it to dropbox as my camera is upside down using
“frame=imutils.rotate(frame,angle=180)” at line 103.
I am currently experiementing trying to get more images capturing the motion. Has anyone had good results without overloading the pi? My config file currently uses:
“min_upload_seconds”: 0.5,
“min_motion_frames”: 1,
“camera_warmup_time”: 2.5,
“delta_thresh”: 5,
“resolution”: [640, 480],
“fps”: 8,
“min_area”: 2000
Hi, Adrian, I have used your code to build a motion detection system, and I add some GPIO controls. However the control of GPIO must run with sudo, and your code can not run with sudo, so could you please help me to solve this?
The easiest way to solve this is to create a virtual environment for the root user:
And then sym-link OpenCV into your root virtual environment. Then just make sure you run your GPIO script as root and everything will work.
what you mean
‘Finally, we’ll define a pyimagesearch package for organization purposes’
This simply means to keep code tidy and organized. Otherwise all of your code would have to live in a single file which would be quite messy! Also, make sure you download the code using the form at the bottom of this post which includes the
pyimagesearchmodule.Hello Adrian, I’m currently implementing your motion detection into my system ( I used the part 2 one) and I want to cite the technique to my paper. Is there any formal paper to cite on or books? Cause citing from website isn’t permitted from my uni. Based on what I’m reading, you are not implementing Improved Gaussian Mixture and that 2 paper above in the motion detection right? Thank you in advance (I’m already posting this comment in the part 1 section)
Hey Andryan, you are correct, I am not using a GMM based method or anything advanced. It’s simply keeping track of the past N frames and performing a subtraction. There is a well known and extremely simple method for background subtraction so there I’m not even sure what the “original” paper was that used this (if there even was one).
Thanks for your reply. I will try finding the paper for it haha ! Btw, does a GMM based method too much for Raspberry Pi?
If you’re using the Pi 2, you might be able to use the GMM method. If you don’t perform shadow detection that will also help speed things up. But in reality, I wouldn’t expect to get any more than a few frames per second performance.
I am trying to detect when the evening/night prevents a good image so that. Can you please give me a pointer as to a simple calculation I can do on the frame to see if evening has come.
Thanks
If you keep track of the past N frames (where N would likely have to contain 15-30 minutes worth of frames), you could compute their average over few minutes. Once the average falls below a preset threshold (meaning the average is getting “darker”, you can say that night has come.
Hi Adrian,
I kept getting:
Could’nt find my error so I donwloaded the source code with your form.
I copied and getting the same error.
Any thoughts?
Marc: You need to supply the
--confswitch via command line argument, like this:$ python pi_surveillance.py --conf conf.jsonThat did it!
Lots of cheers when I got it to work!
Thanks!!
Nice, glad to hear it!
Hi, your tutorials are superb, thank you. I’m having noob issues with TempImage, I touched the files and the made the directory with files that you mentioned in the beginning, but when I run “python pi_surveillance.py –conf conf.json”, there’s an import error. ImportError: cannot import name TempImage. Help!
Hey Dima, I would suggest downloading the source code using the form at the bottom of this post and then comparing your code to mine. My guess is that you forgot to include the
__init__.pyfile.Hey, thanks for the response, I created all the files myself and must have messed something up, downloading the code solved that.
I do have another question: what JSON params should I tweak to send more photos to Dropbox? It would nice for the camera to take more photos per second – does this require tweaking FPS or combinations of parameters or am I missing something?
You’ll need to update both
min_upload_secondsandmin_motion_frames. The smaller you make those values, the more images will be uploaded to Dropbox.Hi Adrian,
I am new to Raspberry Pi and like your project very much,
I was wondering:
now you (and we all) can detect motion would it be possible to enhance this project and detect in wich direction the motion is moving?
And as a next step: add a subproject with to 2 servos and move the camera in that direction.
And from there: a next subproject could be that if the detected motion area is small maybe to zoom in with the camera.
By doing so we can monitor a bigger location (camera totally zoomed out),
And if motion is detected in a part off the monitored area (N,NE,E,SE,S,SW,W,NW) we can center this area by moving the camera.
The next step could be that if the motion-part is less then x percent of the whole screen we could zoom in.
Wouldn’t that be great?
I definitly get a raspberry of my own and will look into this.
I’m not sure if i’m capable to enhance the project this way 😉
Keep up the good work!
Hey Bert, this is indeed all possible with the Raspberry Pi. I haven’t done a tutorial with the servos yet, but here is a tutorial on detecting the direction of motion.
Hi Adrian,
Having trouble with DropBox integration.
Does App need to be “in production” for it to work?
Can you clarify what you mean by “in production”? Also, if you’re having issues with the Dropbox API, you might also want to post on the official Dropbox developer forums.
Adrian,
I see your point. More a Dropbox issue than coputer vision.
By “in production” I meant, when you create an app, it’s listed as “in developpement”, to have it public, you need to apply for “in production”.
I see now that this was not related to my problems of having it back up.
It can back up with the status “in development”.
I didn’t get working like you have it in your video, but I did get it to work with a “acess token”, that eleminates the problem of having to authorise each time.
I see that a few people in the comments were asking about this.
Here is the link I followed to get working with a token.
https://www.dropbox.com/developers-v1/core/start/python
Hope it helps someone.
Thanks for the followup Marc, I certainly appreciate it and I’m sure other PyImageSearch readers will as well 🙂
dropbox app on mobile does not notify on image uploaded
anything i can do to receive notification
I’m honestly not sure what the exact issue is there. I would post on the Dropbox Developer Forums to see if they can help further (I am not a Dropbox API expert).
Hi Adrian,
When I run my “pi_surveillance.py” I get an error:
Traceback (most recent call last):
        File "pi_surveillance.py", line 2, in
              from pyimagesearch.tempimage import TempImage
    ImportError: No module named pyimagesearch.tempimage
Any idea?
Please see my comment to Kitae above. You need to download the source code associated with this post using the form at the bottom or the post or re-create the exact same directory structure I used. If you’re just getting started with Python, I would suggest downloading the code — the code will then run without error.
Hey Adrian, you are indeed an awesome teacher.
Thank you for all the tutorials you had done and taught us.
Just wondering, is it possible to live stream the feed from any device connected to the LAN by assessing through the browser?
Perhaps like MJPEG streamer or some sort?
Thanks
Sure, it’s definitely possible — although I wouldn’t use OpenCV directly for it. I would use something like ffmpeg.
Thanks Adrian. Now waiting for the lengthy process of compiling and installing and hopefully it will turn out well.
Also, is it possible to integrate any kind notification for this project? Trying to add notification feature such as email notification or SMS notification when a picture has been uploaded to the DropBox.
Hope you can guide me to the right source(s) so I can experiment on it.
Thanks again.
If you’re looking to create a SMS notification, then I would use the Twilio API. I’ll be doing a tutorial on this in the future.
thanks. would love to read on it when its done.
so far i managed to use ZAPP integrated app for the email notifications.
Will look on the Twilio API to compare.
Also, still in the process on trying the ffmpeg, somehow i just cant get it to work. Will try again, maybe i did a few careless mistakes.
Thanks again Adrian.
-i might end up buying your book haha. keep up your good work. cheers.
I personally really like Twilio and find it extremely easy to use. I’ve used it successfully in a number of projects.
just awesome!
Thanks a bunch Adrian, can’t wait to find out about smarter image processing techniques to eliminate more tricky changing background conditions.
cheers
No worries Claude, I’ll be covering more advanced motion detection/background subtraction algorithms in the future. Stay tuned!
Hi Adrian,
I am going to use this code to monitor a bird feeding table that i have in the garden. What is involved if i want do to following?
1)Take an individual photo of each countour?(would i simply do a cv2.imwrite just before you create the rectangle?
2) would it be feasible, if motion is detected to take a still photo at the full resolution capabilities of the camera (ie 5 megapixels) when motion is detected? as i suspect that some of the birds are going to be very small, so will not be very clear on the 640pixel image.
Cheers
Ray
Hey Ray, thanks for the comment. To address your questions:
1. Yes, if you wanted to create a photo for each contour, just loop over them, extracting the bounding box (i.e., ROI), and use
cv2.imwriteto write the image to file. All of this should be done before drawing the rectangles.2. I’m not sure if the Raspberry Pi allows for both video capture mode at a lower resolution and then single photo capture at a high resolution. You might want to consult the picamera documentation to see if it’s possible.
Adrian, we conversed briefly on Hacker News re the treat dispenser. I’ve had to modify your code quite a bit and, while overall successful, am definitely still having some issues.
The big one is that I can’t seem to turn the camera off. i.e once I initialize it, the camera red light is always on, even after I’m done using it for that particular round of treats. All of your examples seem to run continuously. I’ve looked through the OpenCV docs but can’t find anything. Is there some method that I’ve missed?
btw, the way it runs is that, when the Pi receives an MQQT message, it instantiates a Dispenser object which in turn instantiates a Camera object. Red light turns on. Then
dispenser.dispenseTreats
if dispenser.isMotionVerified()
dispenser.takeVideo()
dispenser.sendEmailWithVideo()
isMotionVerified and takeVideo really just call the same methods in the Camera class.
I’d like the camera to shut down once I’m done with that sequence above. Any direction on where I could look?
btw, if what I’ve done is useful in any way happy to share that code. Maybe you want to build your own treat dispenser? or maybe we collaborate on a beer dispenser…
Hey Eric! A beer dispenser does sound pretty awesome! 😉
After reading your comment, I’m not sure I entirely understand the question. You want to turn off the camera after a round of treats have been dispensed? If you do that, how will you know to turn it back on again so that motion will be detected?
All that said, you might want to try using the
withPython command, that way when thecamerainstance goes out of scope, it’s automatically deleted. Something like the pseudo-code below should help:while True: wait for something to happen with PiCamera() as camera: do more stuff here once we get here, the camera object is out of scope and is deletedthanks, Adrian.
re knowing when to turn on, I only care about motion after the treat is dispensed (triggered either via email or MQQT) so I turn on motion detection system ~10 seconds post dispensing. Either Pickles is home or not.
I tried what you showed for 20-30 minutes. was stuck so switched over to a different tactic and solved my first problem. My real problems, in descending priority
1) 1st video would record fine but subsequent videos weren’t overwriting the first one, as I desired it to
2) the red light is always on
I moved the cv2.videoWriter code from init to takeVideo method of my camera class and that solved the first problem. The red light always being on is just an annoyance not a huge problem.
thanks again.
Congrats on resolving the first issue!
Regarding #2, have you tried editing your config.txt file?
Hi Adrian, I missed your response. No but I will try that shortly. I’m sure that’ll work. Having some other issues related to the treat triggering mechanism that I’m working through right now…
Hi Adrian
I have got OpenCV 3.1.0 running with python 2.7 on a raspberry pi 2 using your great tutorial. the test_video.py runs fine.
however as I try to run the code in this tutorial, at the step to run the pi_surveillance.py code to link the dropbox I get an error:
Please help – I assume I have not loaded the pyimagesearch module or package but I am new to coding and can’t find out what to do
thanks
Andre
Please be sure to download the source code associated with this post using the “Downloads” form above. You’ll be able to download a .zip of the code that has the correct directory structure. I would suggest starting there if you are new to coding.
Hey Adrian Thank you for your great work. I was wondering how can i display the Delta on the screen next to the live video stream.
All you need to do is use the
cv2.imshowmethod:cv2.imshow("Frame Delta", frameDelta)I have found the way to do it. thank you for the great work again.
will this project work with opencv 3.0 and is there any need for wifi adapter in this project??
If you do not want to upload the images to Dropbox, then you do not need a WiFi adapter or an ethernet connection for this project. Simply comment out the code related to uploading to Dropbox.
As for the code working with OpenCV 3, all you need to do is change the
cv2.findContourscall to:(_, cnts, _) = cv2.findContours(thresh.copy(), cv2.RETR_EXTERNAL, cv2.CHAIN_APPROX_SIMPLE)You can read more about the change to
cv2.findContoursbetween OpenCV 2.4 and OpenCV 3 in this post.Awesome post Adrian, got everything working.
I was wondering what’s the advantage of this method of background subtraction vs. the one outlined on the OpenCV site (here: http://docs.opencv.org/master/db/d5c/tutorial_py_bg_subtraction.html#gsc.tab=0)
I understand Median Blur is slightly computationally intensive, but removes speckles. I was more asking what the advantages are around using the BackgroundSubtractor functions available already and periodically calling those?
I’m essentially looking for a way to determine a way to determine the background of a frame if there is existing movement throughout the video (such as people walking around and/or sitting down).
Thanks a bunch.
OpenCV does indeed have built-in methods for background subtraction. The problem is that they are quite computationally expensive and less suitable for running on the Raspberry Pi — but they are tend to do a better job at background subtraction. I plan on writing a blog post on the more advanced methods of background subtraction built into OpenCV later this year, so be sure to keep an eye on the blog!
Oh that makes sense—thanks for the info.
Quick question regarding the camera.capture_continuous function—how is that called? Is that just capturing the current frame present in the video capture, or does it build up a backlog / buffer of frames not yet processed yet (capturing each frame according to the frame rate)?
Thanks!
It’s capturing the current frame. If you need a backlog/buffer, you should use the
QueuePython data-structure.Hello Adrian,
thank you for your code samples. It workes brilliantly and the movement detection in front of my door works without problem. Your introduction to OpenCV and your knowledge about setting things up on Pi helped me a lot. Without your guide installation of all the libraries would have taken weeks.
Any idea how to increase frame rate? I already adopted a threading aproach (Picamera frame collection thread and surveillance image processing thread), but using your surveillance algorithm I do get 7 fps only on a Raspeberry Pi 2 Model B using 640×480 video and 500 pix width for image processing. As another mystery on another identical Pi 2 mod B I get an even lower frame rate.
Any idea to increase frame rates? Is it possible to split the movement detection into 2 threads so to run on 2 cores also?
Fantastic! It’s great to hear that both the installation guide and motion detection tutorial worked for you 🙂
As for increasing the FPS processing rate, yep, I cover that too. As the tutorial notes, you’ll want to use your Pi 2 and treading to get the most performance out of the system.
This blog is perfect guide for me. I can replicate home surveillance system on my raspberry pi and dropbox. Thank you Adrian, great work!!
Thanks Satoshi! 😀
how to get these variables
“dropbox_key”: “YOUR_DROPBOX_KEY”,
“dropbox_secret”: “YOUR_DROPBOX_SECRET”,
“dropbox_base_path”: “YOUR_DROPBOX_APP_PATH”,
You need to signup for the Dropbox API.
Thnx for the tutorial it worked for me without dropbox integretion but I’m facing some problems with dropbox.
I did get the key and secret but what will be the dropbox_base_path .what is it the location where our snapshots are stored or anything else
The
dropbox_base_pathshould be the full directory path to your “Apps” directory in Dropbox.can u post a sample base path actually I’m not getting it I have made an app in dropbox and downloaded the dropbox and it has only one folder containing the get started pdf
The system I’m currently using right now doesn’t have my original source code. The next time I get back to my Pi, I’ll post the example path. In the meantime, you should read the Dropbox development documentation, specifically regarding the “App” directory.
thanku a lot..i managed to upload the snapshots on dropbox
The base path was just home/dropbox..lol
Thanx man finally it worked for me..Yo
hey hi did u install dropbox on raspberry pi or windows i am also facing the same problem can u pls explain how to do it
Hello Adrian,first of all, thanks for your guidance, I have built a motion detection system according to your blog, however, I want to add some GPIO control, so that I use the wiringpi module, and the GPIO control is function well except under the cv environment, the error hint is: no module named wiringpi, could you help me to figure it out? thanks very much!
I haven’t used wiringpi before. Does it require root privileges to run? Or can you execute it as a normal user?
I have figure it out, but the new problem is that I want to command the PIN output a 3.3 voltage while motion was detected, and this function should only executed once within 1 hour(even the motion was detected again) , could you help with that?
I honestly don’t have much experience working directly with voltage. If I do any tutorials on that in the future, I’ll let you know. But as for the second part of your question, you can easily keep track of the “1 hour” mark by using either the
timeordatetimepackage of Python. Just record the timestamp of the last event, and check to see if an hour has passed. If so, call the vevent again.thank you, love your posts very much, awesome!
Adrian,
As requested link to my updated code – https://www.dropbox.com/sh/81qgnioyawlh961/AADBSe9y5_x3ejeGzX0DN7wDa?dl=0
1. Has a check to see if dropbox is available before trying to send the file, stopping the script from stopping
2. Checker.py is like a launcher (run it not the pi_surveillance.py), if the pi_surveillance.py isnt running or has stops the checker.py will start/restart it
3. The pi_surveillance.py auto logs into dropbox using a generated token you add to config file, facilitating auto restart no human interaction needed!.
I am a newbie python programmer, but the code is functional 🙂
Have fun!
Rob
Awesome, thanks for sharing Robert!
Your welcome….
I wondered why the image files werent showing up in my MS windows dropbox plugin…then I realised they had : (colon) as separators in the time stamp of the file name, Windows doesnt like these. I changed them to – in the code and all the images are now visible in my windows drop box.
Cheers again Adrian
Regards
Robert
hay need a help i had done mootion detection using blob detection now need to draw shape on image using contour could u help me with that plz am usin python (opencv3.0) plz
You will need to use the
cv2.findContoursfunction to draw the contours (i.e., outlines) around a shape. I suggest checking this blog post for an example. I also covercv2.findContoursinside Practical Python and OpenCV.Hey Adrian,
Sick post man! works like a charm.
Thought I would post to let you and other people know where I encountered issues.
1. I was using python 3.4 and so I had some syntax issues there. (fixed these issues via the comments in this post)
2. (my own oops) I was editing the code on my windows machine in notepad++ and when I pasted it into putty some lines didn’t paste nice (easy fix)
3. last issue, I was in root when I did this project so I ran into issues when forwarding x11 (im using windows, the fix included allowing ssh login for root http://tinyurl.com/jo5fxrj and installing xming for putty http://tinyurl.com/zyrn7p8)
quick question: is there an easy way to edit the code so the picture taken doesn’t include the green box?
again, great post! Cheers!
Thanks for sharing Chris! And yes, you can absolutely disregard the green box — simply comment out Line 96 and this will remove the green box from the image. Alternatively, if you still want the green box displayed to your screen (but not written to the file), make a copy of the image before drawing on it via:
orig = frame.copy()and then only write theorigimage to file.Is there any way to get the captured images to be sent in an email or text message? Btw I am really looking forward to building this system.
Absolutely. I’ll be doing a blog post on this in the future, but in the meantime, you’ll want to read up on the Twilio API.
+1! I have successfully managed to trigger a text message, but only after the “if text == ‘occupied’ section. So you can imagine what I am getting…100s of text messages when I only want one or two.
I tried running this example using opencv 3 and python 2.7 and I’m getting the following error.
picamera.exc.PiCameraValueError: Incorrect buffer length for resolution 640x480Normally this error happens when you don’t clear your stream in between image captures. Are you calling
.truncate()on your stream after each call? Also, make sure you download the source code to this post which should work out-of-the-box.Hi I have the following issue:
[INFO] warming up…
[INFO] starting background model…
Traceback (most recent call last):
File “pi_surveillance.py”, line 88, in
cv2.CHAIN_APPROX_SIMPLE)
ValueError: too many values to unpack
any ideas how to resolve
Please be sure to read the comments before submitting. I have answered this question in reply to “Tom Kiernan” above.
HI Adrian,
Thank you very much for this usefull post.
Sorry for my bad English. I’ve a RPi using mjpeg-streamer and picam to check out the garden. I would like to adapt your code to use the remote streaming as source.
Is it possible ?
Thanks
Absolutely! I’ll be doing a series of blog posts on how to write frames and read frames in MJPEG format using strictly Python and OpenCV.
Hey, your posts are amazing 🙂
My SD card keep running out of space while compiling OpenCV, apparently 8GB is too small to fit 🙁 What size of SD card do you recommend so that I will be able to follow all your steps? And what should be the specs of the SD card? Class-10? UHS?
I used an 8GB card for the install, and while it was tight, there was enough room to compile and install OpenCV successfully. That said, it would be worth upgrading to a 16GB card if at all possible. I normally go with the Sandisk cards. Otherwise, you might want to try deleting Wolfram Alpha and Libre Office from your install of Raspbian to free up some space.
hi i have an usb camera could you please send to me the modification of the code
I’m a bit too busy to modify the code myself, but I suggest starting with this blog post to adapt the code to work with both the Raspberry Pi and a USB camera. You also might be interested in this post as well.
Thank you for this post !
I get the camera to work for a few days and then it stops. I reset and all is well for a few days. Anyone get the same problem?
Regards
It sounds like it might be a connection or a hardware problem. Double check the ribbon connection from the camera to your Pi and ensure it is still connected.
hey Adrian i was running this program but i have an eror but i cant resolve this , canu help me to resolve ??
the commend is ” (Security Feed:1414): Gtk-WARNING **: cannot open display:”
thaks
Please read the comments before posting — See my reply to “tass” above.
Great stuff Adrian – even bought and read your book!
For an application I am thinking about I need to get up to at least 30fps with processing similar to this application.
I get around 8fps with my Raspberry Pi 3 / Jessie Lite / VNC doing the above. What can I expect, is it possible to reach 30 fps.
Cheers,
Joakim
Thanks for picking up a copy, I hope you’re enjoying it! As for getting up to 30 FPS is challenging, but it is possible. I would suggest starting here and reading up on how threading can improve your FPS processing rate. You’ll also want to keep your frames as small as possible without sacrificing accuracy. The smaller the frames are, the less data there is to process, thus your pipeline will run faster.
Instead of using the Pi Camera module, could you use a usb webcam like the logitech c270 or c920? I’m thinkig about handling the motion detection using a PIR sensor on the GPIO. Have you tried either approach?
Absolutely, you can certainly use a USB webcam. My USB webcam of choice is the Logitech C920. You can learn how to access both USB webcams and the Raspberry Pi camera module (without changing a single line of code) in this post.
I’ll also be doing some GPIO tutorials in the coming weeks, so be sure to keep an eye on the PyImageSearch blog!
Hi Adrian,
Amazing tutorials! Thank you for writing them! I got this project up and running with DropBox and a raspberry Pi 2 w/ PiCamera.
I’ve been reading your articles/tutorials on FPS and using threading. I was wondering if you had any advice on the best way to add threading to this project. I’m still a beginner, but learning more and more.
Again, thank you for your tutorials and info, it’s awesome!
-Eric V
So if you’ve already read the adding threading to webcam access, then you know enough to get started. I would suggest ripping out the code related to
cv2.VideoCaptureand replacing it with theVideoStream. Start small and create a simple script that utilizes theVideoStream. And then, piece by piece, incorporate the rest of the home surveillance code.Hi Adrian. The code is working and I have connection with Dropbox. When I run it it creates the dropbox base path directory I define in the conf.json file. I see this in my Dropbox account on my PC. It does detect motion and I see the UPLOAD in terminal when there is motion. The one thing that doesn’t work: I don’t see the photos in my Dropbox account… Even if the terminal says it is uploading the files. Do you have an idea about the problem?
That sounds very, very strange. I would suggest reading out to the Dropbox API forums and see if this is a known issue or a potential problem with your account.
I’m seeing another weird line that may explain the problem. When running the code, after the Success dropbox account linked, warming up and starting background model.. there is this line in terminal:
xlib: extension “RANDR” missing on display “1:1.0”.
Then when I create movement I see the UPLOAD lines. Like I said the specific path folder are created in my Dropbox account, but photo files are not uploaded.
Just wandering if that xlib line may interfere or explain something.
Thanks!
I’m honestly not sure. Again, I’m not a Dropbox developer — this is actually the first time I ever used the API! I would suggest consulting the Dropbox docs or posting the official Dropbox developer forums.
Hi Adrian,
I was wondering if i can do something like this using ip camera instead of pi-cam module or usb camera, but i can’t find any clear tutorial anywhere (I’m a noob). Also is it possible to connect streaming camera with any sensors? I plan on doing some kind of smoke detector using TGS 2600 smoke sensor, so when the sensor detected smoke, the camera will take a picture automatically.. but i’m not sure what i have to do first 🙁 please help me.. Anyway, thankyou so much for your always useful tutorials. keep it up 🙂
You can absolutely do this using video streaming. In fact, the
cv2.VidepCaturefunction can accept IP streams as an input to the function. I’ll try to do a blog post on this in the future.As for your second question, you can indeed incorporate additional sensors and take an image based on the sensor output. Make sure you pay attention to next week’s blog post on detecting objects and then sounding an alarm using the GPIO library.
Hi
Did you get the ip web cam steaming to work if so what code needs to be updated / configured?
Hi Rian!
i have problem when i try python pi_surveillance.py –conf conf.json
Traceback (most recent call last):
File “pi_surveillance.py”, line 2, in
from pyimagesearch.tempimage import TempImage
ImportError: No module named pyimagesearch.tempimage
how to solve it? thank you
It’s Adrian, actually. And please see my reply to “Kitae” above. It discusses how to resolve your error.
thank you very much for great tutorials!
Rijal,
try playing around with changing directories, mine was something like /home/pi/pi-home-surveillance then run python pi_surveillance.py –conf conf.json
Also download the code at the top of the post and copy the files like init.py which will tell the python interpreter that imagesearch is a module.
Hi Adrian,
Its really awesome project, I’m doing it form my personal use.
But how I should do it auto run and able to access token automatically, because everytime I have to take update token and paste it their.
So how I do it automatically.
Please suggest me
This project was the first time I used the Dropbox API, so I don’t know the in’s and out’s of the API. Please see the other comments in this blog post, in particular the one from “Danny” above who details how the hardcode the token.
Thanks, I’ll try and revert you after sucess
Wonderful explain project tutorial! I have set up on Raspberry Pi 3 and all is well save for high number of contour tracking boxes (too numerous). Which manner would be ideal to eliminate multiple contours detected? Sometimes camera will identify too many motions when none is present and must be terminated then restart to operate normal.
Also it seems when more than half of image or frame is taken up by “green tracking boxes” status goes to Occupied and never returns to Unoccupied despite stillness in frame, wonder why this never resets?
Any suggestions?
To handle multiple bounding boxes that pertain to the same object, I would suggest utilizing morphological operations (such as closing/dilation) to bridge the gaps between the objects in the mask. As for the green tracking boxes taking up most of the image, be sure to debug the parameters to the script (especially the threshold value) by examining the output of the mask.
Awesome! Thanks for the post. I have a camera at our RC Field and it has a nice feature that would be nice to have implemented in python & opensource. Motion detection alarm/action/snap trigger when motion is across a line in a particular direction. With this feature I now get people only when they are walking facing the camera… no more butts:)
Hi Adrian
I’ve got all this working, thanks for a great tutorial.
Do you know how I can get the files to be sent to Dropbox without needing to enter the code each time? I am trying to get it to run on a stand-alone battery powered pi box with no keyboard and screen so would like to pre-authorise the dropbox account rather than have to put in a new code each time.
thanks!
Please see the other comments on this post. I’ve answered this question multiple times. I’m also not a Dropbox developer. This was the first time I used their API, mainly for demonstration purposes.
See earlier comments on this topic. There is a way to do what you need. Its been discussed and documented.
Hi Adrian,
Thanks for the awesome project.
However, I encountered an error at the dropbox integration page. I pasted the authorization code into the program but I encountered a “dropbox.rest.ErrorResponse: [400] u’invalid_grant'”.
I tried it alternatively by typing the generated access token from the dropbox app, but I got the same error. I don’t know what I am doing wrong here, please help.
Hi JJ,
I ran into this problem as well and determined, by adding try/except blocks that it is an authentication problem. Basically you need to regenerate the key each time you start the Python application (use the link that is output in the terminal, then copy/paste the key into the terminal prompt).
David
Hi,
It’s a wonderful project!
Is it possible to measure size of the object in meters, feet or other unit?
Best Regards.
Sure, just see this blog post.
Hi Adrian,
I stumbled upon this hidden gem and I would like to say thank you for your contribution to the programming community.
I am trying to build a people counter using opencv and this is the closest thing to accomplish it. 🙂
Just wondering how do you add counting detected people on to this script? I’m pretty new with python as well.
Thank you very much in advance.
A simple, hacky way would just be to check the
len(cnts)to count the number of contour regions in the mask. This would be a crude estimate to the number of people in the stream. Another approach would be to use a dedicated people detector.Thank you again mate! I’ll update you once I complete this project.
Hi Adrian,
When I try to execute the program I get an error stating that there is no module named picamera.array. However, when I go into python and search for the module it comes up and I can see it, so it seems that the module does exist. Why is this happening?
Did you install the picamera[array] module in a virtual environment? Or globally? If you installed it into a virtual environment, then you’ll need to execute your Python script from within the virtual environment. If you installed it globally, re-install it in the Python virtual environment.
This may have been mentioned, but I didn’t see it specifically in the comments. Has anyone tried launching the pi_surveillance.py –conf conf.json from ssH? This is the error I get. I tried using the -Y and -X in my ssH command.
[SUCCESS] dropbox account linked
[INFO] warming up…
[INFO] starting background model…
(Security Feed:14093): Gtk-WARNING **: cannot open display:
You need to SSH into our Pi with X11 forwarding. If that is not working, then you should do some additional research on troubleshooting X11 forwarding:
$ ssh -X pi@your_ip_addressCould you do a tutorial with the Raspberry Pi for outside motion detection? I need to monitor my driveway which has trees, leaves, birds and squirrels that I don’t want it to detect. I only want it to detect cars and people. I have a Raspberry Pi 3 and the Pi Camera module.
Thanks for the suggestion Benjamin. I’ll try to do a tutorial for this. In the meantime, you might want to consider training a custom object detector for cars and people. Also, you can apply contour filtering to only detect and report on “large” objects, such as cars/people. This would be a simple heuristic that would work as a good starting point.
Hi Adrian
Great tutorials! I’ve been reading them with great interest! Thanks for sharing! I’ve been trying to adjust the size of the output picture and it doesn’t seem to help that I adjust the resolution. Do you know how I can change it?
Thanks for your help!
Hey Philip, I’m not sure what you mean by adjust the size of the output picture. Can you please elaborate.
Hi Adrian
Thanks for replying. I’m trying to output a high resolution picture. Right now I get a very low resolution picture at only <40kb. When I look at your pictures they seem to be at a higher resolution. When I adjust the resolution size to e.g. 1600×1200 the script does not output a picture in that size. How do I achieve this?
Thank you for your time!
After Line 57, make a copy of the
frame:orig = frame.copy()Then, when motion is detected, you can instead upload
orig, which will be your higher resolution image. In general, we rarely process images larger than 600 pixels along the largest dimension, so if you want a higher resolution frame, just clone the original before processing it.Hi Adrian!
Thank you very much for your tutorials! They are extremely helpful!
I’ve been trying to use this code on my Rasbperry Pi’s (2 and 3) but I can’t manage to make it work.
My issue is that ‘cv2.imwrite(…)’ saves a black image, every time. I’m suspicious that ‘picamera.array.PiRGBArray’ is returning a zero array but I have not been able to confirm it. I’ve also tried ‘VideoStream’ from ‘imutils.video’ and I’m getting the same result: black/empy images.
Any ideas on why this could be happening? Also, how do you debug something like this on a Raspberry Pi?
Thanks!
It sounds like there is an issue with your version of the
picamerapackage or a firmware issue with your Raspberry Pi camera module. Keep an eye on next week’s blog post where I’ll be addressing these issues directly.Many thanks Adrian for your great effort..
I use Rasperypi 2 but the quality of images uploaded to dropbox is low quality…
Secondly, how can record video while motion detection untill motion stop and then upload this video to dropbox or send notification email to can access remote pi and play video on it and stream in real time.
I’m not sure what you mean by “low quality” of your images. If the images are low quality, then you might want to check that your Pi camera is reading “quality” images in the first case.
Secondly, I cover writing video clips to file using OpenCV here. You can combine these two scripts to upload the the video to Dropbox or send you an email notification.
Many thanks Adrian
hi
can i run this project with open cv 3 ?
Please see the other comments on this post. Yes, you can run this with OpenCV 3. You just need to update the
cv2.findContoursfunction call. Either take a look at the other comments, or read this blog post on the differences betweencv2.findContoursbetween OpenCV 2.4 and OpenCV 3.I want to send an alarm through bluetooth when i get some motion but in cv environment i get an error: no module named bluetooth when i import it in python.
how can i use bluetooth in cv environment?
I personally have never used the “bluetooth” package before, but you should be able to install it into the
cvvirtual environment viapip:Many thanks Adrian for your great effort..
The program is working fine but i need to make it auto start at reboot of raspberry pi ..
I tried launcher.sh but it works ./launcher.sh from shell terminal but when i wrote it at rc.local don’t work at reboot so what can i do to do that? Appreciate your fast response
Take a look at this blog post where I demonstrate how to run a Python + OpenCV script on reboot.
Many thanks Adrian for your help
I finally get it……..
My error that while auto starting of on_reboot.sh, home-surveillance.py and load of conf.json file starting ok and Picamera Red Light indicates that python file is working but after 5 seconds only the red light goes OFF indicating the python file is stopped.
The solution that is very very simple ONLY change conf.json parameter “show_video” = false >>>> That is it!
Hi adrian
I just want to ask for advice? I want to make a vehicle and speed tracking system using this concept. I am using a raspberry pi 3 with jessie with opencv 3 (i used your installation tutorial). I am about to buy a picamera ver 2 but is this the one I really need? There are wide angle cameras and adjustable focus cameras as well. Which one should I buy? Lastly, can you give some tips on how I should do my project? Thanks
The version 2 of the Raspberry Pi camera module is indeed the latest version. If you want to use a Raspberry Pi camera module, go with this one. If you want a USB camera, I really refer the Logitech C920. It’s plug and play compatible with the Pi and does a really good job for the price.
As for vehicle speed detection and tracking, start by keeping the project simple. Use basic background subtraction to find cars in semi-controlled environments. Then use the approximate frame rate to derive speed. It won’t be extremely accurate, but it will get you started, which is the most important aspect in this case.
Dear Adrian
When i use video file using keyclipwriter then i use dropbox for upload the recorded files, unfortunately my raspberry pi is stopped from motion detection until uploading is finished… so that if there somehow procedure which enable pi to provide motion detection while uploading process.
Many thanks
Spawn a different thread to upload the recorded files, problem solved 🙂
Hi I was wondering if it was possible to not always have to authorize the application and do it somewhat automatically.
I saw under the developer page from dropbox that a access token can be generated and that I have implicit access set to grant.
which changes do I have to make to the python script to just be able to run the script and not have to authenticate it?
Thanks for any hints
Hi
Thanks for the tutorial. I tried it and it works! 🙂
Instead of images, I would like to stream/record video of few seconds (perhaps until motion is not detected any more). Which part of the code I should change for that? do you have some good examples?
I have also one question: I just read that it is possible to use picamera library for motion detection without needing opencv. Do you suggest using the picamera library alone for such a project to avoid the complexity of OpenCV and the time it takes to install and compile?
You certainly can use picamera without OpenCV, that’s not a problem at all. But if you do, then you completely lose the ability to process the frames for motion (or any other processing you want to apply). You could use a different library, such as scikit-image. SciPy also provides (very basic) image operations. But in general, you’ll end up using OpenCV eventually.
As for updating the code to write video to file, I would use this blog post as inspiration to get you started.
Hi Robert,
I managed to combine Adrian’s home surveillance/motion detection on this page with the key event video clips to record video clips once motion is detected. I had a heck of a time figuring it out and thought I’d share it in case anyone else is running into the same issues.
Code is on my github: https://github.com/mnoah66/home-surveillance-2
Hi Adrian, thank you for all the work you are doing in this blog, it is outstanding, I find your work very interesting, I have been studying and testing some of your projects, specially this one, I found something that maybe you or someone already found and fixed it, I have a raspberry pi 2 and an infrared camera, I followed your tutorial and everything works like charm the program sends pictures to dropbox like it should, but after a while (a couple of hours I guess) my raspberry hangs and I have to reboot to have it operational again, I have been searching for a solution, some people say that maybe is the power supply, others say that maybe is a memory leak, I just wanted to know if anyone has faced something similar to this. Thank you again for all your contribution, your work is an inspiration.
I personally haven’t encountered this issue before, but a good way to find out is to log the memory usage of the Raspberry Pi. I would setup a shell script that every 5 minutes logs the output of
$ free -mto file along with the timestamp. That way, when your Pi shuts off you can reboot it and check the log. If memory usage is increasing, it’s a memory leak. If not, it’s a power supply problem.Yes definitely it was a power supply problem, there was no memory issues, it was a problem with my wifi dongle, the wifi dongle entered in a power saving mode, and it was there, where the raspberry pi used to lost the connection with the network.
Before solving this issue I could not set my raspberry pi into running for more than a couple of hours without rebooting it , now I have my raspberry pi into running for the last 4 days in a row.
To solve my problem I just did the following:
ping router >/dev/null &
where router is the router’s address.
Thank you very much.
Great job resolving the issue! And thank you for sharing the solution.
hello AA (Amazing Adrian),
I have this error;
File “pi_surveillance.py”, line 34
print “[INFO] Authorize this application: {}”.format(flow.start())
^
🙁
It sounds like you are using Python 3. The code for this blog post was written for Python 2.7. You can resolve the issue by changing the print statement to a print function:
print("[INFO] Authorize this application: {}".format(flow.start()))Hi Adrian,
Great tutorial, thank you.
I would like to know how to position the frame at 0x0 in the display. Is there a utility or a command that can do that? Thanks
You should be able to accomplish this using the cv2.moveWindow function.
Adrian,
Thanks a lot for this great tutorial. I am guessing this must be by far one of your most popular posts!
Starting from your work, I’ve added a couple of functionalities in case that the community is interested in using them:
*send an email to a Gmail account with an image attached when motion is detected
*record the activity in a log file
*Change the color of the room status text (just for extra coolness!)
the code can be found at https://github.com/steincastillo/Pi_surveillance.git
Hope you like it and thanks again for sharing your experience!!!
Nice job Stein, thanks for sharing! I really like the email functionality as well.
After installing Silvan Melchior’s RPi_Cam_Web_Interface (which requires Apache2 to run), my Python scripts error out with an “Out of resources (other than memory)” message. I understand that only one process can use the camera at a time, so I’m thinking that even though I am not directly accessing the camera with the Cam_Web_Interface, there’s a process running in the background that’s preventing Python from successfully executing the picamera script. Anybody know if this could be the case, and if so, how to (temporarily) disable other processes from locking the camera? Thanks for any help provided.
Update to my previous post:
After opening the Cam_Web_Interface web page and clicking on the “Stop camera” button, I can now access the camera via the Python scripts.
Hi there Adrian
Dylan here again.
Your code works amazingly well and I have added the code I need executed when motion is detected.
Please please save me some pain and list the exact modification that one needs to make in order to run this blog post’s code using a USB webcam rather than the Picam.
I have battled to adapt this code to use USB webcams using your other guides.
Please do help.
Hey Dylan, while I’m happy to help others and point readers in the right direction I cannot provide custom code for each and every exact situation. There are more than enough (free) resources on this blog to help you create a Python script that uses a USB webcam rather than a Raspberry Pi camera. I would suggest starting with this post that will help you learn how to access boththe Raspberry Pi camera and a USB webcam using the same functions.
Thank you for such a great tutorial. I’m new to all this so I’m confused on where to extract the zip file to. I saw some folks with the same error as Kitae but I’m just not sure where to send the files. Thanks.
You can exact the .zip file anywhere you would like on your system. Then, open up a terminal, change directory to where you unzipped the archive and execute the Python script.
Adrian, I got a I recently purchased the CanaKit Raspberry Pi 3 Complete Starter Kit and the Raspberry Pi 5MP 1080P Camera NoIR (No IR Filter) Night Vision Module with the intent of setting up a night-time camera to film myself sleep walking, which I thought would be hilarious. I’m going to run through your tutorial just to get more experience with the Pi and Python coding (I work as a software engineer so I don’t think I’m going to be too helpless). I’ll report back with any questions that pop up after I’m done with your tutorial in regards to modifying things to fit my specific night-time motion sensing video recording needs!
This sounds like an awesome project Matt, I’m excited to see the end results!
Adrian, I’ve been lazy recently, but overcame that and completed this in just a few minutes (you make it easy with steal-able source code). Now onto your ‘saving-key-event-video-clips-with-opencv’ tutorial to combine these two into a sleepwalking capture device. My only concern is my pi camera working in the dark (I’m not convinced it’s actually an IR camera!). I’ll update when I finish up.
Congrats on the progress Matt, nice job!
Hi Adrian,
I’m so happy about your website, but I’ve one question.
After making my access to DropBox (as the guy comment behind), my biggest problem is error named:
cv2.CHAIN_APPROX_SIMPLE)
ValueError: too many values to unpack
PLEASE HELP 🙂
Hey Tommy — before posting please do a simple ctrl + f and search for your error message in the comments section. I have already addressed this error multiple times. Look at my replies to Tom, Martin, and Roger above.
Hi Adrian,
really thanks for your tutorial. It works!! I have found some problem:
1) I don’t have the virtualenvs folders but just the cv folders
2) I had the problem with the cv2.CHAIN_APPROX_SIMPLE), i don’t know why but there was a variable in line 88 called (cnts,_) and I rename it just cnts and work with just these change.
Now that it works i have some question:
If a person stay satic or move really slow this sytem doesn’t detect it, it’s correct? How can I recognize the person?
There is a variable inside your project that recognize the number of object in movement?
Thanks
If a person doesn’t move or moves really slowly then eventually this method will “average” them out of the detection. In this case, you need to tune Line 76, specifically the alpha weight parameter. Once you’ve detected a person you might want to try using correlation tracking or CamShift to track them.
As for the number of regions in an image that can contain motion, it’s simply:
len(cnts)Hi Adrian and thamks for your reply,
This work it’s really grat. Now I’m try to turn on a Led when the system detect a motion, but when I run the program he said that RPi.GPIO isn’t a module. I try to turn on the same Led outside the cv and it’s work. Do you know why I have this problem? Inside the cv I have already uninstall and reinstall the RPi library but it doesn’t work.
Edit: I’m sorry Adrian I found the solution in one of your post. Thanks again
Nice job resolving the issue Enrico! For any other readers who have a question regarding OpenCV + RPi.GPI together, please refer to this post.
Dear Adrian,
Thanks a lot for your great tutorials! I’m a beginner with Python and OpenCV, but nevertheless it made sense and was explained beautifully.
I was able to combine your previous post (Basic motion detection and tracking with Python and OpenCV) and this one to make it run properly under Windows 7 with Python 3.5.2. The averaging have removed the noise, but the problem I’m now facing is that in case that an object moved in the frame, and then stopped moving, the system will go back to “unoccupied” state, even though the object (i.e. person stealing my beer) is still in the room. How would you suggest solving that issue?
Thanks
If an object stops moving, then by definition, no motion is occurring. If you want to maintain a larger history of motion you’ll want to play with the weight parameter to
cv2.accumulateWeighted(gray, avg, 0.5). In this case it’s 0.5, but you can decrease the value to have the “history” of motion last longer.Alternatively, once you’ve detected motion you can apply methods such as CamShift and correlation filters to continue to track the object (even if it stops moving).
hai adrian , i would like to ask you , what the purpose you attached the wifi at usb port ? is it necessary for this tutorial ? if this tutorial need internet connection , how i can connect to my wifi’s house ?
On the Raspberry Pi 2 there is not a built-in WiFi module; therefore, we have to use the USB WiFi dongle to connect the Pi 2 to a network.
This really is a quality tutorial. Thank you. Once I’d fixed the GtK errors (By Installing Quartz on my Mac) and put in the fix to permanently store my Dropbox token it was plain sailing. I’m about to tackle your guide to auto starting now, and mod the code to store a few days pics on the SD card.
I was wondering how to improve the picture quality though. The sun is low here this time of year and the areas not in direct sunshine look black …. also the resolution isn’t great. I tried to up the resolution to 1440,1080 but got an error message saying the buffer was too small … any idea how to improve this … would it make sense to use raspstill to take a higher quality photo once the motion was detected ?
Nice job Chris, great work!
As for saving a larger image, just clone it before you process it:
orig = image.copy()This will allow you to have a higher resolution image that you can upload to Dropbox before it is resized.
Oh good … Ill try that – playing with the settings in config file didn’t seem to do much …
After some investigation I think the buffer error I referred to I think is just an artefact when you close the program with Ctrl-C..
Hi Andrian, if i want to run without dropbox, how can i do? plz help!
Comment out any dropbox imports and then comment out Lines 28-37 and Lines 117-127.
My pi_surveillance.py script has been working flawlessly for some time now, but lately, it’s been closing after 15-20 seconds with the following mesaage: (Security Feed:2893): “Gtk-WARNING **: Theme parsing error: gtk.css:3976:75: Missing name of pseudo-class.” I can’t figure out why this is all of a sudden occurring nor how to fix it. Can anybody help? Thanks.
Hey Steve — I’m not sure what the error is, I haven’t encountered this message before. If I find anything I’ll be sure to let you know.
I have successfully followed this excellent tutorial and can upload to dropbox. However my dropbox files from the app folder don’t sync with my dropbox desktop folder. I think it is to do with file permissions. Any idea how to fix this? Thanks
Hmm, that is strange. I’m honestly not sure about that. I would suggest posting on the Dropbox Developer forums if you can.
I solved it, the timestamp has a colon : in it which my dropbox was saying is a bad filename. i changed the filename and it all syncs now.
Congrats on resolving the issue Jim!
Thanks for the great tutorial, Adrian. I used it for a school project without any troubles.
That’s fantastic, nice job Benjamin! I hope you got a good grade on your school project 😉
I’ve been working on this project and wanted to use the Twilio API to send a message when the raspberry pi took a picture. I get the error ImportError: No module named twilio.rest whenever I try to run the program from the CV environment (typing “workon cv” in the terminal) I tried a sample code working with the API by simply sending the message and it works. It only causes problems when l’m in CV.
Can anybody help me with that?
It sounds like you need to install the
twiliopackage into the “cv” virtual environment:Hey Adrian,
Currently, i am trying to used your tutorial for my school project. I had some problems trying to do a json file as i am new to coding. i have tried to exclude the dropbox function and also faced with some errors try to run the code.
It said there’s a valueerror: too many values to unpack for this line.
(cnts, _) = cv2.findContours(thresh.copy(), cv2.RETR_EXTERNAL,cv2.CHAIN_APPROX_SIMPLE)
Any idea what will be the cause??
Greatly appreciate your help.
Thankyou
Hey Jax — please read the other comments to this blog post as I have already addressed this question multiple times. You are using OpenCV 3. The
cv2.findContoursneeds to be changed to:(_, cnts, _) = cv2.findContours(thresh.copy(), cv2.RETR_EXTERNAL,cv2.CHAIN_APPROX_SIMPLE)hi adrian,
Your work is marvelous. i have a question that is your project is cloud based? if not, what you suggest to make it work on cloud. sorry for bad English.
Can you elaborate on what you mean by “cloud based”?
Hello,
Which is the editor you used to write python script?
I normally use either Sublime Text 2, PyCharm, or vim.
Hello Adrian, I’m trying to run the pi_surveillance code, but I get an error at line 8:
from picamera.array import PiRGBArray
ImportError: No module named picamera.array
could you help me out? I am a beginner with RB and Python.
I’m sorry I have solved that problem with $ pip install picamera …
but now once inserted the authentication code given by dropbox I error at line 38 …
Hi there Adrian
Your code is performing wonders at one installation but now battling somewhat at another:
I am running a slightly modified version of this code on a RPi2 using a webcam. Python 2.7 and OpenCV 2.4.?
The code runs perfectly well, detecting motion as it should for about 4hours — thereafter it no longer detects any motion.
Sadly I am running a headless setup.
If I perform a reboot everything continues as it should.
If I attempt to run the python script again I get the error: VIDEOIO ERROR: V4L: index 0 is not correct!
I am hoping you can share some wisdom…
(Power to Pi and device is good; contacts are good; Memory and storage space are adequate)
(If I run who command I see the average cpu loading is around 2 for 1, 5 and 15min — significantly higher than when the script runs initially)
If you have not come across this before I will attach a screen and see if the GUI reveals any clues when running.
Thanks.
This is very strange. I wonder if there is a memory leak somewhere. My suggestion would be to create a small cronjob that logs memory usage for each process to disk every 5 minutes. When the program stops detecting motion, check your log and see if a program might have been eating memory and caused the video capture to stop.
Hello Adrian,
Thank You so much for the great tutorial. I was able to get it all working thanks to your explanations and a little help from others who posted(Danny, Darius and Eli). Thank you also for the explanations of all the lines of python code. Great job!
Great job getting the system up and running Greg, nice job!
I feel a bit lost. When I run:
python pi_surveillance.py –conf conf.json
I get:
Traceback (most recent call last):
File “pi_surveillance.py”, line 2, in
from pyimagesearch.tempimage import TempImage
ImportError: cannot import name TempImage
I started with a clean RPi3 and went through your stepped process thoroughly (or so I thought). The OpenCV installation guide was super easy to follow. Then the “Home surveillance and motion detection” guide is a bit more difficult to follow (just due to my level of experience) but I thought I could do it.
It seems like the necessary directories and file haven’t been created yet for the python script to run correctly. I tried mkdir pyimagesearch, and touching the files that haven’t been created – __init__.py and tempimage.py but the same error occurs.
Now I’m fearful that tinkering further will ruin the work I’ve done so far. Any help would be appreciated 🙂 Thank you for the work you’ve done here. Amazing.
Hey Darrell — it’s hard to say what the exact error is without seeing your project structure. This is why I recommend that readers download the source code to the blog post using the “Downloads” section above and comparing their project structure to my own.
Thank you. I’ll take a look.
hi,
adrian how we can configure this project to work offline. mean to say as you go offline the camera takes the snap and upload to your sd card mounted on raspbberry pi and and as you go online it will automatically upload picture from your sd card to the dropbox.. can you help me out?? very curious to hear you answer..
This really isn’t a computer vision question, more of a general-purpose programming question. I would suggest having the script write the images to a special “offline” directory via
cv2.imwrite. Then, have a second Python script that runs in the background and (1) detects when you’re online and (2) uses the Dropbox API to upload the images. An easier alternative would be to usersyncwith your “offline” directory and your Dropbox directory dedicated to handling uploaded images.Great post! Thanks for taking the time to educate all of us with hands-on training.
Question: How would I go about adding “sound” to detection? As a follow on project I think it would be interesting to add a deterrent to the code. For instance the sound of a dog barking once the camera detects a change.
Great question — the short answer is that I’m not sure. I only work with video and image processing and I’ve never tried adding a mic to the Raspberry Pi to capture sound. This thread on StackOverflow seems to have some suggestions for recording sound with Python.
I think Adrian misunderstood your question. In short: When you have determined, in code, that there is motion, simply play an audio file over a loudspeaker or stereo, etc. It would be best to do that by forking the process and then playing the file, so that you can continue to process the video…
I did indeed misunderstood Solid’s question, thanks for pointing this out Saul. Here is a nice list of options for playing sounds with Python.
Hi Adrian,
Great tutorial! I hit a few snags getting this all setup, mainly because I installed OpenCV 3 and had to make a few of the modifications mentioned in these threads.
I originally ran it on Windows 10 in a Putty SSH terminal and it failed with an error about the display. So I hooked up my HDMI monitor to the Pi and loaded up X so that I could more easily do the web authorization for dropbox.
Once at the desktop, I fired up the browser and in a terminal window I set up the virtual environment using the source command and ‘workon cv’. I ran the python script exactly as I did in Putty, entered my dropbox key and it opened and video window this time.
The problem is, the window is completely black. The red light on the camera is on, and walking in front of it has no effect. It’s just a black screen with the word “Unoccupied” and the date on the bottom.
Any ideas? Also, is there a way to obtain the dropbox authorization key and save it to the config file to avoid having to do that repeatedly while troubleshooting?
Thanks for all your help!
-Ben
Hey Ben, to address your questions:
1. If you’re using SSH, just enable X11 forwarding — you won’t need the HDMI cable or monitor. You’ll be able to see the results directly on your laptop screen.
2. The blank/black screens sounds like a firmware issue. A quick update will resolve the issue. Please see this post for more details.
Updating the firmware worked great – thanks Adrian!
I also used X11 and it did popup the video window from Putty, but never refreshed when I walked in front of the camera. However, I did get the image sent to my dropbox with me in it and the outlines highlighting me in the photo. Pressing wouldn’t quit either, so I just hit CTRL-C and eventually it stopped and closed the video window down.
How difficult would it be to send a short video clip instead of a still image?
Thanks again, amazing work!
The video might not have refreshed due to I/O latency reasons. As for uploading a video clip, that’s not terribly hard either.
Hi Ardian,
Thanks for this great tutorial. Your explanations are extremely useful. I got everything installed and running, but have hit a snag during execution time.
I have not modified your code in any way, I just downloaded it from the link in the email you (or your bot) sent me.
When I launch pi_surveillance.py, this is my console output.
Traceback (most recent call last):
  File "pi_surveillance.py", line 88, in
    cv2.CHAIN_APPROX_SIMPLE)
ValueError: too many values to unpack
Line 88 is this:
(cnts, _) = cv2.findContours(thresh.copy(), cv2.RETR_EXTERNAL,
    cv2.CHAIN_APPROX_SIMPLE)
I’m still learning Python and your application is the first I have encountered with multiple operands on the left side on an equation.
I’m at a loss how to continue.
Please help!
Thanks,
Graeme
Hey Graeme — I’ve actually discussed this issue multiple times in the comments section of this blog post. Please see the replies to “Jax” above.
Sir, how to made the video stream to RSTP so i can acess it to my android app. SO the video stream not displayed on the raspi but instead like in the service protocol. Sorry for teribble english. i already done this project its so great love it. And also how to push notification to android app? i really wanna make this kind of project.
No worries, I can understand your english just fine 🙂
I personally haven’t worked with direct video streaming and RSTP in a very long time. I do plan on writing a blog post on the topic in the future, but I’m honestly not sure when that time will come. Right now I am very busy writing deep learning related tutorials.
thanks for your reply 🙂
how about i already got a streamer like motion-mmal and got the video being processed to motion detect like what u did in this tutorial. I mean the source of video is not from rrawCapture but from a video live stream?
hi ardian , i am new to this i would like to know what is drop box path do u need the application in raspberry pi
Hey Adrian,
I’m having some problems figuring out how to save the captured images without the bounding boxes drawn on them. I’m having them saved locally and need just the raw photo with the coordinates of the bounding boxes saved.
Thanks!
Amber
If all you need is the raw frame itself, just clone the frame on Line 57:
You can then manipulate
framehowever you want and still saveorigto disk.Hi Ardian,
Thanks for this great tutorial. Your explanations are extremely useful. I got everything installed and running,
Now I wanted to ask if with this code you can limit motion detection to only a specific rectangles of framing camera chosen by’ user.
I hope to receive soon a reply.
Thank you very much for your time.
PS: sorry for my English
Sure, that’s totally possible. You would need to obtain the (x, y)-coordinates of the box from the user first, then obtain NumPy array slicing to extract the ROI from the frame (and only apply motion detection to this ROI). I would suggest starting here for basic mouse events with OpenCV.
Hi Adrian
Great tutorial thanks. I would like to know how you can add SMS alert function to this code so that as it sends email alerts it can also send SMS messages using a GSM module
I would suggest using the Twilio API. I actually discuss this very topic inside the PyImageSearch Gurus course.
Hi Thanks for such a wonderful tutorial. I tried it and successfully installed opencv on raspberry. I was able to run the code perfectly. I have few questions – my requirement is little different..hope you can guide me in doing that..my target is to detect the number of people sitting in office space and particularly check whether that person is siting on the desk..like there are 12 people normally sitting in one room! Could you guide me how to proceed in this?
There are multiple ways to approach this problem. A simplistic approach would be basic motion detection and background subtraction (like this tutorial). More advanced methods would require object detection via feature extraction and machine learning — HOG + Linear SVM is a great example of this.
Another approach would be to frame the problem as “face recognition”. Detect faces in the office space and recognize them. I cover this inside the PyImageSearch Gurus course.
Hi Adrian,
thanks am really leaning a lot from these tutorials.
Say this same surveillance approach is used to monitor a room with people. How can I incorporate a head-count of people in a room using this code.
For example if i’m supposed to have 3 people in my dining room and there are 5, how is the system able to detect that there are 5 people instead of three?
btw…thanks for the crash course, looking forward to signing up for the gurus.
I would suggest applying “object detection” to detect the number of faces in an image. I cover face detection in detail inside Practical Python and OpenCV.
Hi Adrian,
Our team of students were able to make a working prototype following your detailed guide, thanks. This enabled us noobs to go through the setup procedure and get the working model up. We used python 3 and faced many issues to which we found answers in the Q&A section.
Great work, thanks !
Regards
Shashikant Mandal
Very cool, thanks for sharing Shashikant!
Dear Adrian,
My name is Giridharan Ravichandhran, i found your blog via google as i was searching help full sources regarding my project which is surveillance and motion detection with the Raspberry Pi
your guides were really help full to configure opencv, and accessing picamera with opencv and python
i must thank you very much for this.
Now, i am working on surveillance and motion detection with the Raspberry Pi with the help of your above guide which is really helped a lot
After all the above step i did, i tried to run command
python pi_surveillance.py –conf conf.json
I am struggling with following SyntaxErrors
File “pi_surveillance.py”, line 31
print “[INFO] Authorize this application: {}”.format(flow.start())
^
SyntaxError: invalid syntax
As i do not have any prior experience in python, i literally couldn’t fix this issue
please help me out in this,
Thanks,
Regards,
Hi Giridharan — thank you for taking the time to read the template on how to ask questions on the PyImageSearch blog, I appreciate it. Regarding your error, are you using Python 2.7 or Python 3? If you’re using Python 3, keep in mind that the print statement is now a print function:
print("[INFO] Authorize this application: {}".format(flow.start()))Thank you very much to your timely help which worked well and good and i am really sorry about delayed response. again i need your help in same surveillance and motion detection, i wanted to save captured image and videos in raspberry pi3/pendrive (local)instead Dropbox
please do needfull
Regards,
Thanks,
Giridharan Ravichandhran
Just use the
cv2.imwritefunction to write the image to disk. Specify the path to your pendrive as the first argument. If you are just getting started learning computer vision, OpenCV, and Python, I would highly encourage you to go through Practical Python and OpenCV so you can learn the basics. These types of fundamental questions are discussed in detail inside the book.hey that is good one, can i use this in any sort of moving object, is this technique detect human when total setup is motion( quadcopter , robot).
This method assumes a fixed, non-moving camera. If you are using a quadcopter or a robot, I assume the camera would be moving, in which case motion detection cannot be applied. Instead you might want to train your own custom object detector.
Hello Adrian!
Thank you very much for this tutorial!It has been helpful but I still have a problem. Namely the thing is that I have a setup where I want to detect motion in a very small area and through that area all that passes is a ball,(3/4″ or around 2cm diameter).
My code registers motion erraticaly,I guess due to the high velocity of the ball.
Is there something that I can do about this?I don’t need anything else,just need the program to realise that the ball passed,each time though.
To start, I would only compute motion for the ROI that the ball passes through. Secondly, if the ball is moving at a high velocity, you might want to try using a camera with a higher frame rate.
Hi Adrian,
Thank you so much for this worderful job. It is very pleasant to follow all your instructions. I don’t use dropbox, but I would like to know how I could launch a specific command when there is a motion detection. Where could I insert a call to my specific program ?Also, is there a way to record a printscreen of the motion detection on a specific folder ?
Thank you again for your work.
Gregoire
Absolutely, both are possible. All you need is the
osmodule to get started (although more advanced libraries would be a better choice, such as “sh”, “subprocess” or any other that can run a separate program in a separate thread).To run a special program, you would use
os.system("./myscript.sh")Taking a screenshot can be done using “scrot”:
os.system("scrot")Again, this is a hacky way of doing this, so I would suggest using “subprocess” if possible.
Thank you Adrian for this answer but I’ m not sure that I can handle it as long as I’m a newbie in raspberry and python. In fact, instead of sending captured pictures to dropbox, I would like to store them in a specific directory of my raspberry. How could I do this?
Thank you again for your help and your patience.
Greg
Hi Greg — while I am happy to provide help regarding computer vision and image processing, how to save files to a specific path on your machine is basic programming. I would suggest brushing up on your terminal basics and Python basics before continuing. It’s important to walk before you run, especially when it comes to more advanced computer science topics such as computer vision.
Hello Mr Adrian , i am trying out your code and noticed that if there’s a change in the background the program will detect the moved object as a foreground object highlighting it in the rectangle is there a way to recapture the first frame every N second to fix that problem ?
Hey Marciano — this method of background subtraction assumes that the background is static and non-moving. If the background changes, it is recomputed as a running average via the
cv2.addWeightedcall.Hai andrian, I have a question. Right now I’m running a project “Real Time Video Processing For Drone-Based Lightning Sensor”.
So what I did I’ve installed OpenCV on Pi3 and put it on drone. Right now I’m able to capture lightning at night. I want to improve it by sending the image to the dropbox.
My question is, is the dropbox script will affect my fps on capturing the lightning. Because the lightning pattern is so fast. I dont want to miss a single lightning frame after the previous lightning frame.
I aware that the tranmission data of the dropbox will affected fps of the camera. Am I right, Andrian?
The I/O overhead of uploading the image to Dropbox will not affect the FPS of the physical camera, but it will affect the frame processing rate of your pipeline. To avoid this, simply put the Dropbox upload in a separate thread.
Hey adrian! i have been trying to implement your code. I have installed all the required libraries as you mentioned. But I’m facing troubles. After entering the code the error that i’m facing would be:
Traceback (most recent call last):
File “pi_surveillance.py”,line1, in
from pyimagesearch.tempimage import TempImage
Import Error: No module named pyimagesearch.tempimage
Can u help me out with this?
Please read the comments before posting or using ctrl + f to search for your error message. I have addressed this question in my reply to “Kitae” above.
i want to use USB camera instead of pi camera in the same project. how to do that?
Please see this post where I demonstrate how to use either your USB webcam or picamera module from within a single class — this will help you use your USB camera instead.
Hey Adrian! Firstly thankyou so much for this work. One more thing i want to extend this code by adding a new feature. Along with the uploading part, I want to send an alert notification to the user’s gmail accound when ever a motion is detected. I’m hoping you could help me out with this. Thankyou 🙂
Hey Sai — this really isn’t a computer vision related question. Once you have detected motion, you can do whatever you want. I would suggest looking into tutorials using Python to send emails via SMTP.
Great work Adrian! Used your example here and it works just fine with RPi3+OpenCV3.
(Had some minor problems, like changing the code to work with OpenCV3+ et cetera)
I especially like the automatic Dropbox upload 🙂
Cheers,
Kai
Fantastic, nice job Kai!
Hello…
Thanks for all support.
How can I see inside the packages we import.. I mean I need to know the body and algorithms of functions/classes inside packages such as: imutils, argparse, picamera, json, time and datetime?
Thank you very much
You would need to download the source code if you wanted to examine built-in Python functionality. Other packages are available on GitHub. If you use an IDE there are often shortcut keys that allow you to “jump” inside the libraries you import.
Hi! I had included a code for notification alert to your code and a notification is sent to my gmail account along with dropbox upload when the motion is detected. Now i want to upload the same pictures on my SD card along with dropbox upload and i donno how to proceed for that. I’m hoping you could help me out with this. Thankyou 🙂
This really isn’t a computer vision question, I think it’s a simple file I/O question. Assuming your SD card is connected to your Raspberry Pi, just use
cv2.imwriteto write the image to your SD card.Hi Adrian,
every time when light is turn on or off I have false positive motion detection regardless of all the parameters which I try to change. Are you maybe planning to implement more complex motion detection algorithm since this code not use all raspberry pi 3 CPU power?
If you turn the physical lights in your house on or off you will absolutely see a false-positive motion detection as the background frame changes entirely. That is true for all motion detection algorithms that rely on a series of background images to compute a moving average. Depending on the objects you’re trying to detect for motion, you might want to consider training a custom object detector.
We agree that algorithms that rely on background images will see a false-positive upon switching light on or off. That is the reason I asked you if you are planning to implement more complex algorithm that will be robust to light switching on/off. What do you mean by:” training a custom object detector”?
I don’t have any plans to write a blog post that specifically handles the use case of when a light is turned on or off, although I think it’s totally possible to train a machine learning classifier to detect when this happens. That said, if you’re interested in the training a custom object detector, please see this blog post.
Great tutorial! I just have 2 questions:
1.) Is the security feed a live feed that can also be accessed later?
2.) How are you using the RaspberryPi from your computer for Dropbox authentication, even though the RaspberryPi is setup above your fridge in another room?
Thanks for the help
1. The “security feed” is just the frames polled from the camera. If you wanted to access the video later you would need to write the key event video clips to disk.
2. I’m not sure what you mean here. The Raspberry Pi is connected to the Dropbox API. I was just SSH’d into my Raspberry Pi from my laptop when executing the script.
sir is your program is compatible with python version 3?
You can make this program compatible with Python 3 and OpenCV 3 by using print functions rather than statements and changing the return signature of
cv2.findContours. This has been documented in previous comments on this post.I was messing around with this code wondering if I could automatically open a browser window with the authorization code on it. Turns, out, it’s quite simple apparently.
After adding an import statement for webrowser control
import webbrowser
putting the function
webbrowser.open(url)
with
format(flow.start())
gives you a working automatic browser open to the page! Like this…
if conf[“use_dropbox”]:
# connect to dropbox and start the session authorization process
flow = DropboxOAuth2FlowNoRedirect(conf[“dropbox_key”], conf[“dropbox_secret”])
#Other manual code >>> print (“[INFO] Authorize this application: {}”.format(flow.start()))
webbrowser.open(format(flow.start()))
authCode = input(“Enter auth code here: “).strip()
Hi Adrian, just want to say, that this article is amazing. Thanks for sharing your great ideas.
Thank you Peter!
Hi Adrian, I’m a motorcyclist and I am just starting to delve into the world of Linux and Raspberry Pi. I am a COMPLETE newbie at this so I’m still trying to develop my intuition around Raspberry Pi. I want to use your code and build a DIY surveillance system that will observe my motorcycle and alert me when it’s being stolen. The specific questions that I want to ask are:
How do you modify the code such that the camera will only focus on one entire object (i.e. my motorcycle) and disregard the environment completely while tracking its position overtime? And, furthermore, if sudden movement is detected (indicating that someone is stealing my bike, the wind toppled it over, etc), how do I get the camera to ring my phone loudly (through bluetooth, wifi, etc.)?
Thanks.
MJR
Detecting specific types of objects (such as motorcycles) is a type of object detection problem. A standard method for object detection is HOG + Linear SVM. This project is certainly possible, but is also more advanced, especially if you are new to the world of computer vision and OpenCV.
Given this, I would suggest you work through either Practical Python and OpenCV or the PyImageSearch Gurus course to help you learn the fundamentals.
brother during authorization process dropboxapi.com server could not be found.. what this problem is all about? please help
Adrian, any idea what this error might mean ?
$ python pi_surveillance.py –conf conf.json
…
Traceback (most recent call last):
File “pi_surveillance.py”, line 85, in
cv2.CHAIN_APPROX_SIMPLE)
ValueError: too many values to unpack
Hi John — please read the other comments on this blog post before posting. This question has already been addressed multiple times. Please ctrl + f and look at my replies to Tom, Martin, and Roger above.
Yep, I did and thank you it all works great now.
Fantastic, glad to hear it John 🙂
sir,
please can u explain me about dropbox base path.?
Hi Adrian
Referring to this code:
# compute the bounding box for the contour, draw it on the frame,
# and update the text
(x, y, w, h) = cv2.boundingRect(c)
cv2.rectangle(frame, (x, y), (x + w, y + h), (0, 255, 0), 2)
text = “Occupied”
How do you extract the (x,y) values?
and how do you printf these (x,y) values? (text=”???”)
I’m asking this because i’m trying to make a servo move accordingly to the green bounding box.
Thank you!
The (x, y)-coordinates are computed from the
cv2.boundingRectfunction. You could also simply do:print(x, y)to print them to your terminal.
Thx!
Hi Adrian, nice work!
You think that is possible to use this script to display in Kivy the video?
I’m trying to show the video on the 7 inch raspberry pi display.
BR,
Bruno Brandão
Hi Bruno — I imagine so, but to be honest, I don’t have any experience working with Kivy. You would need to install Kivy and then compile OpenCV against the Kivy version of Python.
Great Project Adrian,
But I have a question, how to limit the number of rectangles? I only need one rectangle to be appeared when motion is detected
You can limit the number of rectangles in an number of ways. How about just sorting them rectangles according to their area and keeping the largest one?
Hi Adrian. I’m working on a motion detection system with a web cam pointing through the window. The problem I’m getting is that on windy days the leaves of a tree are getting picked up as motion. I am unable to mask that bit out because I need to pick up people who cross in front of it. What would you recommend to change eg would it be accumulateWeighted, GuaussianBlur or something else.
Thanks
There are a few ways to get around this. You could simply filter out these regions by looping over the contours and seeing if the motion regions are too small. You could use a more advanced background subtraction method like MOG, MOG2, or GMM. I would start with the former and see how far that gets you.
Hi Adrian,
I don’t have idea yet about how .capture_continuous works, but with modifying your code, i’m trying to start record a video when motion is detected and stop recording then save the video when no motion is detected. Would you like to help me to make it work?
I actually cover how to record “key event clips” in this blog post. Simply replace the “ball detection” with “motion detection” and you’ll be all set.
Hi Drian, hope you have a good day. I follow step by step but now I can’t get key from server in dropbox. please help me. Thank you!!
Hi Manh — I would suggest posting on the official Dropbox developer forums regarding any Dropbox API issues (I am not a Dropbox developer).
Hi Adrian! Great tutorial, however I have just one issue:
I downloaded the source code, and extracted the zip to my desktop. Afterwards, I opened up a terminal and did source ~/.profile and workon CV and after I did /home/pi/Desktop/pi-home-surveillance python pi_surveillance.py –conf conf.json to run the code. However, I was then met with this error:
‘bash: /home/pi/Desktop/pi-home-surveillance: Is a directory’
What is this error and how can I fix this?
Many thanks,
Abdullah
Change directory to
pi-home-surveillancefirst, then executepi_surveillance.pyHi Adrian, thanks for a great post. I am working on a project to detect motion from an outdoor security camera. I applied your technique and while it improves a lot from frame-different technique, I still have many false detections, noticeably when illumination change, casting shadows, moving trees due to the wind. Any guidance on both simple and complicated technique to tackle these false detections? Thanks and I really appreciate it.
If you’re trying to detect specific objects, you should consider training a custom object detector which is covered inside the PyImageSearch Gurus course. Otherwise, start researching the MOG, MOG2, and GMM background subtraction methods of OpenCV. Those will specifically help with shadowing.
Hmm for some reason images are not being uploaded to Dropbox when running script via ssh. I’m on Ubuntu 16.04, SSHing to RPi and running pi_surveillance.py. When I run the script, the security feed pops up and I can see the camera images…with quite a big of lag. I can also see that the status changes to Occupied when I wave my hand around the camera correctly…also with lots of lag. The thing is that the images don’t get uploaded to Dropbox. There were no errors with linking to Dropbox acct.
I do not get Dropbox upload issues when running the surveillance script on my RPi directly. Only when I use SSH. Any ideas on how to fix this?
The lag is due to the I/O latency of transferring the frames from your Pi to your laptop/desktop. That is to be expected. As far as the Dropbox upload issues, are you still validating your auth code?
Hi Adrian,
Great tutorial. I’ve followed it and used your downloaded code and adapted it for a non-dropbox version based on the comment section. I’ve had some trouble however, seems i keep getting the code initiating [INFO] warming up… and then Illegal instruction.
Any ideas?
Can you insert a few more
printstatements into your code to determine exactly which line is throwing the error?Thanks Adrian, seems there is some issue with the resizing of the first frame using imutils (line 62 of your tutorial code). I’ve tried that line in another programme (test video from one of your blog posts) and the same error appears. Is this some issue with my imutil install? It imports ok but this is the first instance whereby imutil is used.
Thoughts?
I don’t think this is an issue with your imutils install, I think it’s either a problem with (1) your Raspberry Pi camera module or (2) your picamera install (or both). I would suggest re-attaching your Raspberry Pi camera, running
rpi-update, rebooting, and ensuring thatraspistillworks.I’ve re-installed cv on another pi and it seems to work fine (with the same uploaded python programme i used on the original pi). I’m going to re-install cv on the original pi and go from there. Hoping that its an issue with the original cv virtualenv etc installs (and not the pi itself!)
I’m glad to hear it’s working now, Rob. Best of luck with the project!
Hi Adrian:
Thank you for the great post!
I have to comment out line#55 where imutils.resize() leads to “illegal instruction”. I am not sure if this error has anything to do with picamera installation because everything else all work fine and I can get image displayed properly after ignore that line#55.
This issue happens on my Pi Zero W, and I am guessing it is related to floating point operation. Exact code with this resizing works fine on Pi3.
I didn’t put “ENABLE_NEON” and “ENABLE_VFPV3” for cmake configuration when compiling OpenCV on Pi Zero W. Maybe the OpenCV build requires different compilation switches for Pi Zero W?
Do you have suggestion on this? Thanks!
Wow, that’s odd. I’m not sure why it would work on a Raspberry Pi 3 but not a Pi Zero W. To be honest I haven’t tried to execute this code in the Pi Zero W. In general I do not recommend the Pi Zero (or Zero W) for real-time processing. With only a single core/thread of execution it’s just too slow. Sorry I could not be of more help here but I’m just not sure. You may want to try using “cv2.resize” instead of “imutils.resize” to see if it makes a difference.
Confirm that on pi zero , there is an issue with both cv2.resize and imutils.resize. Both gives the ‘illegal instruction’ error.
Apparently, it’s related to the default flag of
cv2.INTER_AREAinimutils.resize. If you change the function call to:frame = imutils.resize(frame, width=500, inter=cv2.INTER_NEAREST)It will work (no idea why).
Hi Adrian, I gave that a go. I can run raspistill and vid commands in both the virtual env and outside it without a problem. Also your test_image.py file (which I used after installing opencv according to another of your blog posts) works fine. Sadly it fails with this motion detection at the same point.
I installed opencv on my model 3b (for speed) but I’ve run this on my zero w instead. That wouldn’t pose an issue would it?
Hi Adrian, great tutorial, good job.
Currently i’m working on web based security camera project. So the difference is output interface, instead of showing video frame on window (using cv2.imshow()) i need to stream it to the web. can you give me some advice to make this work?
Thanks in advance.
I don’t have any tutorials on streaming the output of an video processing operation straight to a web browser, but I’ve added this suggestion to my list of ideas to write about. Thanks again for the suggestion! I will try to cover it in a future blog post.
I’ve been running through the blog and have followed and built the app. I even downloaded the code and tried running your version. I’ve run it with and without the cv environment and I still end up running into the same error.
from dropbox.client import DropboxOAuth2FlowNoRedirect
ImportError: No module named client
after running through a number of different articles it seems that dropbox api v1 is now deprecated and it seems that there is no dropbox.client to import.
do you have a blog which explains the new v2 mechanism for OAuth2.0.
Thanks
I do not have a blog post that covers the new version of the Dropbox API. I will make a note to try to update this blog post, but would also appreciate if other PyImageSearch readers could help contribute to resolve the issue.
Hi Adrian,
Thought I would share this.
I did figure out how to deal with the new Dropbox API.
just dropped .client from both dropbox imports so they read:
from dropbox import DropboxOAuth2FlowNoRedirect
from dropbox import Dropbox
also followed “Danny’s” suggestion of directly hard coding the authentication token so now the dropbox connection section just reads:
auth_code = (“Copy from Apps console – generate access token”)
client = Dropbox(auth_code)
print “[SUCCESS] dropbox account linked”
finally, the hardest thing to figure out was how to get uploading to work again. replaced line 126 in your code with:
f = open(t.path, “rb”)
client.files_upload(bytes(f.read()), path)
Also the dropbox_base_path should start with a “/”
Thanks for sharing Alex — I’ll also be updating the code to this blog post in the next 2 weeks.
Can you please update the coding for the new version of the Dropbox API?
Yes, I will have an updated code for v2 of the Dropbox API in the next 2 weeks.
Indeed, the mechanism is a bit different with Dropbox API v2, I got the same error as jim did. This is how I got it to work,
1. In the original python code I replaced lines 3-4:
with,
2. Lines 30-36:
flow = DropboxOAuth2FlowNoRedirect(conf["dropbox_key"], conf["dropbox_secret"])
print "[INFO] Authorize this application: {}".format(flow.start())
authCode = raw_input("Enter auth code here: ").strip()

# finish the authorization and grab the Dropbox client
(accessToken, userID) = flow.finish(authCode)
client = DropboxClient(accessToken)
with,
3. Line 124-126:
path = "{base_path}/{timestamp}.jpg".format(
    base_path=conf["dropbox_base_path"], timestamp=ts)
client.put_file(path, open(t.path, "rb"))
with,
path = "/{base_path}/{timestamp}.jpg".format(
    base_path=conf["dropbox_base_path"], timestamp=ts)
dbx.files_upload(open(t.path, "rb").read(), path)
Notice the added
'/'before"{base_path}"!4. Finally, in the conf.json file I replaced lines 3-4:
with
The Dropbox access token can be generated in your Dropbox API account under MyApps->You_App_Name->Settings and click “generate” under OAuth 2
Thanks for sharing Matias!
Commented out anything drop box related in the code and changed the conf.json file setting to false. but right after i get this
:
>>> args = vars(ap.parse_args())
usage: [-h] -c CONF
: error: argument -c/–conf is required
Getting discouraged here spent the whole weekend on this project.
Hi Stenve — you need to read up on command line arguments. Secondly, you should be running the Python script via a command line instead of using IDLE.
I am in the middle of creating an Android app to host the live feed and was wondering if there’s a way to stream the video live given the fact that I am programming in Java.
Coming back here from your latest post on installing OpenCV 3.3.
Do you have any plans to update popular posts to the new version?
Or cover the most significant/relevant API changes?
I do! This blog post has actually already been updated to use Python 3 and OpenCV 3. My plan is to identify the top posts via my analytics and then go through and update them, ideally one per week.
hello sir i just want to know what do you mean by the dropbox_base_path ?
i m getting error related to this
hi
so if am using a usb camera instead of pi then what is the reference that i should use
There are multiple ways to handle this. One solution would be to use the
cv2.VideoCaptureclass as I do in this blog post. The better option would be to use the VideoStream class..Hi Adrian,
Love the post and all of your other blogs. I happened to be modifying my code tonight (trying to add key event video recording) and started receiving error messages. Apparently, the Dropbox V1 API has ended as of today, 9/28/17. Wondering if you might want to update your source code accordingly.
Dropbox blog post: https://blogs.dropbox.com/developers/2017/09/api-v1-shutdown-details/
Best,
Martin
Hi Martin,
Thanks for raising your issue to the community.
This post was updated on the week of August 21st, 2017 to support the Dropbox V2 API.
Apologies if this is/was unclear, but there is a small “Note:” in the introduction of the post.
Adrian also updated the code download available in the “Downloads” section. In case you’re operating off of a codebase you downloaded before that time, then you can redownload the code, update parameters, and you should be good to go.
It is working fine for me since Adrian’s update.
I will note that I just tested it on Raspbian Stretch and found that
picameraisn’t installed by default. To get it use pip:pip install picamera.Please respond back if you have any problems and maybe I can help you get your code working.
Regards,
Dave
Do You have a thesis report for this project?
please help me to attach the images clicked by the camera to a mail and send it my email address
That really depends on what Python library you are using to send email. While I’m happy to help with computer vision, OpenCV, and deep learning related questions I cannot help with general programming advice.
I was able to piece in some smtp code. Commenting out the Dropbox upload area and replacing it with some code using the smtp library and a class library that is on github. If Adrian says it is alright, I will post the link to the github location. (I don’t post links on other’s blog pages unless permission is given). But google around you should find it.
But take your time and work the code, debug, it works. I looked at about 3 or 4 different examples of smtp but had to pay more attention to the addition of adding the attachment of the image.
Took about an hour to figure it out. debug is how you learn
Hi Tracy — thank you so much for your kind consideration. It’s extremely appreciated. I wish others were as kind and considerate as you! Please feel free to include your link to your repo.
i want to make an ocr using your program. i want to make the camera capture images of printed documents when kept under the camera, due to motion detection the frame will get saved and the saved image can be turned to text file using tesseract-ocr and using narrator can be narrated out to and visually disabled person… please help me. can we do all this in one code by merging a tesseract code in your code??
I cover how to use Tesseract + OpenCV + Python together in this post.
hey!
i did everything in your tutorial. but i am getting error. it says: illegal instruction.
i have raspberry pi zero wireless. is it because of Arm or something?
i googled it and i rebuild cmake with some extra parameters but still no changes.
can you tell me what i am doing wrong ? thanks.
Hi Ertan — in general I don’t recommend using the Raspberry Pi Zero. It’s just not fast enough for real-time video processing. I would recommend using a Pi 2 or Pi 3. Unfortunately, without seeing the full error I’m not sure what the error is.
Hi, nice tutorial. Thanks for sharing. Is it possible if I only get the number that was attached into some rack and coming with the forklift, rather than capturing all object in the area of this camera?
Hi Yadi, thanks for the comment. Do you have an example image of what you’re working with? If so, I can try to take a look. I’m not entirely sure what your goal is so if you could please elaborate that would be helpful.
As of September 28th, 2017: API v1 endpoints are no longer accessible for Dropbox. this configuration will not work for the Dropbox API
https://blogs.dropbox.com/developers/2017/06/updated-api-v1-deprecation-timeline/
This blog post has been updated to use the NEW Dropbox API v2. Please re-download the code or copy and paste it from the blog post — the code will work provided you are using the new Dropbox API and associated library.
Hi Adrian
After installing dropbox lib, I can import dropbox successfully. but when I ran the code, the error message is :
client = dropbox.Dropbox(conf[“dropbox_access_token”])
AttributeError: module ‘dropbox’ has no attribute ‘Dropbox’
I did everything I can do, still have no clue
what should I do?
Hi Adrian, great tutorial as usual. I was wondering if there was any way to extend this to have a polished GUI where the user can simply have a start and stop button, alongside with the ‘uploaded to Dropbox’ status, as opposed to having to always type in the command in the terminal. Do you know a way to do this/ have any documentation that can guide me?
I don’t do many GUI tutorials here on the PyImageSearch blog, but I would refer to this tutorial to get you started.
Thanks for this post.
It provided a lot of inspiration for the work I have done (see my blog https://danicymru.wordpress.com/2017/10/23/motion-detection-security-camera-using-pizero-and-opencv/). My system captures videos of movement on the driveway and sends them to my dropbox account. By using multiprocessing it manages to get 27-30 frames per second in good light. Hope you get a chance to look.
Awesome, thanks for sharing Dani! As for MP4 support, try compiling OpenCV with FFMPEG support enabled. The Pi Zero is also a bit slow, you’ll get optimal performance from a Pi 3. Just a suggestion!
Has anyone ever gotten [SUCCESS] dropbox account linked…without actually linking the two? This happened to me. It did that without allowing me to copy and paste the needed information.
Hi adrian, thank you on the article. It is really give me a wide understanding how to use opencv well.
I recently encounter some problems when i was editing the code. I dont want to use dropbox and want the photos taken store in my flusk server. when i run the program using terminal it says
Unable to init server: Could not connect: Connection refused
(Security Feed:6859): Gtk-WARNING **: cannot open display:
I try using x11 for windows but still cant solve the problem. Any advice on what could i have done wrong ?
Thank you in advance 🙂
Hey Carlos — you need to enable X11 forwarding:
$ ssh -X pi@your_ip_addressI love you Adrian.
Hy i have this type of error
Traceback (most recent call last):
File “pi_surveillance.py”, line 21, in
…
json.decoder.JSONDecodeError: Expecting property name enclosed in double quotes: line 5 column 23 (char 98)
Hi Shrey, it sounds like you may have edited the JSON file and then accidentally included extra characters (likely quotes) in your JSON file. Please validate your JSON file as there is likely a syntax error in it.
Hi,
Your blogs are extremely helpful for beginners. I would like to thank you for all the effort.
How can I generate trajectories with the detection in this code similar to your other post https://www.pyimagesearch.com/2015/09/21/opencv-track-object-movement/
Will it work for multiple moving object?
You will need to pass the center bounding box coordinates for the object you are tracking into the
dequeobject, as I do in the blog post you linked to. The trajectory tracking will not work for multiple objects out of the box. You will need to modify it to have one deque instantiation for object in the frame you want to track.Great tutorial, thanks Adrian!
I am finding that although the images are uploading and I can access them from dropbox.com they never sync with the desktop version I have on windows, even though all folders are set to sync.
I just wondered if anyone else had this problem or knew how to solve it. Thanks!
Hi Rob — there’s a setting from the Dropbox side. The reason the setting isn’t defaulted is because this can fill up your hard drive in some cases quite quickly.
Hi Adrian
I’m having a problem with the code. When it gets to the part of “python pi_surveillance.py –conf conf.json” this happens:
”
[SUCCESS] dropbox account linked
[INFO] warming up…
Illegal instruction
”
Can you help me with that?
Best regards
Hi Adrian, I wonder if we can upload an image array from memory without writting it into a disk file? If dropbox doesn’t provide such an api, is it possible to upload from memory to our own file server?
I’m not sure on the particulars on the Dropbox API, you would need to consult their documentation. As for your second question, this StackOverflow thread should help you out.
Great tutorial. I am wondering if anyone has got it to work via an @reboot job with the display. It works in crontab for me without the display but if I try to start it via @reboot with the security feed it fails with: Gtk-WARNING **: cannot open display:
Ok, fixed that by adding xhost local:user > /dev/null in my .profile and adding export DISPLAY=:0.0 to on_boot.sh. Now if I can just figure out how to put the security feed in the top left corner of the screen and have the display stay awake as long as there’s motion.
Congrats on resolving the issue, Richard! As for moving the window, take a look at the cv2.moveWindow function. I’m not sure about having the display wake up for motion though. You might need to do some research on how to control the display via Python on Ubuntu/Debian-based systems.
Thank you Adrian great idea. Adding cv2.moveWindow(“Security Feed”, 0, 0) just after imshow did the trick. My feed is of my office front door. We are on a busy street and it detects motion with every passing car. Anyway to make it less sensitive so that it only switches to the occupied state when someone is at the door and not from the passing cars?
It would suggest using an object detector to recognize objects in your video stream. OpenCV ships with a pre-trained pedestrian detector but it’s pretty limited. Otherwise you might need to train your own custom object detector. It would be worthwhile to use a deep learning object detector trained on the COCO dataset which does have a person class.
when i run this program , it will shows this error command even if i downloaded the source code nad zip file from pyimagesearch
Traceback (most recent call last):
File “pi_surveillance.py”, line 5, in
from pyimagesearch.tempimage import TempImage
ImportError: No module named ‘pyimagesearch’
.how can i fix this problem ?
Please make sure you use the “Downloads” section of the blog post to download the source code used for this blog post. This will resolve the import error.
your tutorials are so good, i wonder how you do everything so perfectly. I implemented the previous simpler code given in part 1 using raspberry pi and a simple webcam and it works, but i am sure this one would be better than that. how can i implement it with a simple webcam instead of using pi cam? can you please tell which lines of code i would need to modify. also please explain which lines i need to eliminate or modify if i don’t want to upload it to my dropbox. thank you so very much!
My recommendation would be to swap in the VideoStream class I discuss here. This class is compatible with both the Raspberry Pi camera module and USB webcam. I’m happy to help provide these guides + code but understand that I cannot put the project together for you. You’ll need to modify and update the code yourself. Between the highly documented code and detailed tutorials I am confident you can do it!
Anyone know if you have several pis uploading to your dropbox app does each one need it’s own dropbox_access_token or can they all use the same one?
Meant Logitech c922.
Hi
How can I show streaming in an html page?
How can I save videos when in the camera there is a movement?
I don’t have any tutorials on streaming to an HTML page (yet) but you can save to a video file using this tutorial.
Adrian, first of all, I can’t thank you enough for these posts, it is really amazing to have open access to the knowledge and resources you provide here. Thank you!!
With that out of the way, just wanted to let you (and anyone else) know I was able to squeeze 1-2 extra FPS from this script by bypassing the frame resizing with imutils, and instead setting the camera’s resolution to 512×384.
To do that I comment out line 55 in the script, and update the resolution in the conf file to [512, 384]
It’s a small improvement, but I was happy to squeeze out anything extra I could considering that building the optimized OpenCV from another post didn’t noticeably impact performance for this particular script.
Thanks so much for sharing!
Hi! Thank you so much for the tutorials! It is really helpful. I’ve tried the “Basic motion detection and tracking with Python and OpenCV” and I hope to move on to this post but I am having trouble changing the code for a webcam. I saw that 3 persons have asked this already and I have read your reply–simply change PiCamera() to cv2.VideoCapture(0)) but I keep on getting an error. Since I did not receive a reply nor find anything to solve the error I decided to follow your other post “Unifying picamera and cv2.VideoCapture into a single class with OpenCV” and it worked fine so I decided to incorporate it to the code here.
This is what I did:
1. added from imutils.video import VideoStream
2. added ap.add_argument(“-p”, “–picamera”, type=int, default=-1, help=”whether or not the Raspberry Pi camera should be used”)
3. replaced PiCamera() to VideoStream(usePiCamera=args[“picamera”] > 0).start()
And I still get an error
Error for replacing PiCamera() with cv2.VideoCapture(0)
…
camera.resolution = tuple(conf[“resolution”])
AttributeError: ‘cv2.VideoCapture’ object has no attribute ‘resolution’
I hope you can help me
Its now working!
I used while true instead of the for loop. Is this okay?
That is okay. You may also be interested in this blog post where I discuss creating a Python class that is compatible with both the Raspberry Pi picamera module and the cv2.VideoCapture function.
Yes, I have also read that one. You are truly awesome! Thank you!
Quick question: can I create a gui inside the cv environment? I want to put the video stream on a window where I can also display other parameters such as temp, etc and a button to adjust settings. I have only seen gui working on python3, is there another way to do this?
I’m not much of a GUI developer but I would suggest taking a look at Tkinter and Qt. Here is a basic GUI I wrote for OpenCV and Tkinter.
Hello Adrian,
Thank you for all your help. Your tutorial are very well documented and very helpful. I tried using this script on my Pi3, but when I run it, it does nothing. It just returns to the prompt. I was able to run the scripts on your other tutorial capturing an image and a video from my pi camera so I know that’s working well. Any idea what might be happening?
It sounds like OpenCV cannot access your webcam or Raspberry Pi camera module. Are you using a USB camera? Or the Raspberry Pi camera module?
Hi Adrian I just posted a similar question and I think I figure it out.
Sometime the program runs and other times it doesnt.
It has to do with the
if not grabbed:
break
A lot of times for one reason or another the webcam is unable to grab the picture.
Is there a way to restart the python program
You can use a number of different utilities such as “nohup” to ensure the script is kept running. But if the “not grabbed” is causing the issue you should insert additional logic that only breaks if the frame is not read for N (such as N=30) consecutive frames.
Hey Adrian,
really nice articles. I have an outdoor camera with RTSP and started with your basic Motion article. Now I’ve used the code in this article and changed all rPi Cam parts against RTSP Cam. But I loose many times my grabbed image. I’m not sure what’s the reason for that. This behaviour is for sure with both programs, basic and this motion detection.
For now, I release the camera when the grabber is lost, wait 0,1sec. and then do the capturing again. This works, but is not a nice way to do it.
My camera is connected via WiFi but it’s a solid connection and a ping is always under 2ms.
Also I’ve changed line 55 and created a new variable frame_small to get the image in the original resolution when saved. Just a hint 🙂
Hey Maui, thanks for the comment. I’m not sure why you’re experiencing that issue. I will try to do a detailed RTSP tutorial in the future, though!
Hi,
When I am trying to run pi_surveillance.py, it is showing me this error:
usage: pi_surveillance.py [-h] -c CONF
pi_surveillance.py: error: argument -c/–conf is required
I have downloaded the file attached, what can i do ?
Hey Daniah — you need to supply the command line arguments to the script. Your problem can easily be resolved by reading this post on command line arguments.
I tried following the steps in that page, but I kept getting bash:
cd: command-line-arguments: No such file or directory
whenever i tried to use the command line arguments. It is in the same location as my other folders. Is there something that I am missing?
It sounds like you are specifying an invalid path to the directory. Double-check where you download the files to.
Hello, Dr. Adrian! Have been following your works for quite a while, great job as always, keep it up! I have a question though. I have modified this example to work from USB camera, had to use some NumPy here and there. Everything works flawlessly, in regards of motion detection and tracking, but there is one thing. If intruder stays for some time, second or two, the room status becomes “Unoccupied”. He becomes background for the program. How can I fix this? I thought about first frame, as you described in one of your previous blogs, but as you said, frames always will be different, due to noise and lightning. Can you help me please?
There are a few ways to approach this. The first is to rely on object detection. You could also look for motion and then apply a dedicated object tracker, such as correlation filtering. The dlib library has a good implementation of this.
Hello Adrian Instead of saving timestamp.jpg to dropbox I want to save timestamp.mp4 for 10 or 20 seconds locally to my raspberry piwhat shall I do? I tried modifying few things but it is showing an error. can you please help?
I am adding it before if conf[usedropbox] in surveillance.py
and I have kept use dropbox= NULL in json
Please help
See this blog post on recording events with OpenCV. From there you can upload the resulting .mp4 file to Dropbox.
#Adrian Rosebrock
thanks for the great tutorial ……i have a question instead of storing *.jpg to the dropbox account possible to save the video/image to our own memory location like harddisk?
Hi Usuf, you can modify Lines 113-121 to save the image locally. Just take care that your memory card doesn’t fill up. You could attach a USB hard drive.
Useul tutorial. I’m gonna try it out for sure.Thanks mate
i want to know whether ll it detect only human being or any other objct like dog or cat?????
You can, but you’ll want to apply object detection to accomplish it.
Is there anyone who has used this tutorial for his Final Year thesis in Bachelors Program. I really need its documentation.
Thanks,
Farzam.
Thanks for the tutorial. I have trained a CNN to detect objects. I want to use it to detect objects in live streaming. I have amazon cloud cam. I don’t know how to integrate feed from cloudcam.amazon.com to python to detect objects. Please help!
Hey Mitul — I do not have any experience with Amazon Cloud Cam.
Nice example, thank you Adrian!
I made it runable with USB camera.
had a little problem with reboot,
but fixed it
1) adding 60 sec before running a script,
2) making False to show-video parameter.
Hi… dude.. thanks a lot to make this project it is very useful and relevant… I’m curious about your every post on visual recognition.
I wanted to ask that how can I connect my raspberry pi camera module thorough vnc viwer or via WiFi connection, is it possible to see the video stream without desktop connected with raspberry pi.
Sure, you could use VNC or X11 forwarding to login to your Pi from another system. From there you could see the output of the stream.
Is it possible to use the motion detection with a web stream? I want to protect my garages with it. Thanks! 🙂
Hey Max — yes, it is possible, although I do not have any blog post examples for it (yet). I will try to publish a streaming example when I get a chance!
Hello,
Nice system… This gives a few clues for a problem I try to solve. I have several cams around my house with an integrated motion detection, that FTP files showing movement to a PI managing the house/alarm system.
Problem is I use the integrated motion detection because running a motion daemon on the PI is too much work, especially with several network cam + would also results in using some LAN bandwidth continuously.
Would be nice if integrated motion from network cameras was not so basic: Setting detection zones + sensibility still results in too many false positives (with luminosity variations especially… or even night/day modes switches the cam manufacturer did not even disabled captures a few seconds doing so).
So the idea was to run motion over the FTP’ed images, let’s say every 10s, and if images were uploaded meantime doing a 2nd motion filtering on the PI on top of cameras integrated one.
But motion daemon does not look to be able to process jpeg files. Only a video stream.
Will have a look to see if your core image processing can be re-used out of PI camera context.
Regards!
Hi Adrian
Thanks for excellent tutorial.
Can you write a tutorial about human behavior detection by OpenCV ?
Thanks for the excellent article. I had been wanting to add motion detection to a little video surveillance program I had written for the pi, and was able to use the methods in your post to do just that. Rather than send still photos to dropbox, it saves full HD video to a USB hard drive, using your motion detection to start the recordings, and a timeout to stop them. It also uses the rainbow hat to display status. If anybody is interested in taking a peek at the code,
it can be found at https://github.com/jeffhancock/RaspberryPiPython/tree/master/MotionDetectionSurveillance.
I suspect others have done similar things, but I didn’t read through all of the posts here.
Thanks for sharing Jeff!
That’s a very great article! I’m trying to follow it and I’m in the process of setting up the whole thing on my RasPi. I have got one question though? Is the following command run as a daemon?
python pi_surveillance.py –conf conf.json
So from my understanding, it will just execute and stop once it finishes. If so then where is the continuous monitoring happening? Is it the for loop:
for f in camera.capture_continuous…
that never terminates?
The script will not exit until you either:
1. Press the “q” key on your keyboard with the window opened by OpenCV active
2. Or you explicitly kill the script
Cool! Thanks for this wonderful article and the codebase. I managed to get the whole thing up and running on Docker. Here is a reference: https://github.com/joesan/raspi-motion-detection
Thanks for sharing, Joesan!
This works great.
But I note it detects 2 people moving in holding hands as a single person.
How can I divide it?
You may want to instead use my OpenCV People Counter tutorial to detect people rather than just background subtraction.
Hi,
I am having issues with the library imutils.py.
On of the functions that the script is using is “grab_contours” (cnts = imutils.grab_contours(cnts)).
But it seems that my version of the library doesn’t contain that function.
Any ideas about that?
Thank you,
Javier
You need to upgrade your install of imutils:
$ pip install --upgrade imutilsAdrian,
Thanks for the awesome content.
I am trying to have this camera boot up automatically. By following your other tutorials, I create a batch file on_reboot.sh and changed its permissions correctly.
This executes the .py file.
However, the entire file doesn’t execute; there is a failure.
With the help of some file.write() statements, I found that the .py file stops at “import dropbox”.
However, I can ensure that I have dropbox.
When I execute “pip3 list” when in (cv), dropbox is there along with the other imports.
Any ideas?
Are you sure you’re properly accessing your “cv” Python virtual environment via the
on_reboot.shscript? It sounds like you’re not. Try debugging that further.Would I be able to substitute Google Api ?
What specifically are you hoping to achieve with the Google API?
Thanks a lot Ardian… it works for me.
I am implenting this in a peephole camera on my front door. Is there any way to do a digital zoom and would a higher or lower resolution be better when zooming. Also, can this be modified to also record video clips when something is detected. I am trying to catch any package thieves
Take a look at this tutorial on saving key events, such as an object being detected or motion detected, it should solve your exact problem.
Dear sir, all your research works are mind blowing. They inspired me to learn more about Digital Image processing and OpenCv.
Thanks a ton…..
Thanks Ramakrishna, I really appreciate that 🙂
Great article! Very helpful!
I’ve built a small project based on it https://github.com/sergey-koba-mobidev/motion_detector
It utilizes S3 instead of Dropbox and several small changes here and there.
Again – nice article, very detailed!
Great job, Sergey!
Hi Adrian,
Do you have a project on LBP image processing with rapsberry pi?
Yes, I show how to perform face recognition using LBPs and a Raspberry Pi inside the PyImageSearch Gurus course.
Hi Adrian!
Had some queries, would be wonderful if you have solutions to it.
Is there any way that can automate the downloading of images ( which we’ve uploaded) from the dropbox folder into a PC? Is there anyway we can check whether any new images have been added?
Thanks.
There are Unix/Linux commands that can watch libraries as well as Python packages. Python’s watchdog is probably what you need.
Adrian,
Thanks for this sweet tutorial! I was burgled last month of my mitre saw. NEVER AGAIN! Well, at least I’ll have evidence this time and didn’t have to drop hundreds on nest cams or something else.
I’m a web developer and work with django, and use Python3 for automating some things. Anyways, I got caught up with some Dropbox API V2 key/token confusion. For my conf.json > ‘dropbox_access_token’,I kept trying to use the key they give you once you register, rather than clicking the “Generate Access Token” button under the O Auth 2 section, and using that as the access token.
I also kept getting an upload error as follows `UploadError(‘path’, UploadWriteFailed(reason=WriteError(‘malformed_path’, None)`. This, I discovered was happening because I was starting my conf.json > ‘dropbox_base_path’ with the ‘/’ when that is already typed into the path variable in line 118 above. So dropbox was looking for a path that starts ‘//’
I whipped through these tutorials super fast, so I think taking my time, I would’ve realized these things. Just thought they might be good notes to include in the article. You’ll know best!
THANK YOU!!!
Oh no, I’m so sorry to hear you were burglarized! That’s terrible. I hope you didn’t lose anything too valuable or important.
I also really appreciate you sharing the solution to the Dropbox path! That is super helpful to know about, thanks again! 🙂
Hi Adrian
I had my security cam up and running a while back, but recently re-installed Raspbian Stretch on my 3B+. I successfully compiled OpenCV4 as per your blog, but I’m now receiving the following error when executing the pi_surveillance.py script: ImportError: libhdf5_serial.so.100: cannot open shared object file: No such file or directory.
Did you compile OpenCV 4 from source or use a pip install? It sounds like you may have pip installed OpenCV. If so, you may be missing some additional packages:
Hi Adrian,
That was the problem. Although I compiled OpenCV from source (I’ve never used the pip install method), none of the those files ( except for libatlas-base-dev) were installed. Anyhow, all is working now. Thanks for your assistance!
Congrats on getting OpenCV installed! 🙂
What changes do I have to make to store the pictures in Google Photos instead of Dropbox? Is there a pip –install Google Drive, or something of the sort?
You would need to refer to Google Drive’s API. I have not used it before so I do not know what the correct Python package would be to access it.
When you put the main loop within a try-except block to catch a Ctrl-C to terminate, there are exceptions generated like this one:
picamera.exc.PiCameraValueError: Incorrect buffer length for resolution 640×480
The trick is to improve on the video streaming termination in this section:
# clear the stream in preparation for the next frame
rawCapture.truncate(0)
# Truncate the stream to the current position (in case
# prior iterations output a longer image)
# otherwise it will create exceptions with a KeyboardInterrupt
rawCapture.seek(0)
Thanks Adrian, very useful example to introduce in motion detection. I use in outside sports videos and it works great! Now i will try tune it to eliminate shadows contours and the ball (much smaller than players) 🙂
Thanks Ford, I’m glad the tutorial helped you with your project!
Thank you Adrian for posting this tutorial and the other tutorial about installing openCV on Raspberry Pi 3. It works and can’t wait to get the ebook from your kickstarter project.
Thank you for making PyImageSearch possible, Terri! I truly appreciate it.
Hi Adrian!
What shoul i change in the code if instead of save the video in the dropbox i want to send with the Twilio, like in the “Building a Raspberry Pi security camera with OpenCV” ?
Thanks
Ok, I found this googling to be part 2. I was wondering if you just wanted intrusion into a zone, lets say your were facing down into a yard and created a trapezoid (a rectangle seen at an angle) and just cared if a human sized object moved into those boundaries (a virtual “beam breaker” alarm), would this be the best way or would you use OpenCV “optical flow”? Would that eliminate a lot of the issues of false detection? The last piece of my puzzle is how to create a zone and cut holes into it. With optical flow, I could just draw 3 or 4 boundary lines. But with this, HOG or other methods, I would need a way to draw this boundary inside the image frame and then possibly draw areas around exclusion zones (like a rectangle or oval around tree branches). Trying to create this on a Pi, but open to any small SBC.
Hey Fred — have you taken a look at Raspberry Pi for Computer Vision? That book teaches you how to build a surveillance application that sounds very similar to what you’re referring to. I would suggest starting there.
Hi Adrian. I am back at it with a RPi 3B+. I bought your Hobbiest Bundle and am still struggling a bit as to how to create my boundaries. I *think* maybe I use ROIs somehow? At least for my trapezoid boundaries. But for my “exclusion zones”, those are regions of “dis”-interest 🙂 Can you point me to any resources or code to get me further? Thank you!
Hey Fred — can you send me an email or use my contact form to send me a message with more details on your project? That will enable us to have a more detailed discussion about the project.
hi
how can I improve the background subtraction for more robust detection of motion? I mean there is a lot of algorithms but out of them which one that you prefer most to make this algorithm upgrade
Hey Hafi — I would suggest reading Raspberry Pi for Computer Vision. That book discusses more advanced background subtractors that can still run on the RPi.
Hi Adrian,
frame = imutils.resize(frame, width=500)
could you tell me why you did this?
Hey Marcin — that’s been discussed in the previous comments, please give them a read.
Hi can I use this to store images in firebase realtime database? instead of Dropbox? If so, how would it be? Thank You so much..
I wouldn’t store images directly in a database. I would store them on disk and then store a file pointer in the database to the file.
Hello Sir,
What changes should I make if I want to use webcam instead of pi camera module?
By the way, Thanks for great tutorial.
You can use the VideoStream class which is compatible with both a webcam and the Raspberry Pi camera module.
Hello Sir,
while changing code for webcam, what should I write instead of PiRGBArray?
Hi i have question
i want to change only some frame for detection (not detect all of camera frame) like only 100×100 and show “Occupied” that only frame help me plz
You can use basic NumPy array slicing to extract the ROI and then run the motion detector just on that region. It’s easily doable but you need to know the basics first. I suggest you read Practical Python and OpenCV to learn the fundamentals before continuing.