In today’s blog post, I’ll demonstrate how to perform image stitching and panorama construction using Python and OpenCV. Given two images, we’ll “stitch” them together to create a simple panorama, as seen in the example above.
To construct our image panorama, we’ll utilize computer vision and image processing techniques such as: keypoint detection and local invariant descriptors; keypoint matching; RANSAC; and perspective warping.
Since there are major differences in how OpenCV 2.4.X and OpenCV 3.X handle keypoint detection and local invariant descriptors (such as SIFT and SURF), I’ve taken special care to provide code that is compatible with both versions (provided that you compiled OpenCV 3 with opencv_contrib
support, of course).
In future blog posts we’ll extend our panorama stitching code to work with multiple images rather than just two.
Read on to find out how panorama stitching with OpenCV is done.
OpenCV panorama stitching
Our panorama stitching algorithm consists of four steps:
- Step #1: Detect keypoints (DoG, Harris, etc.) and extract local invariant descriptors (SIFT, SURF, etc.) from the two input images.
- Step #2: Match the descriptors between the two images.
- Step #3: Use the RANSAC algorithm to estimate a homography matrix using our matched feature vectors.
- Step #4: Apply a warping transformation using the homography matrix obtained from Step #3.
We’ll encapsulate all four of these steps inside panorama.py
, where we’ll define a Stitcher
class used to construct our panoramas.
The Stitcher
class will rely on the imutils Python package, so if you don’t already have it installed on your system, you’ll want to go ahead and do that now:
$ pip install imutils
Let’s go ahead and get started by reviewing panorama.py
:
# import the necessary packages import numpy as np import imutils import cv2 class Stitcher: def __init__(self): # determine if we are using OpenCV v3.X self.isv3 = imutils.is_cv3(or_better=True)
We start off on Lines 2-4 by importing our necessary packages. We’ll be using NumPy for matrix/array operations, imutils
for a set of OpenCV convenience methods, and finally cv2
for our OpenCV bindings.
From there, we define the Stitcher
class on Line 6. The constructor to Stitcher
simply checks which version of OpenCV we are using by making a call to the is_cv3
method. Since there are major differences in how OpenCV 2.4 and OpenCV 3 handle keypoint detection and local invariant descriptors, it’s important that we determine the version of OpenCV that we are using.
Next up, let’s start working on the stitch
method:
def stitch(self, images, ratio=0.75, reprojThresh=4.0, showMatches=False): # unpack the images, then detect keypoints and extract # local invariant descriptors from them (imageB, imageA) = images (kpsA, featuresA) = self.detectAndDescribe(imageA) (kpsB, featuresB) = self.detectAndDescribe(imageB) # match features between the two images M = self.matchKeypoints(kpsA, kpsB, featuresA, featuresB, ratio, reprojThresh) # if the match is None, then there aren't enough matched # keypoints to create a panorama if M is None: return None
The stitch
method requires only a single parameter, images
, which is the list of (two) images that we are going to stitch together to form the panorama.
We can also optionally supply ratio
, used for David Lowe’s ratio test when matching features (more on this ratio test later in the tutorial), reprojThresh
which is the maximum pixel “wiggle room” allowed by the RANSAC algorithm, and finally showMatches
, a boolean used to indicate if the keypoint matches should be visualized or not.
Line 15 unpacks the images
list (which again, we presume to contain only two images). The ordering to the images
list is important: we expect images to be supplied in left-to-right order. If images are not supplied in this order, then our code will still run — but our output panorama will only contain one image, not both.
Once we have unpacked the images
list, we make a call to the detectAndDescribe
method on Lines 16 and 17. This method simply detects keypoints and extracts local invariant descriptors (i.e., SIFT) from the two images.
Given the keypoints and features, we use matchKeypoints
(Lines 20 and 21) to match the features in the two images. We’ll define this method later in the lesson.
If the returned matches M
are None
, then not enough keypoints were matched to create a panorama, so we simply return to the calling function (Lines 25 and 26).
Otherwise, we are now ready to apply the perspective transform:
# otherwise, apply a perspective warp to stitch the images # together (matches, H, status) = M result = cv2.warpPerspective(imageA, H, (imageA.shape[1] + imageB.shape[1], imageA.shape[0])) result[0:imageB.shape[0], 0:imageB.shape[1]] = imageB # check to see if the keypoint matches should be visualized if showMatches: vis = self.drawMatches(imageA, imageB, kpsA, kpsB, matches, status) # return a tuple of the stitched image and the # visualization return (result, vis) # return the stitched image return result
Provided that M
is not None
, we unpack the tuple on Line 30, giving us a list of keypoint matches
, the homography matrix H
derived from the RANSAC algorithm, and finally status
, a list of indexes to indicate which keypoints in matches
were successfully spatially verified using RANSAC.
Given our homography matrix H
, we are now ready to stitch the two images together. First, we make a call to cv2.warpPerspective
which requires three arguments: the image we want to warp (in this case, the right image), the 3 x 3 transformation matrix (H
), and finally the shape out of the output image. We derive the shape out of the output image by taking the sum of the widths of both images and then using the height of the second image.
Line 30 makes a check to see if we should visualize the keypoint matches, and if so, we make a call to drawMatches
and return a tuple of both the panorama and visualization to the calling method (Lines 37-42).
Otherwise, we simply returned the stitched image (Line 45).
Now that the stitch
method has been defined, let’s look into some of the helper methods that it calls. We’ll start with detectAndDescribe
:
def detectAndDescribe(self, image): # convert the image to grayscale gray = cv2.cvtColor(image, cv2.COLOR_BGR2GRAY) # check to see if we are using OpenCV 3.X if self.isv3: # detect and extract features from the image descriptor = cv2.xfeatures2d.SIFT_create() (kps, features) = descriptor.detectAndCompute(image, None) # otherwise, we are using OpenCV 2.4.X else: # detect keypoints in the image detector = cv2.FeatureDetector_create("SIFT") kps = detector.detect(gray) # extract features from the image extractor = cv2.DescriptorExtractor_create("SIFT") (kps, features) = extractor.compute(gray, kps) # convert the keypoints from KeyPoint objects to NumPy # arrays kps = np.float32([kp.pt for kp in kps]) # return a tuple of keypoints and features return (kps, features)
As the name suggests, the detectAndDescribe
method accepts an image, then detects keypoints and extracts local invariant descriptors. In our implementation we use the Difference of Gaussian (DoG) keypoint detector and the SIFT feature extractor.
On Line 52 we check to see if we are using OpenCV 3.X. If we are, then we use the cv2.xfeatures2d.SIFT_create
function to instantiate both our DoG keypoint detector and SIFT feature extractor. A call to detectAndCompute
handles extracting the keypoints and features (Lines 54 and 55).
It’s important to note that you must have compiled OpenCV 3.X with opencv_contrib support enabled. If you did not, you’ll get an error such as AttributeError: 'module' object has no attribute 'xfeatures2d'
. If that’s the case, head over to my OpenCV 3 tutorials page where I detail how to install OpenCV 3 with opencv_contrib
support enabled for a variety of operating systems and Python versions.
Lines 58-65 handle if we are using OpenCV 2.4. The cv2.FeatureDetector_create
function instantiates our keypoint detector (DoG). A call to detect
returns our set of keypoints.
From there, we need to initialize cv2.DescriptorExtractor_create
using the SIFT
keyword to setup our SIFT feature extractor
. Calling the compute
method of the extractor
returns a set of feature vectors which quantify the region surrounding each of the detected keypoints in the image.
Finally, our keypoints are converted from KeyPoint
objects to a NumPy array (Line 69) and returned to the calling method (Line 72).
Next up, let’s look at the matchKeypoints
method:
def matchKeypoints(self, kpsA, kpsB, featuresA, featuresB, ratio, reprojThresh): # compute the raw matches and initialize the list of actual # matches matcher = cv2.DescriptorMatcher_create("BruteForce") rawMatches = matcher.knnMatch(featuresA, featuresB, 2) matches = [] # loop over the raw matches for m in rawMatches: # ensure the distance is within a certain ratio of each # other (i.e. Lowe's ratio test) if len(m) == 2 and m[0].distance < m[1].distance * ratio: matches.append((m[0].trainIdx, m[0].queryIdx))
The matchKeypoints
function requires four arguments: the keypoints and feature vectors associated with the first image, followed by the keypoints and feature vectors associated with the second image. David Lowe’s ratio
test variable and RANSAC re-projection threshold are also be supplied.
Matching features together is actually a fairly straightforward process. We simply loop over the descriptors from both images, compute the distances, and find the smallest distance for each pair of descriptors. Since this is a very common practice in computer vision, OpenCV has a built-in function called cv2.DescriptorMatcher_create
that constructs the feature matcher for us. The BruteForce
value indicates that we are going to exhaustively compute the Euclidean distance between all feature vectors from both images and find the pairs of descriptors that have the smallest distance.
A call to knnMatch
on Line 79 performs k-NN matching between the two feature vector sets using k=2 (indicating the top two matches for each feature vector are returned).
The reason we want the top two matches rather than just the top one match is because we need to apply David Lowe’s ratio test for false-positive match pruning.
Again, Line 79 computes the rawMatches
for each pair of descriptors — but there is a chance that some of these pairs are false positives, meaning that the image patches are not actually true matches. In an attempt to prune these false-positive matches, we can loop over each of the rawMatches
individually (Line 83) and apply Lowe’s ratio test, which is used to determine high-quality feature matches. Typical values for Lowe’s ratio are normally in the range [0.7, 0.8].
Once we have obtained the matches
using Lowe’s ratio test, we can compute the homography between the two sets of keypoints:
# computing a homography requires at least 4 matches if len(matches) > 4: # construct the two sets of points ptsA = np.float32([kpsA[i] for (_, i) in matches]) ptsB = np.float32([kpsB[i] for (i, _) in matches]) # compute the homography between the two sets of points (H, status) = cv2.findHomography(ptsA, ptsB, cv2.RANSAC, reprojThresh) # return the matches along with the homograpy matrix # and status of each matched point return (matches, H, status) # otherwise, no homograpy could be computed return None
Computing a homography between two sets of points requires at a bare minimum an initial set of four matches. For a more reliable homography estimation, we should have substantially more than just four matched points.
Finally, the last method in our Stitcher
method, drawMatches
is used to visualize keypoint correspondences between two images:
def drawMatches(self, imageA, imageB, kpsA, kpsB, matches, status): # initialize the output visualization image (hA, wA) = imageA.shape[:2] (hB, wB) = imageB.shape[:2] vis = np.zeros((max(hA, hB), wA + wB, 3), dtype="uint8") vis[0:hA, 0:wA] = imageA vis[0:hB, wA:] = imageB # loop over the matches for ((trainIdx, queryIdx), s) in zip(matches, status): # only process the match if the keypoint was successfully # matched if s == 1: # draw the match ptA = (int(kpsA[queryIdx][0]), int(kpsA[queryIdx][1])) ptB = (int(kpsB[trainIdx][0]) + wA, int(kpsB[trainIdx][1])) cv2.line(vis, ptA, ptB, (0, 255, 0), 1) # return the visualization return vis
This method requires that we pass in the two original images, the set of keypoints associated with each image, the initial matches after applying Lowe’s ratio test, and finally the status
list provided by the homography calculation. Using these variables, we can visualize the “inlier” keypoints by drawing a straight line from keypoint N in the first image to keypoint M in the second image.
Now that we have our Stitcher
class defined, let’s move on to creating the stitch.py
driver script:
# import the necessary packages from pyimagesearch.panorama import Stitcher import argparse import imutils import cv2 # construct the argument parse and parse the arguments ap = argparse.ArgumentParser() ap.add_argument("-f", "--first", required=True, help="path to the first image") ap.add_argument("-s", "--second", required=True, help="path to the second image") args = vars(ap.parse_args())
We start off by importing our required packages on Lines 2-5. Notice how we’ve placed the panorama.py
and Stitcher
class into the pyimagesearch
module just to keep our code tidy.
Note: If you are following along with this post and having trouble organizing your code, please be sure to download the source code using the form at the bottom of this post. The .zip of the code download will run out of the box without any errors.
From there, Lines 8-14 parse our command line arguments: --first
, which is the path to the first image in our panorama (the left-most image), and --second
, the path to the second image in the panorama (the right-most image).
Remember, these image paths need to be suppled in left-to-right order!
The rest of the stitch.py
driver script simply handles loading our images, resizing them (so they can fit on our screen), and constructing our panorama:
# load the two images and resize them to have a width of 400 pixels # (for faster processing) imageA = cv2.imread(args["first"]) imageB = cv2.imread(args["second"]) imageA = imutils.resize(imageA, width=400) imageB = imutils.resize(imageB, width=400) # stitch the images together to create a panorama stitcher = Stitcher() (result, vis) = stitcher.stitch([imageA, imageB], showMatches=True) # show the images cv2.imshow("Image A", imageA) cv2.imshow("Image B", imageB) cv2.imshow("Keypoint Matches", vis) cv2.imshow("Result", result) cv2.waitKey(0)
Once our images are loaded and resized, we initialize our Stitcher
class on Line 23. We then call the stitch
method, passing in our two images (again, in left-to-right order) and indicate that we would like to visualize the keypoint matches between the two images.
Finally, Lines 27-31 display our output images to our screen.
Panorama stitching results
In mid-2014 I took a trip out to Arizona and Utah to enjoy the national parks. Along the way I stopped at many locations, including Bryce Canyon, Grand Canyon, and Sedona. Given that these areas contain beautiful scenic views, I naturally took a bunch of photos — some of which are perfect for constructing panoramas. I’ve included a sample of these images in today’s blog to demonstrate panorama stitching.
All that said, let’s give our OpenCV panorama stitcher a try. Open up a terminal and issue the following command:
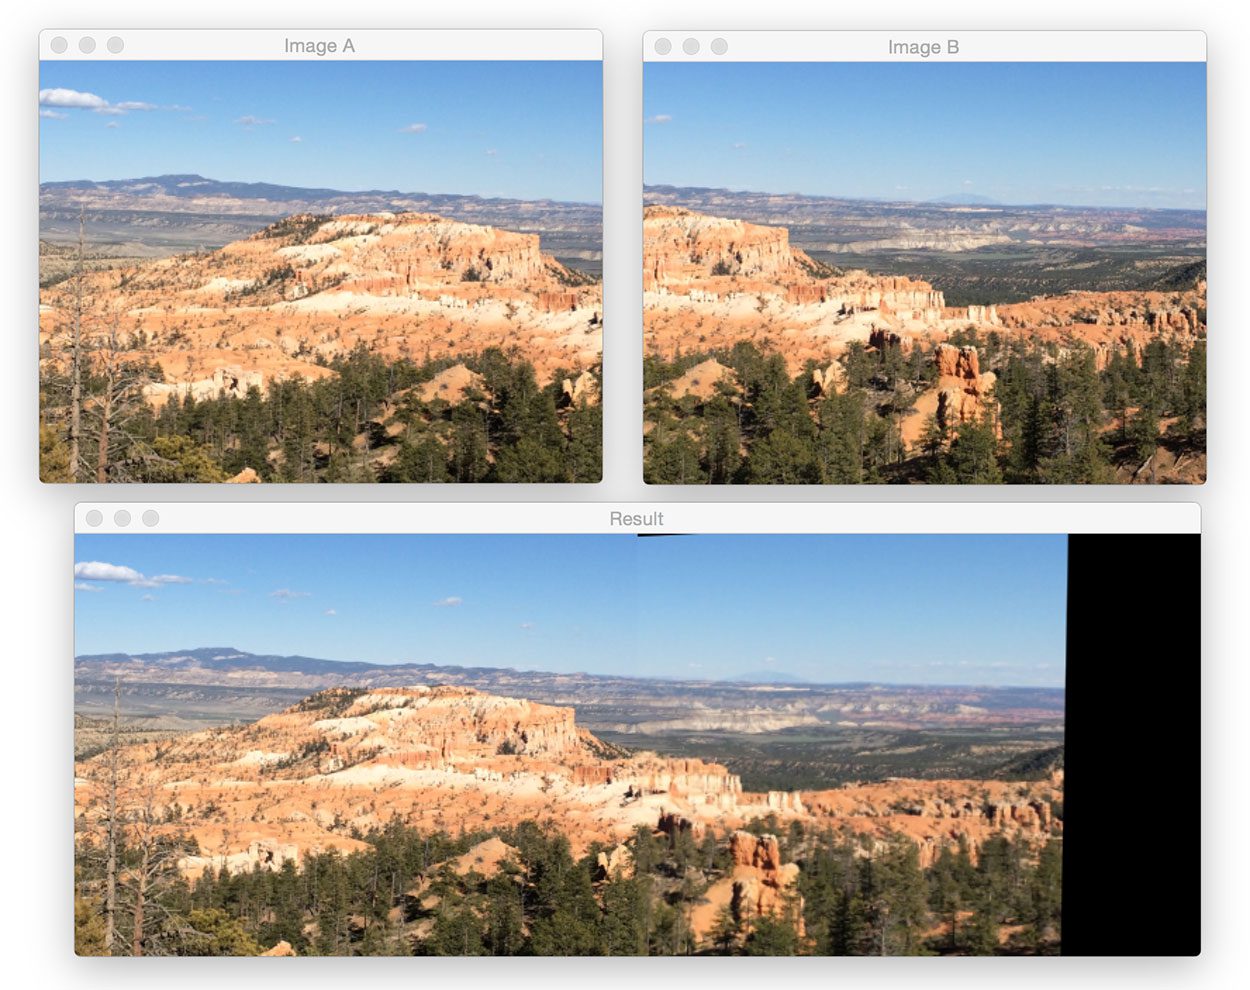
$ python stitch.py --first images/bryce_left_01.png \ --second images/bryce_right_01.png
At the top of this figure, we can see two input images (resized to fit on my screen, the raw .jpg files are a much higher resolution). And on the bottom, we can see the matched keypoints between the two images.
Using these matched keypoints, we can apply a perspective transform and obtain the final panorama:
As we can see, the two images have been successfully stitched together!
Note: On many of these example images, you’ll often see a visible “seam” running through the center of the stitched images. This is because I shot many of photos using either my iPhone or a digital camera with autofocus turned on, thus the focus is slightly different between each shot. Image stitching and panorama construction work best when you use the same focus for every photo. I never intended to use these vacation photos for image stitching, otherwise I would have taken care to adjust the camera sensors. In either case, just keep in mind the seam is due to varying sensor properties at the time I took the photo and was not intentional.
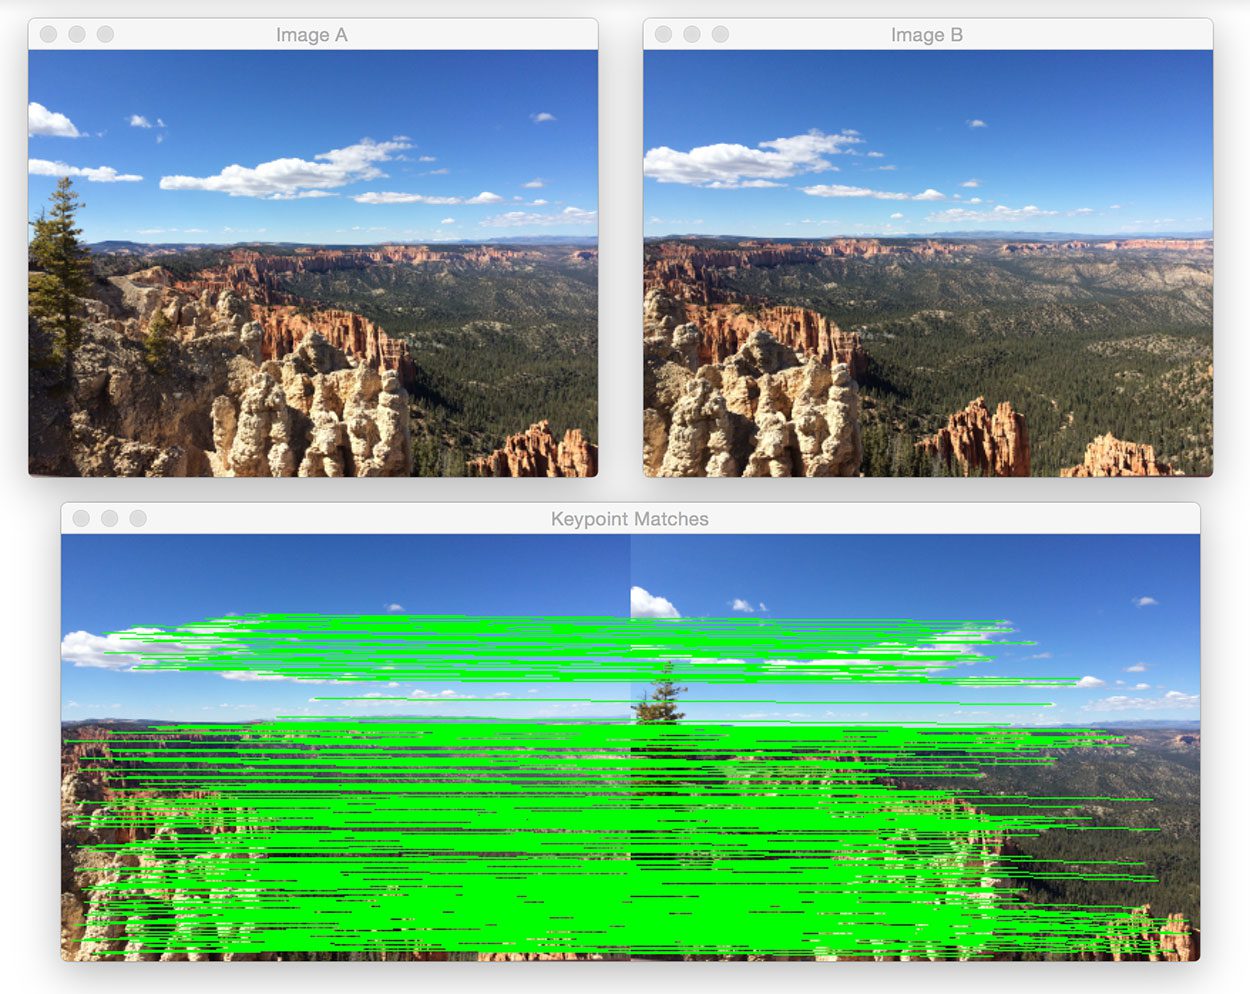
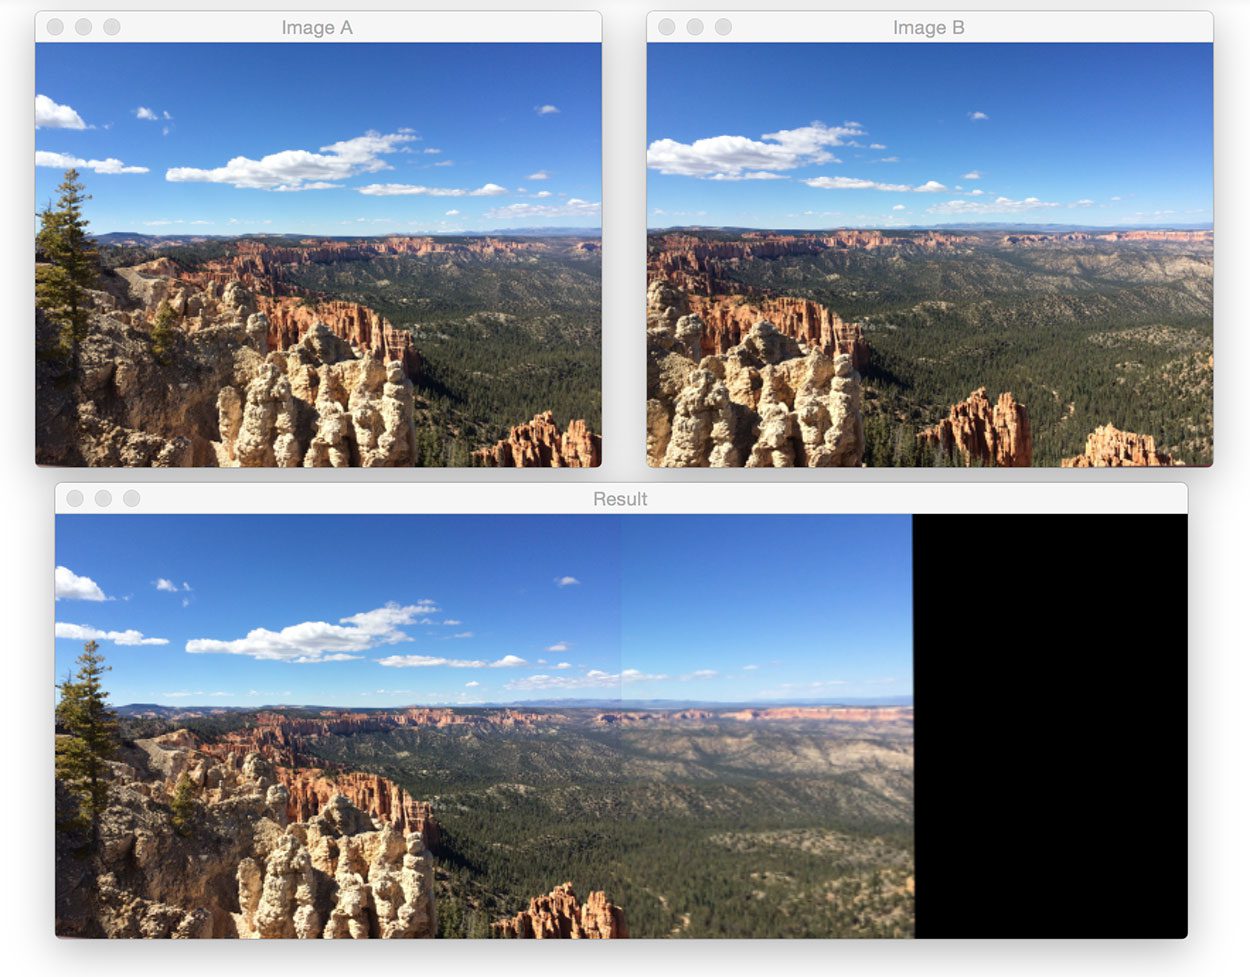
Let’s give another set of images a try:
$ python stitch.py --first images/bryce_left_02.png \ --second images/bryce_right_02.png
Again, our Stitcher
class was able to construct a panorama from the two input images.
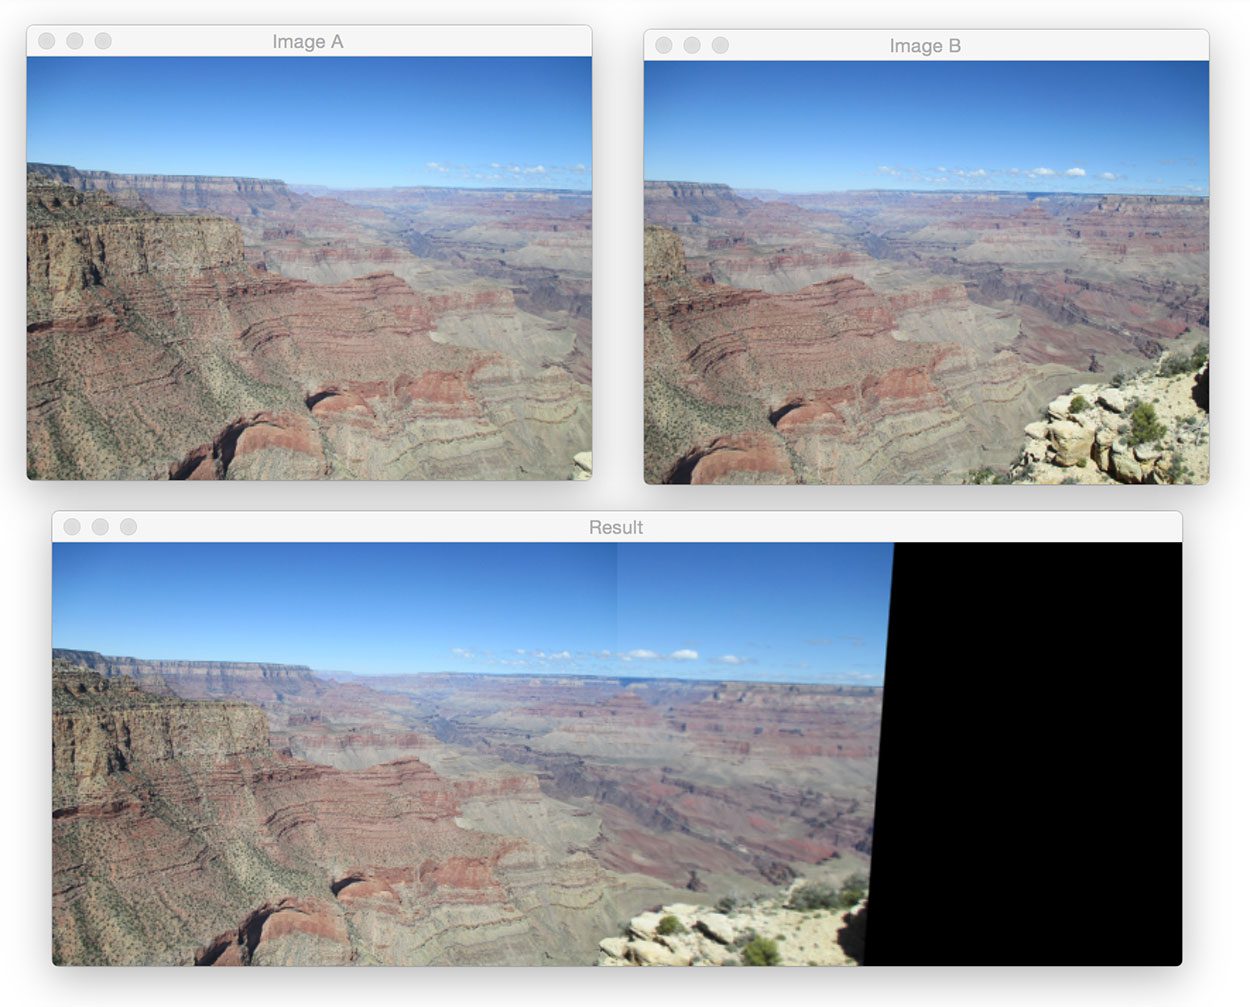
Now, let’s move on to the Grand Canyon:
$ python stitch.py --first images/grand_canyon_left_01.png \ --second images/grand_canyon_right_01.png
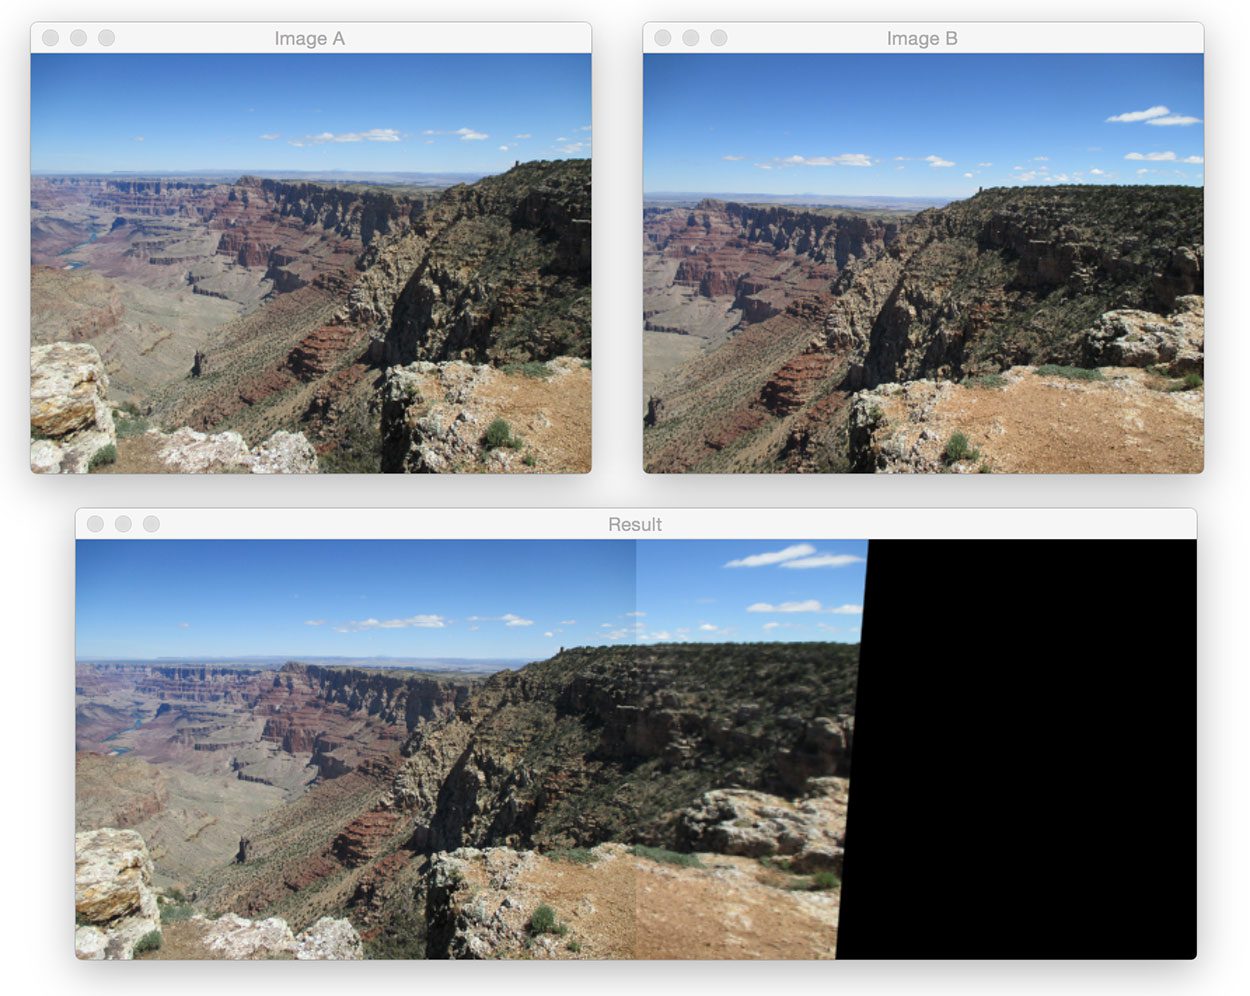
In the above input images we can see heavy overlap between the two input images. The main addition to the panorama is towards the right side of the stitched images where we can see more of the “ledge” is added to the output.
Here’s another example from the Grand Canyon:
$ python stitch.py --first images/grand_canyon_left_02.png \ --second images/grand_canyon_right_02.png
From this example, we can see that more of the huge expanse of the Grand Canyon has been added to the panorama.
Finally, let’s wrap up this blog post with an example image stitching from Sedona, AZ:
$ python stitch.py --first images/sedona_left_01.png \ --second images/sedona_right_01.png
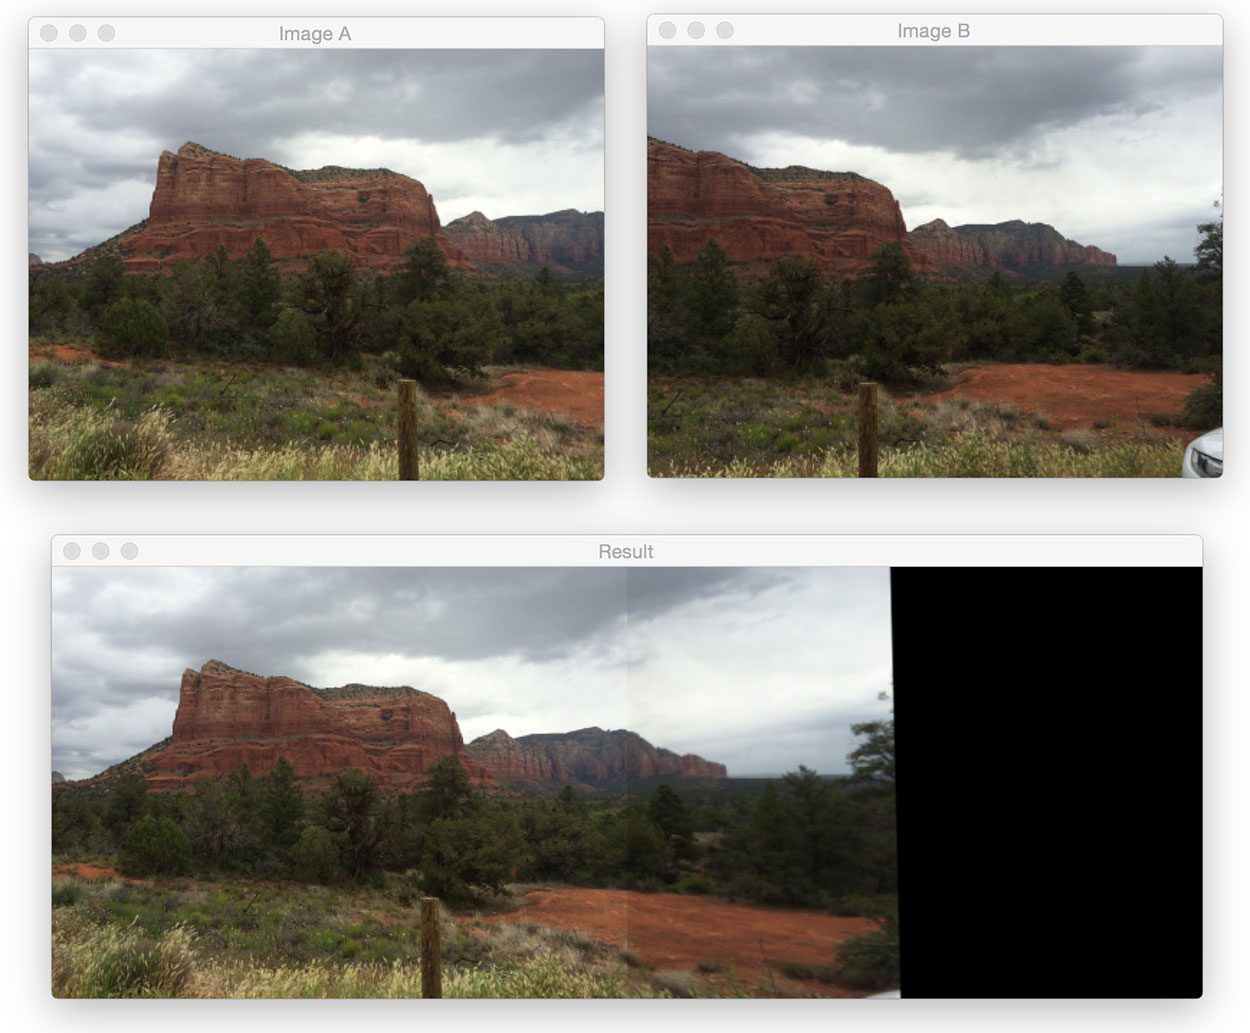
Personally, I find the red rock country of Sedona to be one of the most beautiful areas I’ve ever visited. If you ever have a chance, definitely stop by — you won’t be disappointed.
So there you have it, image stitching and panorama construction using Python and OpenCV!
What's next? I recommend PyImageSearch University.
30+ total classes • 39h 44m video • Last updated: 12/2021
★★★★★ 4.84 (128 Ratings) • 3,000+ Students Enrolled
I strongly believe that if you had the right teacher you could master computer vision and deep learning.
Do you think learning computer vision and deep learning has to be time-consuming, overwhelming, and complicated? Or has to involve complex mathematics and equations? Or requires a degree in computer science?
That’s not the case.
All you need to master computer vision and deep learning is for someone to explain things to you in simple, intuitive terms. And that’s exactly what I do. My mission is to change education and how complex Artificial Intelligence topics are taught.
If you're serious about learning computer vision, your next stop should be PyImageSearch University, the most comprehensive computer vision, deep learning, and OpenCV course online today. Here you’ll learn how to successfully and confidently apply computer vision to your work, research, and projects. Join me in computer vision mastery.
Inside PyImageSearch University you'll find:
- ✓ 30+ courses on essential computer vision, deep learning, and OpenCV topics
- ✓ 30+ Certificates of Completion
- ✓ 39h 44m on-demand video
- ✓ Brand new courses released every month, ensuring you can keep up with state-of-the-art techniques
- ✓ Pre-configured Jupyter Notebooks in Google Colab
- ✓ Run all code examples in your web browser — works on Windows, macOS, and Linux (no dev environment configuration required!)
- ✓ Access to centralized code repos for all 500+ tutorials on PyImageSearch
- ✓ Easy one-click downloads for code, datasets, pre-trained models, etc.
- ✓ Access on mobile, laptop, desktop, etc.
Summary
In this blog post we learned how to perform image stitching and panorama construction using OpenCV. Source code was provided for image stitching for both OpenCV 2.4 and OpenCV 3.
Our image stitching algorithm requires four steps: (1) detecting keypoints and extracting local invariant descriptors; (2) matching descriptors between images; (3) applying RANSAC to estimate the homography matrix; and (4) applying a warping transformation using the homography matrix.
While simple, this algorithm works well in practice when constructing panoramas for two images. In a future blog post, we’ll review how to construct panoramas and perform image stitching for more than two images.
Anyway, I hope you enjoyed this post! Be sure to use the form below to download the source code and give it a try.
Download the Source Code and FREE 17-page Resource Guide
Enter your email address below to get a .zip of the code and a FREE 17-page Resource Guide on Computer Vision, OpenCV, and Deep Learning. Inside you'll find my hand-picked tutorials, books, courses, and libraries to help you master CV and DL!
Still don’t finish to read but looks amazing.
One question: I suppose it can be used to complete a map using different pics of aerial photos
Certainly! Provided that there are enough keypoints matched between each photos, you can absolutely use it for aerial images.
Great topic Adrian.
As for stitching Aerial View imagery – mainly for mapping purpose, can it be used to stitch second image that “overlap” on below part of the first image (not the left-to-right, but bottom-to-upper part of image) ?
Yes, you can use it to stitch bottom-to-top images as well, but you’ll need to change Lines 31-33 to handle allocating an image that is tall rather than wide and then update the array slices to stack the images on top of each other. But again, yes, it’s totally possible.
Unfortunately, the stitcher functionality in OpenCV 3.1 or more precisely the HomographyBasedEstimator and the BunderAdjuster used by the Stitcher class will only estimate camera rotations (no camera translations), i.e. it assumes that all camera centers are approximately equal.
If the camera experience translations (like aerial shots) or translations in general, the obtained results are usually not that great – even though the images can be matched given good keypoints.
Hi Jakob, could you please point me out how what approach could I follow to handle the no-camera-translations problem?
Thanks
Not always! Image stitching works in two situations:
1/ Camera is fixed in position and only allowed to rotate around the optical center, or
2/ Camera is looking at a flat plane in 3D space. Then the position and orientation of the camera are not important.
For aerial photographs the second situation is approximately true in case the distance away from the camera is large compared to the sizes of the objects on the ground.
(see https://staff.fnwi.uva.nl/r.vandenboomgaard/IPCV20172018/LectureNotes/CV/PinholeCamera/Projectivities.html)
BTW this tutorial makes one of the exercises in a course i am teaching dead easy…
Hi adrian,
A very good topic you have covered in this post, thanks for the description, i have a question regarding an OCR problem, i have first version of your book where you have described digit recognition using HOG features, that algorithm works on contour detection (blob based), my question is what may be the other way to approach the problem where i cant get individual contours for each digit or character (Segmentation is not possible), thanks for your suggestion in advance. and a big thank you for writing a very easy to understand book.
Are you referring to cursive handwriting where the characters are not individually segment-able? If so, I think R-CNNs are a likely candidate if you have enough training data. Otherwise, you might want to look at the Street View House Numbers Dataset and the relevant papers associated with high accuracy results.
Hi Adrian thanks for your reply, actually i am working something like vehicle registration data extraction through registration card into a json file, where there are some fixed fields like name and address and their respective variables. i have captured a few images of registration card from a mobile camera so scale varies a lot and in some cases minor orientation changes also there, a big advantage here is there is no hand written letters or digits so variability of data is less, and all alphabets are in upper case, but at the time of segmentation(image Thresholding) some letters got merged in a single blob (or contour) so i cant extract each letter individually. so i cant apply blob based analysis, i have tried few pre-processing steps to separate the blobs but it results in some useful structural information loss, what should i do here.
I would suggest sending me an email so we can chat more offline about it. This post is about panorama construction, not digit extraction, so it would be great if we could keep the comments thread on topic.
Great post. I’ve been wanting to try use OpenCV for orthophoto stitching of aerial photos from drones.
In terms of the seam that’s surely to do with different exposures and not focusing. Typically for landscape photos the focus will be on infinity anyway. Some of the panoramic software I’ve used in the past has a feature to try and equalize the exposures so that the seam isn’t visible. Sounds like potentially a topic for another OpenCV blog post 😉
Great point Sean! I ran a few tests just using images around the apartment captured with my iPhone with a fixed exposure. This got rid of the seam. But of course, it requires that your environment doesn’t change dramatically through the Panorama.
An alternative is to apply a blending mask along the seam, this way you avoid having to adjust exposure between images. If the difference in exposure is small between the neighbouring images, it hides the seam nicely.
Great point Bruno! Perhaps that will be a subject for a future blog post 🙂
Why, in stitcher.stich(), line 15 is (imageB, imageA) = images
when it is called with stitcher.stitch([imageA, imageB]). i.e reversed?
I note that showMatches displays the left and right images exchanged, and correcting line 15 fixes that, but renders the main panorama incorrectly.
Any comments?
It’s more intuitive for us to think of a panorama being rendered from left-to-right (which is an assumption this code makes). We reverse the unpacking in the
stitch
method for the actual matching of the keypoint detection and local invariant descriptors. Again, order does matter when it comes to the stitching of the images.hi adrian i’m vijay i’ve configured the opencv and python in windows and i’ve some doubt….! still to do some project does we need the any ide like eclipes ………? i’ve just stucked in here will you please help me………..
thanks in advance………..
Hey Vijay, I honestly haven’t used a Windows system in 9+ years and I don’t do development with Eclipse, so I’m not the right person to ask about this. Best of luck with your project!
Hey Adrian,
First thanks for your blogpost, really well explained! As for my problem, I am trying to make your code work for three images and I can’t seem to obtain a good result (the right side of the image gets deformed and pixelized).
I did not get to creative I just conduct the exact same operation you did on 2 pictures. First I stitch picture A and B(call the result R1), then picture B and C (R2)and finally I stitch R1 and R2.
You said you’ll post how to do panorama with +2 images, do you have a better algorithm in mind ?
Constructing panoramas > 2 images is a substantially harder problem. I would suggest giving this thread a read for a more detailed discussion on the problem.
Hi Adrian,
great post!
I was wondering if you can help me with this:
http://nbviewer.jupyter.org/gist/anonymous/443728eef41cca0648f1
My images has a black border (results from camera calibration)
The mosaic works great, but I’m struggling in understanding how to get rid of the black borders.
Have you any clue?
Thanks!!!
Massimo.
When you say “get rid of” the black borders, do you mean simply setting the border to white? If so, first create the
result
image usingnp.ones
and fill them with (255, 255, 255) (i.e., white) rather than 0 (black).Hi Adrian,
both original images (A,B) have black pixels at the border (before stitching them together)
See: http://epinux.com/panorama.png
The resulting mosaic has the black border (from image A) overlaying pixels with data from image B.
What I’m looking for is a way to set some sort of transparency
(or perhaps set to null? the black borders )
see the image labeled “desired result” at the link above.
Keep in mind that an image is always rectangular. You can’t set the pixels to “null” since they are part of the image matrix. You can change their actual color (such as making them black or white), but you can’t “remove” the pixels from the image.
Sorry,what I menart is: do you know a way to add an alpha channel to the resulting image ?
If possible, I can then try to set the transparency to 100% where the black borders are.
I would suggest creating an alpha channel that has the same shape as the other channels and then merging all four together:
I haven’t tested this myself, but it should work.
Dear Adrian,
A brilliant tutorial explained with such such simplicity. It really helped me understand and appreciate the Python-OpenCV combo. Thank you
No problem, I’m happy the tutorial could help Koshy! 🙂
Hi Adrian,
Is it possible to save the output image without the black excess? I know it’s because it computed based on the width of the two images, is there a way to save the image without it? If so, how do i do this? Thank You~
I personally haven’t done this, but yes, it is possible. You basically need to find where the black excess is surrounding the image. A hacky way to do this would be to apply thresholding and find the contour of the image itself. A better approach would be to examine the homography/warping matrix and figure out the coordinates of where the valid stitched image is. This will result in some cropping of actual image content, but will remove the black excess. I’ll try to do a blog post on this topic in the future.
Another approach is to use Content Aware Fill with Patch Match Algorithm. https://research.adobe.com/project/content-aware-fill/
This is not a trivial solution though.
When are you going to release a blog about stitching multiple images? You mentioned in this article that you would do it soon.
I would love to do it, but I simply haven’t had enough time as I’ve been working on other projects. I honestly cannot commit to a timeframe for the stitching multiple images.
This is awesome. If it’s trivial, how could I change the code in order to only take the intersection of the two images?
Thanks
Hey Kyle — what you do mean by “intersection of the two images”? Could you please clarify?
By intersection I mean that I only want the parts image portion that is present in both images. I tried using bitwise_and (with the result of your cv2.warpPerspective in the stitch function and with the other image from the panorama), but the image it outputs has it’s colors all messed up. I don’t really know how to create a mask correctly in order to achieve what I want.
Instead of creating a mask, the best option is to explore the (x, y)-coordinates of the matched feature vectors. Find the (x, y)-coordinates of the matched keypoints that correspond to the top-left, top-right, bottom-right, and bottom-left corners. From there, you can crop out the overlapping ROI.
Hello, really enjoying your tutorials but I’ve run into a little snag. I have been trying to get this one to work but I keep getting a typeerror: Nonetype for this line: (result, vis) = stitcher.stitch([imageA, imageB], showMatches=True). I even downloaded the source files too and they don’t seem to work. Pretty new to python so I am not sure why this is happening. Any ideas?
The
stitch
method will returnNone
if not enough keypoints are matched to compute the homography. What images are you using? Are they the same images as in this post or ones of your own? If they are ones of your own, then there are not enough matched keypoints to stitch the images together. In that case, I would try different combinations of keypoint detectors and feature descriptors. It could also be the case that the images simply cannot be stitched together.Ah okay, that’s good to know! I guess that the images don’t have enough keypoints then. And I did get the posts pictures to work, I was using two of the left images instead of a left and right… Looks like it was mainly human error. Thanks for the help and information though!
Hi Adrian,
I am having the same problem as Wayne, where nothing is being displayed, however I am not even getting an error message. I tried running with photos from this post and still nothing showed up. Using print statements I’ve realized the problem originates in line 61. It seems like the code just stops after that line because any print statement after line 61 is not displayed.
I’d really appreciate your help.
Hey Maggie — see my original reply to Wayne. The
stitch
method is returningNone
. When this happens not enough keypoints are matched between the two images. If not enough keypoints are matched then you cannot stitch the images together.What do you think would have to be done to make the stitching not care whether you gave the left photo first or the right photo first?
This becomes very problematic because at least one of the images needs to act as a “reference point”. This is why panorama apps normally tend to make sure you move from left-to-right or down-to-up. Without setting an initial reference point, you have to resort to heuristics, which often fail.
So I’ve being looking at this for a bit now, and have managed to find something that you may be interested in.
I plotted all the matched points (called “matches” from line 30 in your code) of when images are inputted left to right and when inputted right to left. I found out that these points make roughly a line, and it is possible to calculate the slope of such a line.
The slope of the left to right instance should always be smaller than the right to left instance. Therefore it’s possible to throw in a simple if statement and make a swap of variables.
I have tested this theory with many images, and it seems to work very well. I have a couple others in my code for special cases (like being equal for example). Just thought you or some reader would be interested to know.
Thanks for sharing, and great investigative work! This is certainly an interesting heuristic — however, it’s a heuristic that is easily broken. For certain situations though, this might work well enough.
you can do the same program in c ++
Hello Adrian
Thanks for a wonderful post on image stitching. This is kind of faster then
C++ example I had tried earlier.
I had a query though on the topic. How can you stitch 3 or 4 images to get one panrama image? What changes are needed in this code?
Regards
Amey
Stitching > 2 images together is substantially harder than stitching 2 images together. The code has to change dramatically. I will have to write a separate blog post on this, but I’m honestly not sure when I’ll be able to.
How to remove the black portion in stitching if you are going to stitch about 10 images together when kindda creating an aerial map
Hi Adrian, I’m so grateful for that brilliant Tutorial … but I have a problem !
when I try to run the code from Terminal nothing will be shown on screen although it gives NO error and –first/–second parameters are set perfectly .. I have the the latest version of OpenCV, is there any suggestion to help me, please my project should be finished in less than a week … wainting for ur reply … thanks again 🙂
If nothing is getting displayed to your screen, then it sounds like the homography matrix isn’t being computed (in which case there are not enough keypoint matches). I would suggest inserting some
print
statements to help you debug where the code is existing.Awesome Mr. Adrian. Love you blog.
I have a question. I am trying to run this program. Getting this error line 33
result[0:imageB.shape[0],0:imageB.shape[1]] = imageB
ValueError: could not broadcast input array from shape (302,400,3) into shape (300,400,3)
Hey Sri — based on the error message, it looks like
imageB
has a different height than theresult
image. Try changing the code to this and see if it helps:Hi Adrian,
You are calling stitch.py with the left image as first argument, that becomes imageA, and you warp it with warpPerspective. But what you say in the text is that warpPerspective gets as input the image we want to warp: the right image.
So I don’t know what I’m missing here.
Thanks.
PD: I’m going send you my previous comment tomorrow.
Very informative post. Thanks for it. I just wanted to know can you direct me to some post which is about spherical stitching. Actually i have 7 images from gopros (Including top and bottom) I want to create a spherical panorama from it. Any idea how that can be done.
I don’t know of any tutorials related to spherical/fish eye image stitching, but if I come across any, I’ll be sure to post them here.
Thanks Adrian. That would be of great help.
Hi Adrian,
Great blog. Thank you for your valuable time. I learned a lot.
I am also looking for algos to stitch fisheye images.
It would be great if you can share any info you find relevant to this.
Thanks,
Tiru
Hi Adrian, excellent work with this example.
I’m trying to implement image stitching from a video using this example , but I cannot make it work, none of images retrieves from video have successfuly stitched together. I’ve searched a lot of examples using OpenCV with Java, C# and Python. Please if you can send me some highlights to accomplish image stitching from a video it would be great!! thanks in advance 😉
Have you tried using my example on image stitching from video?
Thank for your quickly response! 😉 I’m trying to do something like this: https://www.youtube.com/watch?v=93jOLlObfuE
Thanks for sharing. I’ll certainly use that video as inspiration when I create the future tutorial on > 2 image/frame stitching.
Awesome! I’ll be waiting for your tutorial to test it! thanks again! 😉
helle Felipe , i am working on a project where i shoud have something like the video you shared.
Do you have some helpfull information ?
Hey Adrian,
I was wondering if it would be possible to take multiple images of a slide and stitch these together to create a very high resolution image of the whole slide. If so I was wondering why when I run the code it says segmentation fault (core dumped)
You’re likely trying to stitch together very large images and thus detecting TON of keypoints and local invariant descriptors (hence the memory error). Instead, load your large images into memory, but then resize them to be be a maximum of 600 pixels along their largest dimension. Perform keypoint detection and matching on the smaller images (we rarely process images larger than 600 pixels along their maximum dimension).
Once you have your homography matrix, apply it to your original high resolution images.
I am getting this error as well. It happens even when I use smaller images. It seems to be related to this line:
kps = detector.detect(gray)
How small are your “smaller” images in terms of width and height? Also, which version of OpenCV are you using?
hello felipe you can see your code.
thank you
Great Tutorial this is awesome! I had an interesting idea. I was wondering if it was possible to combine photos of different sizes based on your code. As a project I want to use a video to create a panorama. Using OpenCV to parse through the frames I would stitch one photo to the combined strip. This would mean that the left/first photo would be a lot wider than the right/second photo. Just looking for your opinion. Also your book is great I have been using it for my research.
Your images certainly don’t have to be the same size or from the same camera sensor to be stitched together provided enough keypoints match; however, I think you’re going to get mixed results that may not be aesthetically pleasing. If one image has a different exposure than the other then you’ll need to correct the final image by applying image blending.
Hay Andrian,
Please post the multiple image stitching it would be great please…
hi Adrian,
How can I evaluate quantitatively different feature descriptors and extractors performance on the same image pair? Which parameters can tell me about the accuracy of feature matching using different descriptors and extractors? Is Lowe ratio or repError doing that also?
If I understand your question right you are trying to determine which set of keypoint detectors and local invariant descriptors perform best for a given set of image? The Lowe ratio test is used to avoid false positive matches. On the other hand, the RANSAC method is used to actually spatially verify these matches.
Hi Adrian,
I was wondering if you happened to do the other blog post where you stitched multiple images together? I modified ur code from this example to linearly stitch images but am struggling to find a way to stitch images regardless of orientation. Any help is appreciated.
Also If you know of any tutorials on how to build the opencv_conrib modules for opencv 3 on windows that would be a god send.
Thanks for your help,
Cheers.
Hey Chris, I haven’t had a chance to write up another blog post on image stitching. Most of my current posts have been related to deep learning and updated install tutorials for Ubuntu and Mac (I don’t support Windows on this blog). I’ll try to circle back to the image stitching post, but I honestly can’t say when that might be.
Thanks for getting back to me:)
Cheers,
Hi Adrian,
Sorry for all the questions. I was curious as to why you used the imutils package to resize your images instead of the built in resize function in OpenCV? are there any advantages or tradeoffs?
Thanks in advance.
Cheers,
My
imutils.resize
function automatically takes into account the aspect ratio of the image whereas thecv2.resize
function does not.Hi Adrian!
First of all, thanks A LOT for that and all the other contents I’ve been using a lot since I got an interest in image processing with Python!
I enjoy a lot both the quality and the pedagogy of your guides & solutions 🙂
I have a question about this one I can’t find the answer of on my own: I’m trying to get a “reduction factor” of the homographies I compute.
Which would mean something like: if a segment measures 10 pixels before warping, how long is it after warping. Because of deformation, there’s no unique value but I guess it could be possible to have the value range?
I was thinking maybe calculate the total distance between all matching key points on image A then the total distance between all matching key points on image B and calculate the ratio of those 2 values? If there’s enough and well-reparted matching points that should give me an average reduction factor shouldn’t it?
Unless there’s something built-in and more reliable with a cv2 function?
Thanks again for everything 🙂
Hmmm, this is a good question. I’m not sure there is a built-in OpenCV function to do this. By definition applying a perspective transform is going to cause the images to be warped. I guess my question is what are you trying to accomplish by computing this value?
Hello, could you explain how to use SURF with RANSAC but without using the cv2.findHomography () function because I want to use the cv2.getaffinetransform
Thanks
hello,
I think we don’t have to use imutils I executed code without imutils and it works fine and quality is also good compared to imutils substituted input image
In this example
imutils
is used to (1) determine your OpenCV version and (2) resize your image. You can modify this code to not useimutils
, but it is highly recommended.thank you if images are resized only by width I got broadcast error. So I removed the lines
imageA = imutils.resize(imageA, width=400)
imageB = imutils.resize(imageB, width=400)
and worked fine
then I tried
imageA = imutils.resize(imageA, width=400,height=350)
imageB = imutils.resize(imageB, width=400,height=350) and worked fine
it worked fine.May be you can add this change to your tutorial
Thanks again for all your effort into building this OpenCV community. I had a question regrading the photos themselves. You implementation requires a certain order for the images to be piped into your program. TO my understanding this is due to the warp perspective and the way you link the images from line 31-33 in panorama.py. I was wondering if there is a way to modify that section of code to allow for any order of images to be passed through (I’ve been trying my own thing to no avail)?
Thanks for any help in advance.
Chris
You are correct, we assume a specific order passed to the function — this is by far the easiest method. For multiple images you actually keypoint matching on all the frames and then define a “path finding” algorithm that can order the frames. But for two images, I think it’s much easier to define a function that expects the images in a specific order.
Do you know where I might be able to find out more information regarding these “path finding” algorithms to allow me to input an unordered image set?
Again thank you for all your help.
Take a look at Dijkstra’s algorithm and dynamic programming to start. I don’t know of any examples off the top of my head that implement this explicitly for image stitching. But again, this will (ideally) be a topic that I’ll cover in a future PyImageSearch post, I’m just not sure when.
Hi,
I am new to opencv and image processing. Please anybody help me to solve this error. I am even unable to figure out its meaning.
usage: stitch.py [-h] -f FIRST -s SECOND
stitch.py: error: argument -f/–first is required
You are not supplying the image paths via command line argument. Please take the time to brush up on command line arguments before continuing.
Would it be possible to create a solution with this that stitches stereo video? Working on a project for school and looking for some insight. Thanks.
Yes, absolutely. In fact, I’ve already done a blog post on the topic.
Thank you for your response! I actually did find that blog post later, and you’ll notice that I made a comment on there as well, I’m curious about how one might go about streaming the stitched video to something like a VR headset, or just streaming it in general. Just looking for some ideas.
Thanks again!
I don’t do any work with VR headsets; however, there are a number of different streaming protocols. I would suggest doing research on your particular headset and see if it’s possible to stream the frames from the headset itself. Regarding streaming in general, I plan to cover that in a future blog post, although I’m not entirely sure when that will be.
Thanks Adrian for a very clear tutorial. I was wondering if you could help me a bit further how to stitch four images together (2×2 grid), or guide me in the right direction. Basically I have four cameras in a grid filming a large space and which overlap by 1/5th of the space on the sides and top/bottom. I got your script working on two side-by-side images, but how could I adapt your script to stitch all four images together? Is there an easy way to adapt your script by first stitching the top 2 and then the bottom 2 and then stitching those new top and bottom images together? Any help is appreciated. I will then actually try and use the stiching parameters to use in stitching frames from the video together.
Thanks again!
Are these cameras fixed and non-moving? If so it might be easier to simply calibrate the cameras and perform projection that way.
Hi Adrian,
We are also looking for a way to stitch video from multiple cameras together. IN our arrangment, the cameras are pointing from the edge of the space towards the center of the space, the opposite from most rigs today. This arrangment is basically bullet time. If we align our cameras to have the same centers (for example put one on each of four walls in a room at the same x/y on each wall) can we stitch the video together?
Thanks, I hadn’t seen you reply hence the delay. Yes the cameras are fixed and non-moving. I calibrated them to account for any distortion of the lenses. But then using your script on just the top two cameras it does warp the right camera based on the left. I would like all four to be stitched with all having the ability to be warped. Do you have any further tips, also what you mean regarding calibrating the cameras? I appreciate it!
I don’t have any tutorials on camera calibration here on the PyImageSearch blog, but I would suggest starting here.
Hi Adrain, thanks for the code and guide.
I was wondering how may I perform a cylindrical/inverse cylindrical projection before of the candidate images to be stitched together. This will help me to stitch multiple images taken from a rotating base.
Thanks again.
Absolutely. I will try to cover cylindrical projections in a future blog post.
Hi Adrian,
Thanks for your sharing! Now the output panorama is left photo overlaps right photo. I am wondering which part of code should I change to make right photo overlaps left photo? Thanks!
You would want to swap the left and right images on Lines 31-33.
Does not work on Raspberry Pi 3 but it works on PC windows 10
Any ideas?
AT first it complained about an extra agument showMatches in stitch call.
Then I removed it and now it say “Segmentation fault” on 320 x 240 images…
I use python 2.7…
The segmentation fault is helpful, it’s likely that this is a local invariant descriptor issue. I would start to debug the problem by inserting
print
statements throughout your code until you can narrow down exactly which line is causing the seg-fault.Also, make sure you use the “Downloads” section of the post to download the code (if you haven’t done so already) rather than copying and pasting. This will ensure you are using the same codebase and project structure.
I am using Python v. 2.7 and cv2 v. 2.4.9.1
Hey Adrian,
I’ve see your tutorial page that shows how to install OpenCV 3 with opencv_contrib support enabled, but I didn’t see the way for windows, can you please upload one?
Thank you so much!
Hi Carol — I actually don’t have any Windows install tutorials. Sorry about that! When it comes to computer vision and OpenCV, I highly recommend that you use a Unix-based environment.
Hello Adrian,
I’m having this error message:
usage: stitch.py [-h] -f FIRST -s SECOND
stitch.py: error: argument -f/–first is required
When i try and run the stitch.py
I extracted the files to a folder and just ran it on Python2.7.13
Did i do something wrong ? it’s not working.
You need to read up on command line arguments before you continue.
I still don’t quite get it.
Can you tell me what to do step by step after downloading the zip file?
When and if you get a chance. It would be really helpful.
I personally do not know much of python since i was taught on Java and a little bit of C++.
I got on the command line and went to the file (i put it on my desktop and did “cd desktop => panorama-stitching” and tried to run stitch.py) and had that trouble.
and doing “stitch.py bryce_left_02.png bryce_right_02.png” had the same result.
Thanks.
Hi Enkhbold — while I’m happy to help point readers in the right direction, the PyImageSearch blog does assume you’ve had some basic programming experience and are comfortable working with the command line. I can’t provide step-by-step instructions on how to execute a Python script. I would recommend you go through my list of recommended Python resources to help you learn the basics first.
Was able to make it work (found the comment on top of the stitch.py) i was trying “python stitch.py –first images/bryce_left_01.png \ –second images/bryce_right_01.png” from the picture above and what made it not work was that backslash.
Now i want to stitch multiple images can you provide the page you talked about that if you made it ?
Me and my teacher are trying to make a program that constantly reads images from a video and saves it into a big panoramic picture to make it easier for watchers to see what was on a few secs or way back whenever they want.(the idea came from MIT lectures and because the video can only show so much, or it would make things impossible to read since its too small)
So again, Is there a multiple image stitching method you made that i can take a look at ?
Hi Enkhbold — I have not written a tutorial on stitching multiple images together yet. I’m not sure when I will get to it, but I will try to cover it in the future.
Hi,
There is a reason that you sending in stitcher line 55 the RGB image and not the gray one? (OpenCV3 option)
attached:
(kps, features) = descriptor.detectAndCompute(image, None)
instead of
(kps, features) = descriptor.detectAndCompute(gray, None)
I’m trying to do something similar with videos, I have two cameras, one PTZ and one wide and I’m drawing a rectangular on the wide one of what the PTZ is showing and it’s really slow, I tried to use threads but still not close to real time. any suggestion?
Thank you for pointing out this typo — we typically detect keypoints and extract local invariant descriptors from grayscale rather than multi-channel images. The
gray
image should be used instead, but in most cases you won’t notice any changes in performance.I want to control a servo depending on the overlap between two pictures .. is no overlap I will rotate the servo till there is .. I tried to push two pictures of different places and it still finds keypoints .. how can I prevent that or at least increase the occuracy
is there anyway to know the overlap % between two pictures !?
Yes, absolutely. A good way to approximate the overlap is to match the keypoints. Once you have the (x, y)-coordinates of the matched keypoints in both images you can determine how much of image #1 overlaps with image #2.
Hello Adrian and thanks for your post.
Is that necessary using Homograpy? Or it just use for better resaults?
Thanks.
It is necessary to compute the homography as this allows us to estimate the affine transformation.
Thanks for your answer. Yes its right, because we have more than 4 points. Thanks again Adrian.
Hi Adrian, very good job. I want to know how to make the mosaic but without reducing the quality of the images and the resulting mosaic. Greetings.
Apply keypoint detection, local invariant descriptors, and RANSAC to the resized images, but then apply the homography transfer to the original, not resized images.
Thank you very much, it worked for me but half of the mosaic is presented (I work with four aerial images). In other words, I do not work with a horizontal panorama, rather a square panorama.
Hi Adrian, Thank you for the tutorial. I wonder how to warp the left image to match the right image instead of warping the rigtht one to match the left one. Thank you.
I tried to change the parameter of warpPerspective from imageA to imageB and cover the columns 400:800 with imageA, but the left image does not stitch to the right one
Make sure you update Line 33 where the images are actually stitched together.
Line 33 what does it represent me ??
Line 33 is responsible for stitching the actual images together. It accomplishes this via NumPy array slicing.
Hi Adrian, Great post as usual.
Btw, I wonder about stitching not in panorama way, but match and stack two image with different size, for example: image1 size = 500×500, image2 size = 100×100. image2 is part of spatial area on image1 so it should have high matches keypoint. But when I try with your code, It was said : “could not broadcast input array from shape (…) into shape (…).
I knew this error was already asked before but how about this specific problem?
fyi, I try to make image2 size same as image1 with framing it with black pixel, but image2 always behind on image1.
I try to change the black frame into alpha channel too, but after I try to match it, the alpha channel frame become bright red.
Thanks in advance
Hi Evan — this is a bit more challenging, but you would need to compute the size of the new, resulting image manually. Take the coordinates of the matched region, compute the overlap, and subtract from image2. This will give you the new dimensions that you need to “pad” the output image by in order to apply the array slicing.
Hi Adrian, thanks for replying – The compute the overlap part I still didn’t know. Is overlap calculation is a kind of image registration method? It seems overlap calculation is dragging reference image into sensed image.
Thank you
You can actually compute the overlap percentage by examining the (x, y)-coordinates of the matched keypoints. Loop over the coordinates of the matched keypoints and examine their coordinates.
How does the stitching happen, I mean how does it define the overlapped area or the key features between two images ? does it compare the RGP of each pixel ?!
The area of overlap is determined by detecting keypoints, extracting local invariant descriptors, and applying the RANSAC algorithm to determine keypoint correspondences. If you are interested in learning more about this technique, I cover it in both Practical Python and OpenCV and inside the PyImageSearch Gurus course.
HI Adrian, your post really helps me a lot.
I’m working on a dual fisheye camera stitching project, that is to stitch the two equirectangular projections of two fisheye images.
So I tried to apply your solution here as the stitching method. But the result I got was unsatisfactory. The “right” image was usually warped too much.
It’s probably because the distortion made by equirectangular projection affects the homography matrix.
Do you have any idea to deal with this?
Or, are there any stitching method having better performance on fisheye stitching?
Thank you!
Hi Cynric — I have not worked with fisheye lenses before, so unfortunately I do not have any guidance in this specific instance. Best of luck with the project!
Thanks for your reply
Hey Adrian,
Great post and a great blog overall! It was very easy to understand, even as a beginner. I tried to modify this code to stitch multiple images (not the best way to do it, but it kinda works). I’m cropping out all the black regions that are left out after the stitching is done and then go on and stitch the next image alongside. However, after stitching a few images, it starts going out of the plane, resulting in a completely stretched out image.
I’ve gone thru’ all the comments and the topic of ‘multiple image stitching’ keeps coming up again and again. It would really help all of us if you could do a tutorial on that. I did find some other tutorials on this topic but they’re nowhere as close to simplicity as this one. I hope you respond to this request soon!
Thanks.
Hi Shreyash — thank you for the request, I will certainly consider it for the future.
Adrian,
I somehow managed to stitch multiple images using this code but after stitching a few images I get the following error:
ValueError: could not broadcast input array from shape (320,480,3) into shape (297,480,3)
I tried the solution you gave above, but that didn’t work.
Also, can you please explain this line of the code:
result[0:imageB.shape[0], 0:imageB.shape[1]] = imageB
Thanks!
The code:
result[0:imageB.shape[0], 0:imageB.shape[1]] = imageB
Is simply a NumPy array slicing. You can read more about NumPy array slicing here, as well as inside Practical Python and OpenCV.
Thanks for the reply Adrian!
I understand that this line is slicing the ‘result’ array or in simpler terms, we are cropping the image. But what I don’t understand is the flow of the code in this line.
Are we taking a slice of that array and equating that to imageB, thereby superimposing imageB on top of the result, which completes the stitching? Please correct me if I’m wrong.
Also, can you please explain why does slicing a numpy array like this result in broadcasting errors?
Thanks again!
Instead of trying to detail every aspect of “broadcasting” and how it turns up in error messages, I think it’s best that you review the NumPy documentation on broadcasting. In this case, it seems that the output dimensions of the image cannot hold the slice.
The result of the code
0:imageB.shape[0]
starts from y=0 to y=imageB (height). The second slice,0:imageB.shape[1]
starts from x=0 to x=imageB (width). Then,imageB
is stored in this slice of the result.Hey Shreyash, could you share with me your modified code to stitch multiple images? Or give me some tips on how to do it from Adrian’s code?
Thanks!
Hi Adrian,
When i ran the above code i got this:
Traceback (most recent call last):
File “stitch.py”, line 16, in
(result, vis) = stitcher.stitch([img1, img2], showMatches=True)
TypeError: ‘NoneType’ object is not iterable
I am actually initialising 2 webcameras and taking input from them rather than using argparse. Rest of the steps are as you have mentioned above. I have checked and both img1 and img2 are initialised(I used imshow). Can you please help me out
I know you mentioned validating the images via
cv2.imshow
, but I would double and triple check this. It really sounds like that one or both of the images you are trying to stitch are not being properly read from the webcam(s). I discuss these types of NoneType errors in this blog post.Hi,
I went through the link and as suggested, have verified both cv2.VideoCapture and cv2.imread. I am not missing any codecs and rest of the codes are running just fine. What else can I check??
No I am sure that the image is loading. I have used imshow as well as first wrote the frames from videostream then loaded through imread. Still giving the same error
That is indeed quite strange behavior. I’m not sure why this may happen off the top of my head. I would start inserting more print and cv2.imshow statements into the code until you can see exactly where the error happens.
Hi Adrian,
The error was not with the image but actually with the M. For some reason it always returned None.
The error it shows while i tried to debug is
OpenCV Error: Bad argument (The input arrays should be 2D or 3D point sets) in findHomography, file /home/ayush/opencv/opencv-3.2.0/modules/calib3d/src/fundam.cpp, line 341
.. (H, status) = cv2.findHomography(ptsA, ptsB, cv2.RANSAC,reprojThresh) error: (-5) The input arrays should be 2D or 3D point sets in function findHomography
Any insights on why this is happening??
It sounds like not enough keypoints and local invariant descriptors are being detected and matched. How many keypoints are being computed for each image?
Hi Adrian,
I’m just curious, if I would like to move the seam to the left – say, stitch it a little bit to the left, maybe more central – does that mean I have to restrict region of matching points on the right-hand-side image? How else could I achieve that…?
Thanks!
I’m not sure what you can by “move the seam to the left”. Can you elaborate on your question?
At this moment, on the stitched panorama, there is 100% of the imageA (left). I meant to only include 70% of the left image.
If you want to only include 70% of the left image you would either (1) crop the left portion of the image you don’t need via NumPy array slicing or (2) after detecting keypoints, remove any keypoints from the list that fall into the 30% range that you do not want to stitch. This can be accomplished by examining the (x, y)-coordinates of the keypoints.
Hi Adrian,
I would like to move the seam a bit to the left, say in the middle of the left-hand-side photo? Is it possible by restriction of keypoints on the right-hand-side photo? Or, is there another more efficient way ?
Thanks!
sorry for two questions, my browser must had played tricks on me… 😛
Hi Adrian,
Is it possible to change panorama projection from Equirectangular to rectilinear in python?
Hi Adrian,
Thank you so much for this post!
Is there any parameter I could use to neutralize the rotation of the pictures during the stitching?
Hi Mika — I’m not sure what you mean by “neutralize” the rotation.
Hi,
Using a microscope, I took pictures of a sample from above line by line:
I “split” the sample into squares, took a photo of each square in the line, and then moved to the next line.
Now I am trying to stitch them all together to get a picture of the whole sample.
Therefore, I don’t want the algorithm to rotate the pictures more than 1-2 degrees in trying to match the keypoints, and if it is possible, I had like to create an adjusted homography (or change another parameter), to optimize the algorithm.
I’m not an expert in microscope-captured images and it’s also a bit hard to provide a suggestion without seeing example images. However, if you’re worried about a 1-2 degree rotation than I’d be concerned about the quality of the matched keypoints you are receiving in the first place. Cellular structures can look very similar and aren’t exactly the intended use case of keypoint detectors + local invariant descriptors. It may be the case that this panorama stitching method isn’t appropriate for your images.
I used a few filters and I have managed to find the right keypoints. Now I am trying to calculate the translation and stitch the images according this parameter only (instead of using the knnMatch function). Thanks a lot any way!
I need to stitch 4 images from a 4 camera array. Can the stitch procedure be extended to do 4 or would I need to do the two pairs then stitch those? Can the opencv routine handle more than 2 images?
The method I presented in this post is only intended for two images. I’ll try to cover image stitching with more than two images in the future.
What do you think about large images with high resolution? images with size near GB.
You could try resizing your input images to 500-600px along the maximum dimension, obtaining the transformation matrix M, and then applying the stitching to the original large images using the matrix M.
Hello Adrian!
Thank you so much for the tutorial. It helped me a lot in the process of understanding the stitching pipeline. Currently, I’m trying to convert the code to C++, in order to use OpenCV CUDA functions while warping images. However, I didn’t understand what happens in lines 92 & 93:
ptsA = np.float32([kpsA[i] for (_, i) in matches])
ptsB = np.float32([kpsB[i] for (i, _) in matches])
Could you please explain how ptsA & ptsB are obtained from kpsA and kpsB? There is a similar notation in line 69:
kps = np.float32([kp.pt for kp in kps])
In this one, at every iteration of the for loop, we take an object “kp” from kps, and append it’s “pt” property to the kps on the left hand side of the equation. However, the notation used in 92 & 93 looks a bit different and I couldn’t understand what (_, i) and (i, _) mean, and what is the correlation between the elements of the matches vector, and kpsA[i] and kpsB[i] elements. I would be glad if you could help me with this part.
Thank you for your time.
Hi Deniz, thank you for your comment. Converting this code to C++ is quite the task but you will achieve some speed. It seems you have 2 questions so I’ll answer them both.
1) List comprehension in Python is just a concise notation for building a list.
2)
(i, _)
is tuple notation. In general the_
means that you don’t care about the value and you are ignoring it. It’s a Python convention.Thank you so much for your answer Adrian. I will take look at the examples to understand the notation.
Hi Adrian,
I have ran your image-stitching code. I now would like to modify it to implement an image-stitching algorithm for more than 2 images. Could you give me some hints/tips/references on how to do that?
Thank you.
Working with more than two images dramatically changes the algorithm. It’s too much for me to cover in a comment — I will try to do a detailed tutorial on multi-image stitching.
hi bro your site is very good for me thanks for every think i want to use this source real time i mean i want to make this : my drone is flying and take pictures number 1 and save it and in a few later in certain location using gps take another shot so i want to stitch image 2 and 1 and 3 or many more image and make map or mapping so can you help me to do that ?
I cover real-time image stitching in this post. I will try to cover more in-depth image stitching (including panoramas with more than two photos) in a future blog post.
Awesome! I’ll be waiting for your tutorial to test it! thanks again! ?
how can i stitch more than two image? i mean stitch 50 image and create air map can you give me a link or something and if you can post in futures please tell me when? thank you for every think
Hi James — I do not have any resources directly for putting together an aerial map. I cannot say when I will cover a tutorial on that in the future, but I will certainly try to.
Adrian,
Thanks for the post! While I have this working for the most part one quick question. I’d like to hard mount my cameras to a fixture. If I know the amount of overlap, is there anyway to hard code the points for homography with a number of pixels from an edge or something similar?
Thanks!
If you want you can can compute the homography once and serialize the weights to disk and then re-load the weights each time the script runs. This will work since the camera is fixed and non-moving. However, it might be good to periodically recompute the homography matrix just in case the camera shifts slightly.
Thanks for the post!!
Traceback (most recent call last):
File “stitch.py”, line 22, in
imageA = imutils.resize(imageA, width=400)
File “C:\Users\Lisbon\Anaconda3\lib\site-packages\imutils\convenience.py”, line 69, in resize
(h, w) = image.shape[:2]
AttributeError: ‘NoneType’ object has no attribute ‘shape’
I’m not sure what’s going on imutils here?
Did install incorrectly?
Thanks for your reply
It sounds like your path to your input images are incorrect. Your imutils install is fine, but your image paths passed into
cv2.imread
do not exist. I would also suggest on reading up on NoneType errors in OpenCV. I hope that helps!Hi Kelsier!
It’s pretty late but I’m wondering if you managed to solve this?
I want to stitch 115 images , but your approach goes on increasing the width of the image and i want aa efficient approach to stitch all those images. It’s very urgent . atleast an approach to be followed will be appreciated
Can we use BRISK detector instead of SIFT ?
Yes. Provided you have enough keypoint correspondences you can use a different combination of keypoint detector and local invariant descriptor. Just make sure if you are using binary features to update the distance function to use the Hamming distance.
How can I modify this to stitch whole of two images i.e combine whole of two images into single frame?
You mean something like this?
Hi,
I get imageB only as an output while performing the above code.
can you help me with this issue?
Thanks,
It sounds like your input images may be ordered differently. This code assumes left-to-right ordering but you may have a different ordering.
hello adrian ,
can you please tell us how to implement this method to stitch multiple images !
Thanks in advance
Hey Mezher — I haven’t had a chance to write a multi-image stitching post yet. I’m not sure when I will be able to do that (I’m very busy) but I hope to be able to do it eventually.
Hello Adrian,
Can this algorithm be adapted to make a 3D model from an adequate number of images?
I was just looking at the research paper “Building Rome in a Day”. what do you suggest?
The paper you are referring to actually refers to building a 3D reconstruction based on keypoint matching. The paper also introduced a number of novel parallel optimizations. Keypoint matching and panorama stitching are two different computer vision topics.
Thank you, great code! Is this approach also working when there is a translation of the camera between the images? Say I image half of a long painting, move a meter or so to the side and image the other half (with some overlap)?
As long as there is some overlap this method should work. By “some overlap” I’m referring to enough valid keypoint matches to construct the homography matrix.
Hi Adrian,
Can you me help me in implementing this code for multiple images?
Hi Adrian,
How do I obtain result without having image B warped/distorted after stitching. I would like to have an output where the keypoint matches and overlap over each other without any perspective warps.
Hey Danish — I’m not sure I understand the goal here. Are you specifically asking about drawing/visualizing the keypoints? Keep in mind that that it may be impossible to have the keypoints lineup and match without a perspective transform.
Let say I have a really long horizontal pole and I have a drone scanning from left to right(the images having a certain % of overlap) maintaining constant distance. the pole could either become thinner or larger along its length.
I understand this is another problem as its unlike a normal panorama where there is a center point. But what I’m trying to achieve is just to detect the features between two consecutive images and put them over each other without a perspective warp.
“Keep in mind that that it may be impossible to have the keypoints lineup and match without a perspective transform.” Since this is the case, would you happen to know a work around? I’m still relatively new to python so theres a lot I still don’t know.
Depending on how the pole looks it may be impossible to detect enough keypoints to stitch the images together in the first place. Keypoints require enough edges, corners, and “blobs” in an image to create the correspondence. Without seeing enough images of this “pole” I wouldn’t be able to provide any specific recommendations.
As far as scanning from left-to-right, have you tried any basic image processing operations like thresholding or edge detection just to see if you can segment the pole easily? A quick hack would be to segment the pole and then fit a line through the center of the region.
If you’re new to Python and OpenCV I would recommend that you read through Practical Python and OpenCV to help you get up to speed. The book teaches you the core fundamentals and would better prepare you for your project.
“In future blog posts we’ll extend our panorama stitching code to work with multiple images rather than just two.” you said. Did not you post? Or Am I missing the post on website?
I simply have not written the post. I’ve been too busy with other topics. I’d like to circle back to this but I’m not sure if/when that may be.
Hi Adrian,
Thank you for your very helpful post. I am a high school student trying to learn OpenCV and your posts have helped me tremendously!!
I am trying to stitch 4 images together. Say i1, i2, i3, and i4 and they are same focus and there is overlap in the images between i1 and i2, between 12, and i3 and i3 and i4. They have same focus.
When I stitch i1 with i2, it returns an image with a large black border on the right. I am struggling to “crop” that black portion. Would you kindly put a code snippet to remove the black right border from the result.
This is what I am trying to do: (hopefully I can stitch all 4 images or more this way)
Stitch i1 and i2, get result1.
Stitch i3 and i4, get result2.
Then stitch result1 with result2 (there should be some “overlap” in image as i2 and i3 have overlaps.
Thank you very much for your help.
Hi Danielle — congrats on studying computer vision at such a young age, that’s very impressive. I unfortunately do not have any tutorials on stitching images to together with more than 2 images. It’s been a topic I’ve wanted to cover but never been able to get to. I don’t have any code snippets for removing the black border either but I do hope that another PyImageSearch reader may be able to help out with the project.
Hello Adrian, I am following your posts and I really appreciate you. Your articles really solve my problems and encourage me. I have two questions about your panorama stitching code
1-) When inputs are grayscaled, it gives an error. Could we apply stitching to grayscaled images?
2-) Is there a solution for the images that has different light intensity and different focus. I want to apply it to a moveable car, but since car is mobile the photos have different light averages. Is there any method for equalizing the light in both picture?
Thank you very much for your help.
1. What is the error you are getting? Without knowing the error I’m not sure what the problem may be.
2. When you say “solution” what are you referring to? Obtaining the actual output stitched images? Or “blending” the two together to make it look like the output was taken from a “single” camera sensor with the same lighting conditions?
Hello Adrian, thanks for the post very helpful when walking through it step by step.
Whenever I try to stitch images that should have a ton of keypoint matches I’m only getting like 2-4 matches max when it should obviously be a lot more. I’m literally taking a complete image and splitting it in 2 then feeding them in so I don’t see why it won’t work.
I’m trying to use this without imutils because the system I need to run it on only has opencv on it natively so I took out the resize function in stitcher.py. Other then that, I didn’t change much else.
Any ideas why this is happening?
How large, in terms of pixels, are your input images? I think the issue may be that you’re trying to stitch very large images but not resizing when computing the homography matrix. Secondly, it may be the case that you aren’t detecting a ton of keypoints — you should verify that as well.
Hi Adrian, here you said:
“Line 15 unpacks the images list (which again, we presume to contain only two images). The ordering to the images list is important: we expect images to be supplied in left-to-right order. If images are not supplied in this order, then our code will still run — but our output panorama will only contain one image, not both.”
When I’m applying the algorithm, I have two troubles:
(1) What if I am processing a stream of photos and there is no chance for me to know the sequence of image in advance? Is there anyway I can tell the sequence in Python/ during the process of stitching?
(2) Trying to answer the first question myself, I swapped the two images in the sequence. I want to detect the sequence by looking at the ptA and ptB in the Stitcher.drawMatches(). Applying image A and B in the right order, it works fine, but when I apply B and A (in the opposite sequence), it produces wrong matches between points. The output contains more than one image, not following what you described.
So my biggest problem is how to use this great method without knowing the sequence of the two images and if possible, how should I detect the sequence?
Thanks
The method in this post assumes you have a priori knowledge regarding image ordering. Without this knowledge, the method will not work. You need to know the image ordering.
how to go for stitching more than two images
I am getting these errors:
…
descriptor = cv2.xfeatures2d.SIFT_create()
AttributeError: module ‘cv2.cv2’ has no attribute ‘xfeatures2d’
How can this be fixed?
You need to install OpenCV with the “opencv_contrib” module enabled. You can follow one of my OpenCV install tutorials to help you install OpenCV correctly.
I have two images of the same scene just slightly translated(not stereo). I want them perfectly aligned right on top of each other to perform image differencing. So far I’ve been able to perform the feature detection using which I computed the fundamental matrix but i don’t know what to do next. I want to know how to exploit that fundamental matrix and transform either of the two images so that they can be subtracted perfectly. Any help in this regard would be very much appreciated.
Hi Ubaid — you mentioned using the “fundamental matrix” which makes me think you are performing stereo vision, is that correct? Either way, is there a particular reason you do not want to use the technique covered in this tutorial?
I have two aerial shots of a road(same location); one with a car and the other without. I just want to subtract the two and be able to get the car as a difference but that is not the case since i have to transform them first. I couldn’t find anything related to transformation of images that i could use for my application. Kindly help me.
Hi Adrian,
Thank You for your opencv panorama stitching tutorial, it is a great starting point. I am testing it with 4 IP cameras and it is working but I have the issue that the image that is warpPerspective it is stretched.
I have the same result also with 2 Images, the image that I add to the stitching is stretched and kind of distorted. Is there a way to stitch two images without distorting the warpPerspective one. Can you please give me a hint what flags or values I can start twerking?
Thank You!
Teo
The issue isn’t with the warpPerspective per se. The issue is not enough keypoints are being correctly detected and matched between frames. Try looking into your keypoint matching procedure.
Hi Adrian,
Thank You very much for your reply. Since your reply I was trying to look into the keypoint matching procedure, I have used the same procedure from your example and other online procedures. From what I have seen there are enough matching keypoints between the 2 images, the stitching is perfect, very nice, no difference between the images but the second image that is warp-ed it is kind of ‘adjusted’ to the first image trying to fit it in but stretching it.
I cannot attach the images here but I have analyzed your stitching and if you look also at your stitching example the second image on the right it is not the same with the original one, it is ‘stretched’ (maybe not the right wording), the ground are where the trees are on the right is no longer there in the stitched image. Is there a way that you are aware of to point me on the direction to adjust this?
Thank You very much in advanced.
Kind Regards,
Teo
I’m actually publishing a brand new tutorial on image stitching this coming Monday. Keep an eye on the PyImageSearch blog for it, I think it will help you.
🙂 Thank You! I am waiting with interest the new tutorial. Teo
The new tutorial can be found here.
Hey Adrian, ive read all the post an comments. Great post. I now looking for stitching >2 images not only horizontal. Is there anywhere to start? or some code or blog you have provided before for this?
thanks
Be sure to refer to my latest guide on image stitching.
Greetings Adrian and a wonderful opencv stitching project. Do you have Python or C++ stitching information on LDA “linear-diode-array” LINE cameras? They seem to be popular in document scanners, astronomy “NASA images”, and X-ray machines that scan objects on conveyor belts for defects. I have seen two x-ray images stitched together to product a very nice panoramic picture. But I do not know if it was done with opencv? The LINE_cameras have great contrast and resolution detail as the image is put together line-by-line. There are some hobby LDA line camera software examples but not much on opencv code. Adrian, do you have any suggestions? Thank you.
Sorry, I do not have any LDA/LINE related code for image stitching.
Hi Adrian,
A great tutorial overall, I had a query as to which IDE or environment you’re running your programs in?
I like to use Sublime Text or PyCharm to write code. I always execute my code via the command line.
Hi Adrian. I downoloaded your code form this website (https://www.pyimagesearch.com/2016/01/11/opencv-panorama-stitching/) but I want to run it, there is error:
ImportError: No module named imutils
I work in Python3 on OS Raspbian. Where is problem? Thank you
You need to install “imutils” on your system:
$ pip install imutils
Another excellent tutorial !
I found that increasing the value of parameter “ratio” in function stitch could increase the accuracy of stitching and reduce the displacement.
Thanks for sharing!
what about video stitching? would this be possible by just swapping the variable corresponding to video feed rather than the images?
It’s possible. See this tutorial.
Hi Adrian
Thanks your sharing!
I have a task need someone to help:
use bilinear interpolation to stitch 2 picture’s 3 same points become a panorama picture
I think the result is very like your example,but the ‘way’ to completed is different
wish you can give me some tips,thanks!!
Hi Adrian,
Thank You for your opencv panorama stitching tutorial, it is a great starting point. I am testing it with single camera video and it is working but I have the issue that when it read images from directory it distort the original order and while cropping it only fives the small images region and cropping most of the region. So please guide me how can I implement real time panorama of single camera video frames just like mobile camera panorama frame
Thank You!
Shahxoo
Hi,
Adrain please tell me how to do 360 degree image stitching to create a panorama it have accomplished to stitch 3 images but cannot stitch further ,I want to stitch atleast 6 images.I used stitcher class to stitch in opencv 3.0
Hi Adrian,
Firstly, thank you for the tutorial! It was a fun and educating exercise. However, I am experience a blurring effect when I stitch to photos together, causing the right photo to be obscured but the left intact. Do you have any ideas as to what might cause this blurring effect? Thanks for any information you can provide.
Cheers,
Joshua