Did you know that OpenCV can detect cat faces in images…right out-of-the-box with no extras?
I didn’t either.
But after Kendrick Tan broke the story, I had to check it out for myself…and do a little investigative work to see how this cat detector seemed to sneak its way into the OpenCV repository without me noticing (much like a cat sliding into an empty cereal box, just waiting to be discovered).
In the remainder of this blog post, I’ll demonstrate how to use OpenCV’s cat detector to detect cat faces in images. This same technique can be applied to video streams as well.
Detecting cats in images with OpenCV
If you take a look at the OpenCV repository, specifically within the haarcascades directory (where OpenCV stores all its pre-trained Haar classifiers to detect various objects, body parts, etc.), you’ll notice two files:
haarcascade_frontalcatface.xmlhaarcascade_frontalcatface_extended.xml
Both of these Haar cascades can be used detecting “cat faces” in images. In fact, I used these very same cascades to generate the example image at the top of this blog post.
Doing a little investigative work, I found that the cascades were trained and contributed to the OpenCV repository by the legendary Joseph Howse who’s authored a good many tutorials, books, and talks on computer vision.
In the remainder of this blog post, I’ll show you how to utilize Howse’s Haar cascades to detect cats in images.
Cat detection code
Let’s get started detecting cats in images with OpenCV. Open up a new file, name it cat_detector.py , and insert the following code:
# import the necessary packages
import argparse
import cv2

# construct the argument parse and parse the arguments
ap = argparse.ArgumentParser()
ap.add_argument("-i", "--image", required=True,
	help="path to the input image")
ap.add_argument("-c", "--cascade",
	default="haarcascade_frontalcatface.xml",
	help="path to cat detector haar cascade")
args = vars(ap.parse_args())
Lines 2 and 3 import our necessary Python packages while Lines 6-12 parse our command line arguments. We only require a single argument here, the input --image that we want to detect cat faces in using OpenCV.
We can also (optionally) supply a path our Haar cascade via the --cascade switch. We’ll default this path to haarcascade_frontalcatface.xml and assume you have the haarcascade_frontalcatface.xml file in the same directory as your cat_detector.py script.
Note: I’ve conveniently included the code, cat detector Haar cascade, and example images used in this tutorial in the “Downloads” section of this blog post. If you’re new to working with Python + OpenCV (or Haar cascades), I would suggest downloading the provided .zip file to make it easier to follow along.
Next, let’s detect the cats in our input image:
# load the input image and convert it to grayscale
image = cv2.imread(args["image"])
gray = cv2.cvtColor(image, cv2.COLOR_BGR2GRAY)

# load the cat detector Haar cascade, then detect cat faces
# in the input image
detector = cv2.CascadeClassifier(args["cascade"])
rects = detector.detectMultiScale(gray, scaleFactor=1.3,
	minNeighbors=10, minSize=(75, 75))
On Lines 15 and 16 we load our input image from disk and convert it to grayscale (a normal pre-processing step before passing the image to a Haar cascade classifier, although not strictly required).
Line 20 loads our Haar cascade from disk (in this case, the cat detector) and instantiates the cv2.CascadeClassifier object.
Detecting cat faces in images with OpenCV is accomplished on Lines 21 and 22 by calling the detectMultiScale method of the detector object. We pass four parameters to the detectMultiScale method, including:
- Our image,
gray, that we want to detect cat faces in. - A
scaleFactorof our image pyramid used when detecting cat faces. A larger scale factor will increase the speed of the detector, but could harm our true-positive detection accuracy. Conversely, a smaller scale will slow down the detection process, but increase true-positive detections. However, this smaller scale can also increase the false-positive detection rate as well. See the “A note on Haar cascades” section of this blog post for more information. - The
minNeighborsparameter controls the minimum number of detected bounding boxes in a given area for the region to be considered a “cat face”. This parameter is very helpful in pruning false-positive detections. - Finally, the
minSizeparameter is pretty self-explanatory. This value ensures that each detected bounding box is at least width x height pixels (in this case, 75 x 75).
The detectMultiScale function returns rects , a list of 4-tuples. These tuples contain the (x, y)-coordinates and width and height of each detected cat face.
Finally, let’s draw a rectangle surround each cat face in the image:
# loop over the cat faces and draw a rectangle surrounding each
for (i, (x, y, w, h)) in enumerate(rects):
	cv2.rectangle(image, (x, y), (x + w, y + h), (0, 0, 255), 2)
	cv2.putText(image, "Cat #{}".format(i + 1), (x, y - 10),
		cv2.FONT_HERSHEY_SIMPLEX, 0.55, (0, 0, 255), 2)

# show the detected cat faces
cv2.imshow("Cat Faces", image)
cv2.waitKey(0)
Given our bounding boxes (i.e., rects ), we loop over each of them individually on Line 25.
We then draw a rectangle surrounding each cat face on Line 26, while Lines 27 and 28 displays an integer, counting the number of cats in the image.
Finally, Lines 31 and 32 display the output image to our screen.
Cat detection results
To test our OpenCV cat detector, be sure to download the source code to this tutorial using the “Downloads” section at the bottom of this post.
Then, after you have unzipped the archive, you should have the following three files/directories:
cat_detector.py: Our Python + OpenCV script used to detect cats in images.haarcascade_frontalcatface.xml: The cat detector Haar cascade. Please use this Haar Cascade that is provided and not the one on OpenCV’s GitHub repository for compatibility purposes.images: A directory of testing images that we’re going to apply the cat detector cascade to.
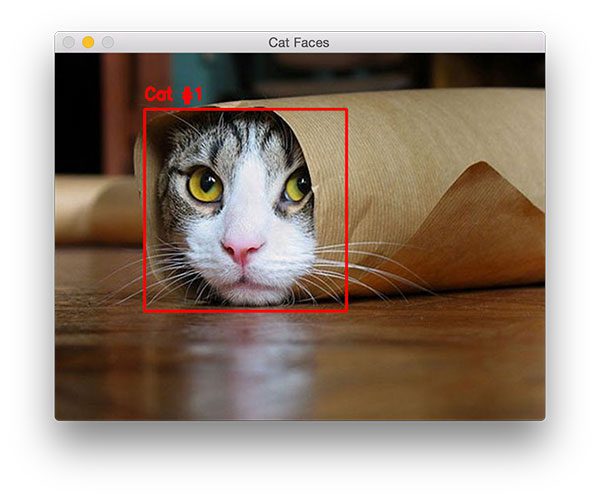
From there, execute the following command:
$ python cat_detector.py --image images/cat_01.jpg

Notice that we have been able to detect the cat face in the image, even though the rest of its body is obscured.
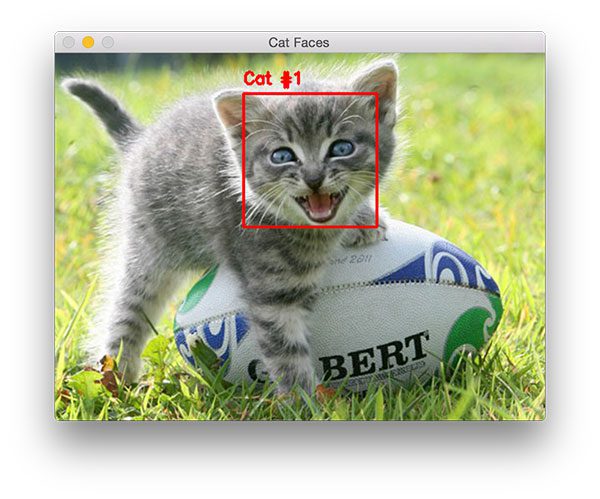
Let’s try another image:
python cat_detector.py --image images/cat_02.jpg

This cat’s face is clearly different from the other one, as it’s in the middle of a “meow”. In either case, the cat detector cascade is able to correctly find the cat face in the image.
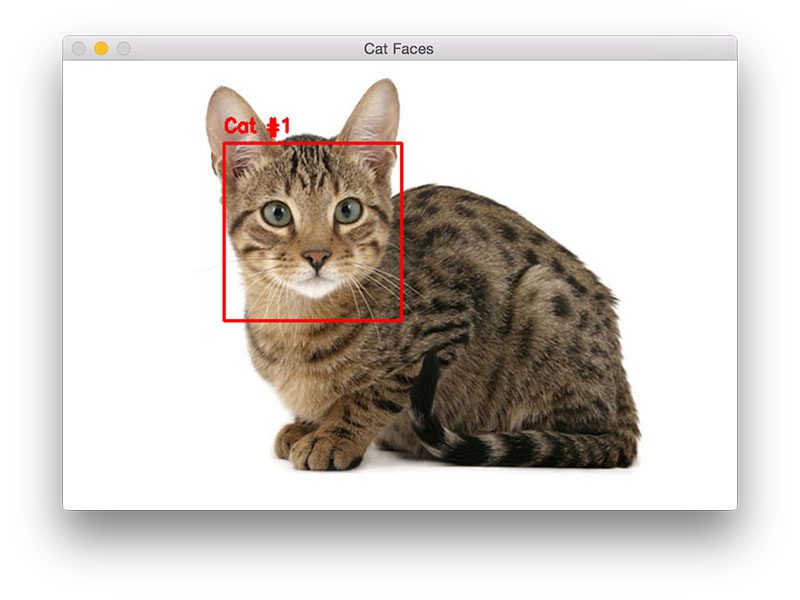
The same is true for this image as well:
$ python cat_detector.py --image images/cat_03.jpg

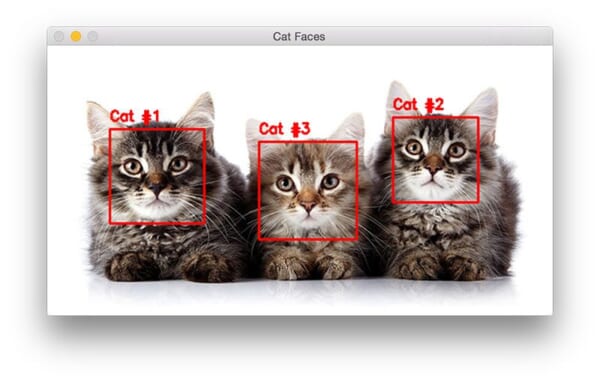
Our final example demonstrates detecting multiple cats in an image using OpenCV and Python:
$ python cat_detector.py --image images/cat_04.jpg

Note that the Haar cascade can return bounding boxes in an order that you may not like. In this case, the middle cat is actually labeled as the third cat. You can resolve this “issue” by sorting the bounding boxes according to their (x, y)-coordinates for a consistent ordering.
A quick note on accuracy
It’s important to note that in the comments section of the .xml files, Joseph Howe details that the cat detector Haar cascades can report cat faces where there are actually human faces.
In this case, he recommends performing both face detection and cat detection, then discarding any cat bounding boxes that overlap with the face bounding boxes.
A note on Haar cascades
First published in 2001 by Paul Viola and Michael Jones, Rapid Object Detection using a Boosted Cascade of Simple Features, this original work has become one of the most cited papers in computer vision.
This algorithm is capable of detecting objects in images, regardless of their location and scale. And perhaps most intriguing, the detector can run in real-time on modern hardware.
In their paper, Viola and Jones focused on training a face detector; however, the framework can also be used to train detectors for arbitrary “objects”, such as cars, bananas, road signs, etc.
The problem?
The biggest problem with Haar cascades is getting the detectMultiScale parameters right, specifically scaleFactor and minNeighbors . You can easily run into situations where you need to tune both of these parameters on an image-by-image basis, which is far from ideal when utilizing an object detector.
The scaleFactor variable controls your image pyramid used to detect objects at various scales of an image. If your scaleFactor is too large, then you’ll only evaluate a few layers of the image pyramid, potentially leading to you missing objects at scales that fall in between the pyramid layers.
On the other hand, if you set scaleFactor too low, then you evaluate many pyramid layers. This will help you detect more objects in your image, but it (1) makes the detection process slower and (2) substantially increases the false-positive detection rate, something that Haar cascades are known for.
To remember this, we often apply Histogram of Oriented Gradients + Linear SVM detection instead.
The HOG + Linear SVM framework parameters are normally much easier to tune — and best of all, HOG + Linear SVM enjoys a much smaller false-positive detection rate. The only downside is that it’s harder to get HOG + Linear SVM to run in real-time.
What's next? I recommend PyImageSearch University.
30+ total classes • 39h 44m video • Last updated: 12/2021
★★★★★ 4.84 (128 Ratings) • 3,000+ Students Enrolled
I strongly believe that if you had the right teacher you could master computer vision and deep learning.
Do you think learning computer vision and deep learning has to be time-consuming, overwhelming, and complicated? Or has to involve complex mathematics and equations? Or requires a degree in computer science?
That’s not the case.
All you need to master computer vision and deep learning is for someone to explain things to you in simple, intuitive terms. And that’s exactly what I do. My mission is to change education and how complex Artificial Intelligence topics are taught.
If you're serious about learning computer vision, your next stop should be PyImageSearch University, the most comprehensive computer vision, deep learning, and OpenCV course online today. Here you’ll learn how to successfully and confidently apply computer vision to your work, research, and projects. Join me in computer vision mastery.
Inside PyImageSearch University you'll find:
- ✓ 30+ courses on essential computer vision, deep learning, and OpenCV topics
- ✓ 30+ Certificates of Completion
- ✓ 39h 44m on-demand video
- ✓ Brand new courses released every month, ensuring you can keep up with state-of-the-art techniques
- ✓ Pre-configured Jupyter Notebooks in Google Colab
- ✓ Run all code examples in your web browser — works on Windows, macOS, and Linux (no dev environment configuration required!)
- ✓ Access to centralized code repos for all 500+ tutorials on PyImageSearch
- ✓ Easy one-click downloads for code, datasets, pre-trained models, etc.
- ✓ Access on mobile, laptop, desktop, etc.
Summary
In this blog post, we learned how to detect cats in images using the default Haar cascades shipped with OpenCV. These Haar cascades were trained and contributed to the OpenCV project by Joseph Howse, and were originally brought to my attention in this post by Kendrick Tan.
While Haar cascades are quite useful, we often use HOG + Linear SVM instead, as it’s a bit easier to tune the detector parameters, and more importantly, we can enjoy a much lower false-positive detection rate.
I detail how to build custom HOG + Linear SVM object detectors to recognize various objects in images, including cars, road signs, and much more inside the PyImageSearch Gurus course.
Anyway, I hope you enjoyed this blog post!
Before you go, be sure to signup for the PyImageSearch Newsletter using the form below to be notified when new blog posts are published.

Download the Source Code and FREE 17-page Resource Guide
Enter your email address below to get a .zip of the code and a FREE 17-page Resource Guide on Computer Vision, OpenCV, and Deep Learning. Inside you'll find my hand-picked tutorials, books, courses, and libraries to help you master CV and DL!

