Over the past few weeks I have demonstrated how to compile OpenCV 3 on macOS with Python (2.7, 3.5) bindings from source.
Compiling OpenCV via source gives you complete and total control over which modules you want to build, how they are built, and where they are installed.
All this control can come at a price though.
The downside is that determining the correct CMake paths to your Python interpreter, libraries, and include directories can be non-trivial, especially for users who are new to OpenCV/Unix systems.
That begs the question…
“Is there an easier way to install OpenCV on macOS? A way that avoids the complicated CMake configuration?”
It turns out, there is — just use Homebrew, what many consider to be “the missing package manager for Mac”.
So, is it really that easy? Just can a few simple keystrokes and commands can be used to avoid the hassle and install OpenCV 3 without the headaches?
Well, there’s a little more to it than that…but the process is greatly simplified. You lose a bit of control (as compared to compiling from source), but what you gain is an easier to follow path to installing OpenCV on your Mac system.
To discover the easy way to install OpenCV 3 on macOS via Homebrew, just keep reading.
Install OpenCV 3 on macOS with Homebrew (the easy way)
The remainder of this blog post demonstrates how to install OpenCV 3 with both Python 2.7 and Python 3 bindings on macOS via Homebrew. The benefit of using Homebrew is that it greatly simplifies the install process (although it can pose problems of its own if you aren’t careful) to only a few set of commands that need to be run.
If you prefer to compile OpenCV from source with Python bindings on macOS, please refer to these tutorials:
Step #1: Install XCode
Before we can install OpenCV 3 on macOS via Homebrew, we first need to install Xcode, a set of software development tools for the Mac Operating System.
Download Xcode
The easiest method to download and install Xcode is to use the included App Store application on your macOS system. Simply open up App Store, search for “Xcode” in the search bar, and then click the “Get” button:
Depending on your internet connection and system speed, the download and install process can take anywhere from 30 to 60 minutes. I would suggest installing Xocde in the background while you are getting some other work done or going for a nice long walk.
Accept the Apple developer license
I’m assuming that you’re working with a fresh install of macOS and Xcode. If so, you’ll need to accept the developer license before continuing. Personally, I think this is easier to do via the terminal. Just open up a terminal and execute the following command:
$ sudo xcodebuild -license
Scroll to the bottom of the license and accept it.
If you have already installed Xcode and previously accepted the Apple developer license, you can skip this step.
Install the Apple Command Line Tools
Now that Xcode is installed and we have accepted the Apple developer license, we can install the Apple Command Line Tools. These tools include packages such as make, GCC, clang, etc. This is a required step, so make you install the Apple Command line tools via:
$ sudo xcode-select --install
When executing the above command you’ll see a confirmation window pop up asking you to approve the install:
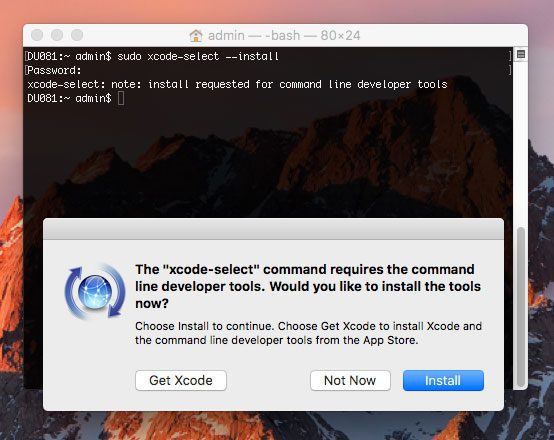
Simply click the “Install” button to continue. The actual install process of Apple Command Line Tools should take less than a 5 minutes.
If you haven’t already, be sure you have accepted the Xcode license using the following command:
$ sudo xcodebuild -license
Step #2: Install Homebrew
We are now ready to install Homebrew, a package manager for macOS. You can think of Homebrew as the macOS equivalent of the Ubuntu/Debian-based apt-get.
Installing Homebrew is dead simple — simply copy and paste the command below the “Install Homebrew” section of the Homebrew website (make sure you copy and paste the entire command into your terminal). I have included the command below as reference:
$ ruby -e "$(curl -fsSL https://raw.githubusercontent.com/Homebrew/install/master/install)"
After Homebrew installs you should make sure the package definitions (i.e., the instructions used to install a given library/package) are up to date by executing the following command:
$ brew update
Now that Homebrew is successfully installed and updated, we need to update our ~/.bash_profile
file so that it searches the Homebrew path for packages/libraries before it searches the system path. Failure to complete this step can lead to confusing errors, import problems, and segfaults when trying to utilize Python and OpenCV, so make sure you update your ~/.bash_profile
file correctly!
The ~/.bash_profile
file may or may not already exist on your system. In either case, open it with your favorite text editor (I’ll be using nano
in this example):
$ nano ~/.bash_profile
And then insert the following lines at the bottom of the file (if ~/.bash_profile
does not exist the file will be empty — this is okay, just add the following lines to the file):
# Homebrew export PATH=/usr/local/bin:$PATH
All this snippet is doing is updating your PATH
variable to look for libraries/binaries along the Homebrew path before it searches the system path.
After updating the ~/.bash_profile
file, save and exit your text editor.
To make sure you are on the right path, I have included a screenshot of my ~/.bash_profile
below so you can compare it to yours:
Remember, your ~/.bash_profile
may look very different than mine — that’s okay! Just make sure you have included the above Homebrew snippet in your file, followed by successfully saving and editing the editor.
Finally, we need to manually source
the ~/.bash_profile
file to ensure the changes have been reloaded:
$ source ~/.bash_profile
The above command only needs to be executed once. Whenever you open up a new terminal, login, etc., your .bash_profile
file will be automatically loaded and sourced for you.
Step #3: Install Python 2.7 and Python 3 using Homebrew
The next step is to install the Homebrew versions of Python 2.7 and Python 3. It is considered bad form to develop against the system Python as your main interpreter. The system version of Python should serve exactly that — system routines.
Instead, you should install your own version of Python that is independent from the system install. Using Homebrew, we can install both Python 2.7 and Python 3 using the following command:
$ brew install python python3
At the time of this writing the current Python versions installed by Homebrew are Python 2.7.12 and Python 3.5.2.
As a sanity check, let’s confirm that you are using the Homebrew version of Python rather than the system version of Python. You can accomplish this via the which
command:
$ which python /usr/local/bin/python $ which python3 /usr/local/bin/python3
Inspect the output of which
closely. If you are see /usr/local/bin/python
and /usr/local/bin/python3
for each of the paths then you are correctly using the Homebrew versions of Python. However, if the output is instead /usr/bin/python
and /usr/bin/python3
then you are incorrectly using the system version of Python.
If you find yourself in this situation you should:
- Go back to Step #2 and ensure Homebrew installed without error.
- Check that
brew install python python3
finished successfully. - You have correctly updated your
~/.bash_profile
file and reloaded the changes viasource
. Your~/.bash_profile
should look similar to mine in Figure 3 above.
Check your Python versions
After installing Python 2.7 and Python 3, you’ll want to check your Python version numbers using the following commands:
$ python --version Python 2.7.10 $ python3 --version Python 3.5.0
In particular, pay attention to both the major and minor version numbers. For the first command, my major Python version is 2 and the minor version is 7. Similarly, for the second command my major Python version is 3 and the minor version is 5.
The reason I bring this up is because file paths can and will change based on your particular Python version numbers. The instructions detailed in this tutorial will successfully install OpenCV via Homebrew on your macOS machine provided you pay attention to your Python version numbers.
For example, if I were to tell you to check the site-packages
directory of your Python 3 install and provided an example command of:
$ ls /usr/local/opt/opencv3/lib/python3.5/site-packages/
You should first check your Python 3 version. If the python3 --version
command above reported 3.6, then you would need to update your path to be:
$ ls /usr/local/opt/opencv3/lib/python3.6/site-packages/
Notice how python3.5
was changed to python3.6
.
Forgetting to check and validate file paths is a common mistake I see readers make when trying to install OpenCV on their macOS machines for the first time. Do not blindly copy and paste commands and file paths. Instead, take the time to validate your file paths based on your Python version numbers. Doing so will ensure your commands are correctly constructed and will help you immensely when installing OpenCV for the first time.
Step #4: Install OpenCV 3 with Python bindings on macOS using Homebrew
Now that we have installed the Homebrew versions of Python 2.7 and Python 3 we are now ready to install OpenCV 3.
Tap the “homebrew/science” repo
The first step is to add the homebrew/science
repository to the set of packages we are tracking. This allows us to access the formulae to install OpenCV. To accomplish this, just use the following command:
$ brew tap homebrew/science
Understanding the “brew install” command
To install OpenCV on our macOS system via Homebrew we are going to use the brew install
command. This command accepts the name of a package to install (like Debian/Ubuntu’s apt-get), followed by set of optional arguments.
The base of our command is: brew install opencv3
; however, we need to add some additional parameters.
The most important set of parameters are listed below:
--with-contrib
: This ensures that the opencv_contrib repository is installed, giving us access to additional, critical OpenCV features such as SIFT, SURF, etc.--with-python3
: OpenCV 3 + Python 2.7 bindings will be automatically compiled; however, to compile OpenCV 3 + Python 3 bindings we need to explicitly supply the--with-python3
switch.--HEAD
: Rather than compiling a tagged OpenCV release (i.e., v3.0, v3.1, etc.) the--HEAD
switch instead clones down the bleeding-edge version of OpenCV from GitHub. Why would we bother doing this? Simple. We need to avoid the QTKit error that plagues macOS Sierra systems with the current tagged OpenCV 3 releases (please see the “Avoiding the QTKit/QTKit.h file not found error” section of this blog post for more information)
You can see the full listing of options/switches by running brew info opencv3
, the output of which I’ve included below:
$ brew info opencv3 ... --32-bit Build 32-bit only --c++11 Build using C++11 mode --with-contrib Build "extra" contributed modules --with-cuda Build with CUDA v7.0+ support --with-examples Install C and python examples (sources) --with-ffmpeg Build with ffmpeg support --with-gphoto2 Build with gphoto2 support --with-gstreamer Build with gstreamer support --with-jasper Build with jasper support --with-java Build with Java support --with-libdc1394 Build with libdc1394 support --with-opengl Build with OpenGL support (must use --with-qt5) --with-openni Build with openni support --with-openni2 Build with openni2 support --with-python3 Build with python3 support --with-qt5 Build the Qt5 backend to HighGUI --with-quicktime Use QuickTime for Video I/O instead of QTKit --with-static Build static libraries --with-tbb Enable parallel code in OpenCV using Intel TBB --with-vtk Build with vtk support --without-eigen Build without eigen support --without-numpy Use a numpy you've installed yourself instead of a Homebrew-packaged numpy --without-opencl Disable GPU code in OpenCV using OpenCL --without-openexr Build without openexr support --without-python Build without Python support --without-test Build without accuracy & performance tests --HEAD Install HEAD version
For those who are curious, the Homebrew formulae (i.e., the actual commands used to install OpenCV 3) can be found here. Use the parameters above and the install script as a reference if you want to add any additional OpenCV 3 features.
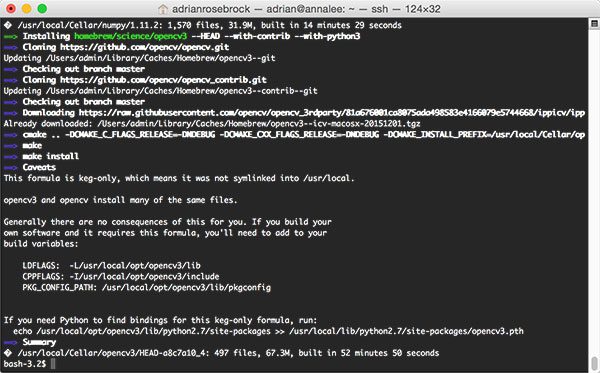
We are now ready to install OpenCV 3 with Python bindings on your macOS system via Homebrew. Depending on the dependencies you do or do not already have installed, along with the speed of your system, this compilation could easily take a couple of hours, so you might want to go for a walk once you kick-off the install process.
Installing OpenCV 3 with Python 3 bindings via Homebrew
To start the OpenCV 3 install process, just execute the following command:
$ brew install opencv3 --with-contrib --with-python3 --HEAD
This command will install OpenCV 3 on your macOS system with both Python 2.7 and Python 3 bindings via Homebew. We’ll also be compiling the latest, bleeding edge version of OpenCV 3 (to avoid any QTKit errors) along with opencv_contrib
support enabled.
Update — 15 May 2017:
There was recently an update to the Homebrew formula used to install OpenCV on your macOS machine that may cause two types of errors.
Ideally the Homebrew formula will be updated in the future to prevent these errors, but in meantime, if you encounter either of the errors below:
opencv3: Does not support building both Python 2 and 3 wrappers
No such file or directory 3rdparty/ippicv/downloader.cmake
Then be sure to refer to this updated blog post where I provide solutions to both of the errors.
As I mentioned, this install process can take some time so consider going for a long walk while OpenCV installs. However, make sure your computer doesn’t go to sleep/shut down while you are gone! If it does, the install process will break and you’ll have to restart it.
Assuming OpenCV 3 installed without a problem, your terminal output should look similar to mine below:
However, we’re not quite done yet.
You’ll notice a little note at the bottom of the install output:
If you need Python to find bindings for this keg-only formula, run: echo /usr/local/opt/opencv3/lib/python2.7/site-packages >> /usr/local/lib/python2.7/site-packages/opencv3.pth
This means that our Python 2.7 + OpenCV 3 bindings are now installed in /usr/local/opt/opencv3/lib/python2.7/site-packages
, which is Homebrew path to the OpenCV compile. We can verify this via the ls
command:
$ ls -l /usr/local/opt/opencv3/lib/python2.7/site-packages total 6944 -r--r--r-- 1 admin admin 3552288 Dec 15 09:28 cv2.so
However, we need to get these bindings into /usr/local/lib/python2.7/site-packages/
, which is the site-packages
directory for Python 2.7. We can do this by executing the following command:
$ echo /usr/local/opt/opencv3/lib/python2.7/site-packages >> /usr/local/lib/python2.7/site-packages/opencv3.pth
The above command creates a .pth
file which tells Homebrew’s Python 2.7 install to look for additional packages in /usr/local/opt/opencv3/lib/python2.7/site-packages
— in essence, the .pth
file can be considered a “glorified sym-link”.
At this point you now have OpenCV 3 + Python 2.7 bindings installed!
However, we’re not quite done yet…there is still a few extra steps we need to take for Python 3.
Handling the Python 3 issue
Remember the --with-python3
option we supplied to brew install opencv3
?
Well, this option did work (although it might not seem like it) — we do have Python 3 + OpenCV 3 bindings installed on our system.
Note: A big thank you to Brandon Hurr for pointing this out. For a long time I thought the --with-python3
switch simply wasn’t working.
However, there’s a bit of a problem. If you check the contents of /usr/local/opt/opencv3/lib/python3.5/site-packages/
you’ll see that our cv2.so
file has a funny name:
$ ls -l /usr/local/opt/opencv3/lib/python3.5/site-packages/ total 6952 -r--r--r-- 1 admin admin 3556384 Dec 15 09:28 cv2.cpython-35m-darwin.so
I have no idea why the Python 3 + OpenCV 3 bindings are not named cv2.so
as they should be, but the same is true across operating systems. You’ll see this same issue on macOS, Ubuntu, and Raspbian.
Luckily, the fix is easy — all you need to do is rename cv2.cpython-35m-darwin.so
to cv2.so
:
$ cd /usr/local/opt/opencv3/lib/python3.5/site-packages/ $ mv cv2.cpython-35m-darwin.so cv2.so $ cd ~
From there, we can create another .pth
file, this time for the Python 3 + OpenCV 3 install:
$ echo /usr/local/opt/opencv3/lib/python3.5/site-packages >> /usr/local/lib/python3.5/site-packages/opencv3.pth
At this point you now have both Python 2.7 + OpenCV 3 and Python 3 + OpenCV 3 installed on your macOS system via Homebrew.
Verifying that OpenCV 3 has been installed
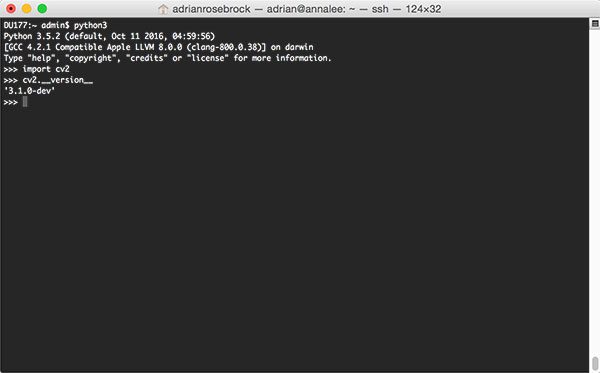
Here are the commands I use to validate that OpenCV 3 with Python 2.7 bindings are working on my system:
$ python Python 2.7.12 (default, Oct 11 2016, 05:20:59) [GCC 4.2.1 Compatible Apple LLVM 8.0.0 (clang-800.0.38)] on darwin Type "help", "copyright", "credits" or "license" for more information. >>> import cv2 >>> cv2.__version__ '3.1.0-dev' >>>
The screenshot below shows how to import the OpenCV 3 bindings into a Python 3 shell as well:
Congratulations, you have installed OpenCV 3 with Python bindings on your macOS system via Homebrew!
But if you’re a longtime reader reader of this blog, you know that I use Python virtual environments extensively — and you should too.
Step #5: Setup your Python virtual environment (optional)
You’ll notice that unlike many of my previous OpenCV 3 install tutorials, Homebrew does not make use of Python virtual environments, a best practice when doing Python development.
While Steps #5-#7 are optional, I highly recommend that you do them to ensure your system is configured in the same way as my previous tutorials. You’ll see many tutorials on the PyImageSearch blog leverage Python virtual environments. While they are indeed optional, you’ll find that in the long run they make your life easier.
Installing virtualenv and virtualenvwrapper
The virtualenv and virtualenvwrapper packages allow us to create separate, independent Python virtual environments for each project we are working on. I’ve mentioned Python virtual environments many times before on this blog so I won’t rehash what’s already been said. Instead, if you are unfamiliar with Python virtual environments, how they work, and why we use them, please refer to the first half of this blog post. I also recommend this excellent tutorial on the RealPython.com blog that takes a more in-depth dive into Python virtual environments.
To install both virtualenv
and virtualenvwrapper
, just use pip
:
$ pip install virtualenv virtualenvwrapper
After both packages have successfully installed, you’ll need to update your ~/.bash_profile
file again:
$ nano ~/.bash_profile
Append the following lines to the file:
# Virtualenv/VirtualenvWrapper source /usr/local/bin/virtualenvwrapper.sh
After updating, your ~/.bash_profile
should look similar to mine below:
Once you have confirmed that your ~/.bash_profile
has been created, you need to refresh your shell by using the source
command:
$ source ~/.bash_profile
This command only needs to be executed once. Assuming that your ~/.bash_profile
has been updated correctly, it will automatically be loaded and source
‘d each time you open a new shell, login, etc.
Create your Python virtual environment
We are now ready to use the mkvirtualenv
command to create a Python virtual environment named cv
(for “computer vision”).
For Python 2.7 use the following command:
$ mkvirtualenv cv -p python
For Python 3 use this command:
$ mkvirtualenv cv -p python3
The -p
switch controls which Python version is used to create your virtual environment. Please note that each virtual environment needs to be uniquely named so if you want to create two separate virtual environments, one for Python 2.7 and another for Python 3, you’ll want to make sure that each environment has a separate name — both cannot be named “cv”.
The mkvirtualenv
command only needs to be executed once. To access the cv
Python virtual environment after you have already created it, just use the workon
command:
$ workon cv
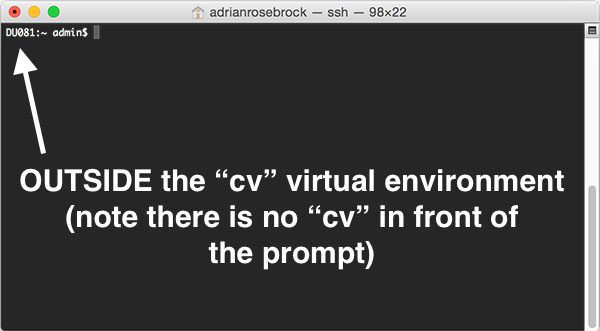
To visually validate you are in the cv
virtual environment, just examine your command line. If you see the text (cv)
preceding the prompt, then you are in the cv
virtual environment:
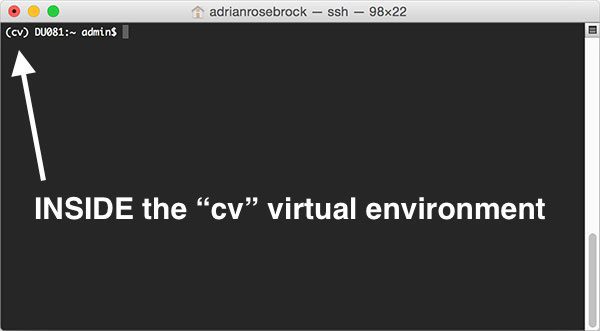
Otherwise, if you do not see the cv
text, then you are not in the cv
virtual environment:
Install NumPy
The only Python prerequisite for OpenCV is NumPy, a scientific computing package.
To install NumPy, first make sure you are in the cv
virtual environment and then let pip
handle the actual installation:
$ pip install numpy
Step #6: Sym-link the OpenCV 3 bindings (optional)
We are now ready to sym-link in the cv2.so
bindings into our cv
virtual environment. I have included the commands for both Python 2.7 and Python 3, although the process is very similar.
For Python 2.7
To sym-link the cv2.so
bindings into your Python 2.7 virtual environment named cv
, use these commands:
$ cd ~/.virtualenvs/cv/lib/python2.7/site-packages/ $ ln -s /usr/local/opt/opencv3/lib/python2.7/site-packages/cv2.so cv2.so $ cd ~
For Python 3:
To sym-link the cv2.so
bindings installed via Homebrew to your Python 3 virtual environment (named cv
), execute these commands:
$ cd ~/.virtualenvs/cv/lib/python3.5/site-packages/ $ ln -s /usr/local/opt/opencv3/lib/python3.5/site-packages/cv2.so cv2.so $ cd ~
Repeat as necessary
If you would like to have OpenCV 3 bindings installed for both Python 2.7 and Python 3, then you’ll want to repeat Step #5 and Step #6 for both Python versions. This includes creating a uniquely named Python virtual environment, installing NumPy, and sym-linking in the cv2.so
bindings.
Step #7: Test your OpenCV 3 install (optional)
To verify that your OpenCV 3 + Python + virtual environment install on macOS is working properly, you should:
- Open up a new terminal window.
- Execute the
workon
command to access thecv
Python virtual environment. - Attempt to import your Python + OpenCV 3 bindings on macOS.
Here are the exact commands I used to validate that my Python virtual environment + OpenCV install are working correctly:
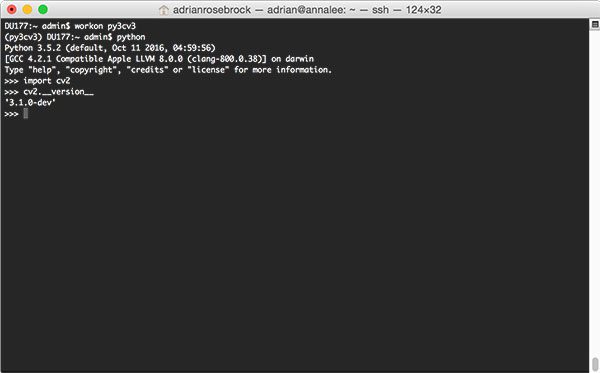
$ workon cv $ python >>> import cv2 >>> cv2.__version__ '3.1.0-dev' >>>
Note that the above output demonstrates how to use OpenCV 3 + Python 2.7 with virtual environments.
I also created an OpenCV 3 + Python 3 virtual environment as well (named py3cv3
), installed NumPy, and sym-linked the OpenCV 3 bindings. The output of me accessing the py3cv3
virtual environment and importing OpenCV can be seen below:
So, what’s next?
Congrats! You now have a brand new, fresh install of OpenCV on your macOS system — and I’m sure you’re just itching to leverage your install to build some awesome computer vision apps…
…but I’m also willing to bet that you’re just getting started learning computer vision and OpenCV, and probably feeling a bit confused and overwhelmed on exactly where to start.
Personally, I’m a big fan of learning by example, so a good first step would be to have some fun and read this blog post on detecting cats in images/videos. This tutorial is meant to be very hands-on and demonstrate how you can (quickly) build a Python + OpenCV application to detect the presence of cats in images.
And if you’re really interested in leveling-up your computer vision skills, you should definitely check out my book, Practical Python and OpenCV + Case Studies. My book not only covers the basics of computer vision and image processing, but also teaches you how to solve real-world computer vision problems including face detection in images and video streams, object tracking in video, and handwriting recognition.
So, let’s put that fresh install of OpenCV 3 on your macOS system to good use
What's next? I recommend PyImageSearch University.
30+ total classes • 39h 44m video • Last updated: 12/2021
★★★★★ 4.84 (128 Ratings) • 3,000+ Students Enrolled
I strongly believe that if you had the right teacher you could master computer vision and deep learning.
Do you think learning computer vision and deep learning has to be time-consuming, overwhelming, and complicated? Or has to involve complex mathematics and equations? Or requires a degree in computer science?
That’s not the case.
All you need to master computer vision and deep learning is for someone to explain things to you in simple, intuitive terms. And that’s exactly what I do. My mission is to change education and how complex Artificial Intelligence topics are taught.
If you're serious about learning computer vision, your next stop should be PyImageSearch University, the most comprehensive computer vision, deep learning, and OpenCV course online today. Here you’ll learn how to successfully and confidently apply computer vision to your work, research, and projects. Join me in computer vision mastery.
Inside PyImageSearch University you'll find:
- ✓ 30+ courses on essential computer vision, deep learning, and OpenCV topics
- ✓ 30+ Certificates of Completion
- ✓ 39h 44m on-demand video
- ✓ Brand new courses released every month, ensuring you can keep up with state-of-the-art techniques
- ✓ Pre-configured Jupyter Notebooks in Google Colab
- ✓ Run all code examples in your web browser — works on Windows, macOS, and Linux (no dev environment configuration required!)
- ✓ Access to centralized code repos for all 500+ tutorials on PyImageSearch
- ✓ Easy one-click downloads for code, datasets, pre-trained models, etc.
- ✓ Access on mobile, laptop, desktop, etc.
Summary
In today’s blog post I demonstrated how to install OpenCV 3 with Python 2.7 and Python 3 bindings on your macOS system via Homebrew.
As you can see, utilizing Homebrew is a great method to avoid the tedious process of manually configuring your CMake command to compile OpenCV via source (my full list of OpenCV install tutorials can be found on this page).
The downside is that you lose much of the control that CMake affords you.
Furthermore, while the Homebrew method certainly requires executing less commands and avoids potentially frustrating configurations, it’s still worth mentioning that you still need to do a bit of work yourself, especially when it comes to the Python 3 bindings.
These steps also compound if you decide to use virtual environments, a best practice when doing Python development.
When it comes to installing OpenCV 3 on your own macOS system I would suggest you:
- First try to install OpenCV 3 via source. If you run into considerable trouble and struggle to get OpenCV 3 to compile, use this as an opportunity to teach yourself more about Unix environments. More times than not, OpenCV 3 failing to compile is due to an incorrect CMake parameter that can be correctly determined with a little more knowledge over Unix systems, paths, and libraries.
- Use Homebrew as a fallback. I would recommend using the Homebrew method to install OpenCV 3 as your fallback option. You lose a bit of control when installing OpenCV 3 via Homebrew, and worse, if any sym-links break during a major operating system upgrade you’ll struggle to resolve them. Don’t get me wrong: I love Homebrew and think it’s a great tool — but make sure you use it wisely.
Anyway, I hope you enjoyed this blog post! And I hope it helps you get OpenCV 3 installed on their macOS systems.
If you’re interested in learning more about OpenCV, computer vision, and image processing, be sure to enter your email address in the form below to be notified when new blog posts + tutorials are published!
Join the PyImageSearch Newsletter and Grab My FREE 17-page Resource Guide PDF
Enter your email address below to join the PyImageSearch Newsletter and download my FREE 17-page Resource Guide PDF on Computer Vision, OpenCV, and Deep Learning.
Thanks! This is super useful. FWIW, I’ve also been using the opencv-python [1] package. If the architectures, Python versions, and OS versions are supported, it’s a super easy alternative.
[1] https://pypi.python.org/pypi/opencv-python
Thanks for sharing Javier. I personally have not used the
opencv-python
package. I’ll look into this more.My biggest worry is that the
opencv_contrib
package isn’t installed by default. I can’t seem to find any mention of this in their GitHub repo?Yeah, it seems like unfortunately `opencv_contrib` is not there yet.
That’s good to know — and also sounds like a great pull request for the project 🙂
I tried “opencv-python” before finding out this blog. I still recommend newcomers to install opencv from source, or through homebrew. opencv-python works by providing a precompile cv.so and the Python binding. It is fast and extremely convenient, but at the cost of the limitation of that cv.so. It will not have UI support, since it is not compiled with GTK on *your* computer.
That may work for some people, when they know exactly what they need, and can work around the limitation. But for newcomers, it is better to grab everything, and save yourself a headache of finding out which is missing.
Thank you for sharing Quang, I didn’t realize that “opencv-python” didn’t have UI support out of the box. I’ll also worth nothing that the “opencv_contrib” module is not included either.
I think that it’s easier to install/manage Python3 bindings via ‘pip’, the Python package manager. In this case, the Homebrew dependencies shrink and the additional flags are not required, as specifying the pip3 installer handles the configuration:
$ brew install python3 opencv3
$ pip3 install scipy scikit-image matplotlib opencv-python
This works to get the compare-two-images example from 2014/09/15 running correctly on MacOS 10.11+, for example.
Thanks for sharing Scott. I’m not familiar with the
opencv-python
package, but I’ll check it out.As I mentioned to “Javier” above, I’m concerned with
opencv_contrib
isn’t installed by default, but I’ll look into this.Man! you are a genios, just save me a week of pain.
n Step 7, I execute python and cv2.__version__ and the version returns 2.4.12. How do I update OpenCV to 3.1.0-dev?
It sounds like you already have OpenCV 2.4.12 installed on your system. How did you previously install OpenCV 2.4? Via Homebrew? Or from source?
I have the same problem, it says the version I installed is 2.4.12. The only thing I did differently was not include the –with-python3 when installing opencv3, but I don’t think that would cause this weird error. I did previously try to install opencv from the source on your other guide but ran into the QTkit error.
Did you have OpenCV installed on your system prior to running the steps in this tutorial?
Hello sir,
Thank you so much for giving such wonderful installation steps.
But I have a problem after installation of opencv on my mac.
That is I am not able to see the pixel values on the GUI and not even the X and Y coordinate points, after CV2 imshow. Can u please help me. I am banging my head into many website from past 1 week. Please help me.
Just to be sure — are you calling
cv2.waitKey
aftercv2.imshow
? Thecv2.waitKey
call is required in order to see the window open up on your system.Thanks, this was very helpful!
FWIW: I didn’t have to rename the python 3.5 opencv shared object file in order to successfully import cv2 in python3.5 and I didn’t need to create the .pth file either. Leaving the versioned file name alone the import still succeeded. Unless I need a more involved test?
Thanks for sharing your experience Steve, congrats on getting OpenCV installed!
Hi Adrian,
Have you tried conda? conda is a cross-platform package manager (OSX, Windows, Linux).
It provides a precompiled opencv package. I never tried this package specifically, but I highly recommend conda when working with compiled libraries.
After installing conda, it should be just a matter of running:
“`
conda create -n cvenv opencv
source activate cvenv
“`
I’ve used conda in the past and found it reasonable. I might still use it today, but the parent company (Continuum) responsible for conda had a very large falling out over a business deal when I was creating the PyImageSearch Gurus course. It’s a great tool, but I’d caution you regarding their OpenCV support — they have removed it in the past and have only recently added it back in over the past couple of years.
Ok, I see, but I think it is getting more stable now and they are getting more open. And meanwhile conda-forge was created: https://conda-forge.github.io/
It is a community-driven initiative to provide conda packages and it has almost all packages provided by Continuum, so it is probably less risky now.
Missing reference: http://conda.pydata.org/miniconda.html
miniconda is a minimal conda installer
Anyone try to download https://codeload.github.com/opencv/opencv/zip/3.2.0 recently? Just timing out for me (Jan.1 2017) despite status.github.com saying all systems running.
The link seems to be working with me.
This was a breeze! I’ve spent *days upon days* trying to get OpenCV installed before finding this tutorial. Installing this way took me about an hour. Amazing.
Note that the latest version of Python is now 3.6 so if you’re copy-pasting Adrian’s code, you might need to replace any instances of 3.5 with 3.6.
Congrats on getting OpenCV installed Tori, I know how much of a struggle it was based on our email chats! I hope you can now continue with your research 🙂
Thank you so much for this tutorial!! Still don’t get why installing OpenCV is so hard compared to other modules… :p
Articles like this really helps us noobs actually get into the environment.
I think there were some updates to the installation of OpenCV, and though it may just be an issue with me, I’ll note the changes I had to make, in case it may help someone…
As Tori has already said, I had to change all the 3.5 for 3.6 (and for “Handling the Python 3 issue” in step 4, cv2.cpython-35m-darwin.so became cv2.cpython-36m-darwin.so), to accommodate Python 3.6.
Also, “the little note” that came when I installed OpenCV via Homebrew, told me to run
$ echo /usr/local/opt/opencv3/lib/python2.7/site-packages >> /usr/local/lib/python2.7/site-packages/opencv3.pth
$ mkdir -p /Users/yasunori/Library/Python/2.7/lib/python/site-packages
$ echo ‘import site; site.addsitedir(“/usr/local/lib/python2.7/site-packages”)’ >> /Users/yasunori/Library/Python/2.7/lib/python/site-packages/homebrew.pth
whereas in this tutorial, only the first line was mentioned.
This fixes finding the binding for Python 2.7, and for 3.6, I ran the same 3 lines except with 3.6 in the place of 2.7 .
Thanks for sharing Yasu!
I could not get the Homebrew version of Python to work. Then I found out about brew doctor.
Can you explain how you got yours to work? I’m struggling here, installing on a MacBook Pro on OSierra. I keep getting an ImportError. What did you do with brew doctor?
Thank you so much for this tutorial also. And a small reminder to the people in China, want to install successfully, need to cross GFW…
Hey Adrian,
Wonderful installation walkthrough!
The only problem is that I seem to be getting an error when I’m “solving the python3 issue”
In my terminal I write: “ls -l /usr/local/opt/opencv3/lib/python3.5/site-packages/” like you said, but my output is saying “no such file or directory”.
Did I do something wrong? I’m pretty sure that I followed your instructions to the letter and when I did “ls” for python (not python3) it worked…
Thanks!
Hey Andy — are you sure you’re using Python 3.5? You might be using Python 3.6. Another suggestion is to check whether the
cv2.so
file is in thesite-packages
or thedist-packages.
Hey Adrian,
Thanks for the tutorial! It worked perfectly for Python2.7 and also for Python 3.5.
But I encountered the same problem as Andy with Python3.6, no *.so file in site-packages directory. It seems coming from 3.6 since with 3.5 it worked. Any idea where it may come from?
I haven’t tried with Python 3.6, so I’m not sure what the exact problem is. I would check the CMake logs created by Homebrew and then see if the path to the
cv2.so
file is listed there.If you coming from 3.5, you may need to reinstall opencv3 with homebrew, to get it work with python 3.6. I don’t have a concrete proof about how opencv3 is brewed, but it seems to me that it looks for the current version of python and creates the “site-package” for that.
So, when you upgrade your python from 3.5 to 3.6, I don’t think you can expect to have “/usr/local/opt/opencv3/lib/python3.6” created for you. But you can just link the *.so file in “/usr/local/opt/opent3/lib/python3.5/site-package”.
For what it worth, I can confirm that brew install opencv3 works for my python 3.6.
I had the same issue “No such file or directory” while performing the “Handling the python3 issue” steps. Like Adrian pointed out below, I saw that I was using python 3.6, so I changed all the paths to python3.6 instead of python3.5:
$ cd /usr/local/opt/opencv3/lib/python3.6/site-packages/
$ mv cv2.cpython-36m-darwin.so cv2.so
$ cd ~
echo /usr/local/opt/opencv3/lib/python3.6/site-packages >> /usr/local/lib/python3.6/site-packages/opencv3.pth
I was able to complete the install without any errors.
Thanks for sharing Sunday!
Problem and solution found here:
http://stackoverflow.com/questions/43113151/error-in-installing-opencv3-with-homebrew-and-python3
I have the same issue “No such file or directory” “/usr/local/opt/opencv3/lib/python3.6”, any solution?
MacOS Sierra Python3.6 Opencv3.2.0
Same here, I installed it –with-python3, but the only directory in “/usr/local/opt/opencv3/lib/” is python2.7.
Just to clarify, did you use Homebrew to install Python 3? And if so, is the
python3
command pointing to your Homebrew installation?I’ve got the same problem, in /usr/local/opt/opencv3/lib there is only python2.7, but no python3.6.
While following the tutorial I did type “which python3” which gave me “/usr/local/bin/python3” so it seems to point to the Homebrew installation.
Do you have any idea how to tackle this problem?
Same problem happened to me. It bothered my nearly two days, and finally I figured out what is going wrong here, but I cannot solve it.
Enter following command in your terminal:
brew gist-logs opencv3
then you will get I link to github, and find out the whole installation log. In the log, you will find out following lines (may not exactly the same, but similar):
— Found PythonInterp: /usr/local/bin/python3.4 (found suitable version “3.4.4”, minimum required is “3.4”)
— Could NOT find PythonLibs: Found unsuitable version “3.6.0”, but required is exact version “3.4.4” (found /usr/local/opt/python3/Frameworks/Python.framework/Versions/3.6/lib/python3.6/config-3.6m-darwin/libpython3.6.dylib)
Here is the problem, since opencv3 cannot find a suitable PythonLibs, therefore it does not install the opencv3 for python3 (e.g. the python3.6 folder in /usr/local/opt/opencv3/lib).
How to solve this problem? Here is my “solution”,
remove python3 and start using python2 :(.
Thanks for the tutorial Adrian. !!
I followed the steps, and i can run opencv in python, but i cannot run an opencv example with c++ and qt-creator. Any solutions ?
Thanks.
Without doubt the easiest to follow tutorial i’ve found thus far – thank you (as I mentioned on Twitter)
However, I still encounter a couple of errors as I go through – including the 3.5/3.6 ones mentioned above.
So, I went back to the beginning and noticed that $ which python gives me: /usr/bin/python
But $ which python3 gives me: /usr/local/bin/python3
I’m fairly sure this is probably the root of the rest of the errors, but I’ve not idea why it would be like this?
Hey Sam — it’s great to hear that you’re enjoying the tutorial.
Regarding your error, it sounds like your Python 3 path is updated, but not Python 2.7. Have you updated your
.bash_profile
file? And have you installed both Python 3 and Python 2.7 via Homebrew?Any updates with this? I get the same error but can’t work out why. Definitely installed both python and python3 via Homebrew. Definitely updated the ~/.bash_profile file as well. Cannot work out what’s gone wrong, looks like something in a script somewhere isn’t playing ball. Any thoughts on how to solve?
I am running into the same error. Tried everything I can think of with uninstall-reinstall. Still which python outputs /usr/bin/python
If anyone has any updates, it would be greatly appreciated
Take a look at David’s reply here — it seems to have resolved the issue.
I followed the whole tutorial, everything worked out, the only problem I’ve got was the binding to Python 3.6.
If I open the python shell with IDLE, everything works fine. But if I open Xcode and try to import the cv2 (for c++) it doesn’t work at all, do you have any idea how to make it work there as well?
Thank you very much for the tutorial! It was very helpful
I’m not sure what you are trying to accomplish here. You’re trying to import Python OpenCV bindings into a C++ program? Or you’re trying to include the OpenCV header files in a C++ program?
When you tried to compile your C++ source files, you have to tell the compiler where is the Opencv header file (.h or .hpp), so that the compiler can find the header file.
You can add follow command when you compile your c++-opencv source file:
-I/usr/local/Cellar/opencv3/3.2.0/include/opencv -I/usr/local/Cellar/opencv3/3.2.0/include
Note: “/usr/local/Cellar/opencv3/3.2.0/include/opencv” and “/usr/local/Cellar/opencv3/3.2.0/include” is the path where my opencv header files stored, you may have different paths.
Then during, the linking process, you need to tell the compiler where is the .lib file, so that them could be linked to your final executable file.
Add following command to achieve this goal:
-L/usr/local/Cellar/opencv3/3.2.0/lib -lopencv_stitching -lopencv_superres -lopencv_videostab -lopencv_aruco -lopencv_bgsegm -lopencv_bioinspired -lopencv_ccalib -lopencv_cvv -lopencv_dpm -lopencv_fuzzy -lopencv_hdf -lopencv_line_descriptor -lopencv_optflow -lopencv_reg -lopencv_saliency -lopencv_stereo -lopencv_structured_light -lopencv_phase_unwrapping -lopencv_rgbd -lopencv_surface_matching -lopencv_tracking -lopencv_datasets -lopencv_text -lopencv_face -lopencv_plot -lopencv_dnn -lopencv_xfeatures2d -lopencv_shape -lopencv_video -lopencv_ximgproc -lopencv_calib3d -lopencv_features2d -lopencv_flann -lopencv_xobjdetect -lopencv_objdetect -lopencv_ml -lopencv_xphoto -lopencv_highgui -lopencv_videoio -lopencv_imgcodecs -lopencv_photo -lopencv_imgproc -lopencv_core
Note: “/usr/local/Cellar/opencv3/3.2.0/lib” is the path where my opencv lib files stored, you may have a different path, just change it to yours.
Hi Adrian
this instruction is awsome! I installed opencv3 successfully on my mac sierra system. However now I may want to add ffmpeg surpport to my opencv3.
I noticed that actually there is a –with–ffmpeg option for brew install. However I followed exactly your commands and did not add this option at that time.
Now how can I add ffmpeg support without uninstalling and installing opencv3 again ?
If you want to add FFMPEG support you will have to uninstall OpenCV and install it with the FFMPEG flag.
I brew install ffmpeg and I uninstall opencv and re-install it with ffmpeg flag. However today when i was trying to read a mp4 file with videocapture() it always returned False, which made me doubt whether I added ffmpeg successfully.
If I installed opencv with ffmpeg support correctly, where and which file ( kind like opencv-ffmpeg.h ?) should I see ?
Instead of trying to enable FFMPEG from Homebrew, try compiling OpenCV from source.
Thank you so much for writing this tutorial! Awesome informations!
Thank you!
Hi Adrian,
I’ve followed your instructions up to the point of actually installing OpenCV3 (brew install…)
At the end of the process I get the “missing Python.h file” error. Any ideas?
Thanks!
Have you installed the Homebrew version of Python? Also, which version of Python are you using?
Adrian, thanks for the reply. Seems to be solved now, I exported a $CPATH pointing to the missing Headers folder. I think it’s working now, however, which is funny, python imports cv2, while pyhon3 imports cv3. Haven’t played with virtualenvs yet, though.
Thanks for covering this tricky install so thoroughly. My Python (2&3) and OpenCV installs were damaged – I think by XCode update or other auto upgrade in Mac OS. I had to re-install Python3 from scratch and re-do all the libraries I had from before. Following this tutorial worked for me first time.
Congrats on getting OpenCV installed, Neil! In general I would recommend turning off the macOS auto upgrade feature. Major OS upgrades almost always break sym-links in your development environment which is likely what happened here.
I got a error in installing opencv3 step:
==> Installing opencv3 from homebrew/science
Error: You must `brew link cmake` before homebrew/science/opencv3 can be installed
Could you help with it?
Do what the message says:
$ brew link cmake
And try continuing.
Hi,
Thank you for the tutorial!
I correctly installed opencv3 in this way. However I wish to install the version 3.1.0 of opencv, and by following the tutorial I’m only able to get the latest 3.2 version.
I have searched a lot for a way to do this, but couldn’t find something.
Is it possible to choose the version we want to install?
Using the automated Homebrew method I don’t think you can install specific versions of OpenCV. If you need a specific OpenCV version I would suggest compiling from source.
Thank you for the reply i’ll try from source.
I wish to try another version of opencv because i get trouble with using opencv 3.2.0 on my mac Sierra 10.12.3. The problem is that i want to read a video with python 3.6 and opencv 3.2.0, but it is very slow. I tried to install opencv with many options but still i get the same problem. (i made the install –with-cuda –with-contrib –with-ffmpeg –with-python3 –with-qt5 –with-tbb –without-opencl)
Moreover i get a normal video speed with exactly the same script on another computer with macOs El Capitan 10.11.6 and with opencv 3.1.0_3 and python 3.5.1. So i think the slow speed may be caused by the version of opencv.
Did you already have such a problem?
It’s hard to say without having physical access to your system. When it comes to processing video, I would recommend Ubuntu slightly more as you’ll have better control over the package management. Other than that, I’m not sure what the exact issue would be.
Great tutorial!
However, I have a quick question. When I type which python3, I get the correct directory. With which python, I only get /usr/bin/python.
I have installed both python 2.7 and 3, and my .bash profile is updated.
Any ideas as to why this is happening?
Hmm, that is indeed very strange. Make sure your
source
your.bash_profile
. Try re-installing Python 2.7 via Homebrew and checking for any errors.Hi Adrian, thanks for tutorial. I am having the same issue as Ameya and have uninstalled/reinstalled/updated .bashprofile/sourced it, and repeated the process. Any further suggestions?
Without physical access to your machine, unfortunately I’m not sure what the exact problem is.
The same thing here has happened to me, $ which python returns /usr/bin/python, and $ which python3 returns /usr/local/bin/python3.
Is it actually necessary that we have to make sure that we’re using the homebrew python 2.7, even if we never intend to use python 2.7? If the computer wants me to use a different python 2.7 than I installed, that’s fine, because I’m going to be using my homebrew version of python 3.5, which did correctly install.
If you’re going to be using Python 3.5 exclusively, then I don’t see it being an issue.
Hello,
Many thanks for this tutorial. Really helped me. I am new to OpenCV.
I have the source code to open an image in a window and closing it when any key is pressed.
I compiled the program like this:
g++ `pkg-config –libs –cflags opencv` -o display_image display_image.cpp
Is there an easier way to compile the code? It is very tedious to have to type this every time.
Thanks in advance!
Keep in mind that this is a Python blog, not a C++ blog. In any case, you should look into creating Makefiles.
Dear Adrian
Thank you very much for the tutorial. I have been trying to search for comment with the same problem but I cannot find so I decided to post here to ask.
I have previously installed OpenCV 2.4.12 in my OSX with brew and python 2 and 3 several months ago.
Today I have installed OpenCV 3 following your homebrew tutorial and everything seems fine until I tried
cv2.__version__
‘2.4.12’
Any ideas?
I have tried the following and it worked!
brew uninstall opencv
Thank you for your time 🙂
Glad to hear it Peeraya! 🙂
My terminal shows me this error while Installing OpenCV 3 with Python 3 bindings via Homebrew. What do i do?
==> Checking out branch master
Error: No such file or directory – /private/tmp/opencv3-20170411-5809-hafb4d/3rdparty/ippicv/downloader.cmake
I’ve seen a few readers encounter this issue. Unfortunately, I’m not sure what the exact problem is as it seems to be related to Homebrew. I would suggest trying to install OpenCV from source.
I got the same problem when installing opencv3. Then I solve the problem like this: go to the official website and download the zip code source, unzip it and you can get downloader.cmake file in 3rdparty, then you put it into the same file in opencv–git. After that try again and it will work.
Thanks very much for your very helpful tutorial. But I still get some problem.
First, when I follow your instruction at step4, after cloning the file from github, I got an error with a prompt: the ‘downloader.cmake’ file in 3rdparty is missing. I checked it out and found a problem. The code post on Github does not include ‘downloader.cmake’ while when I download the zip code, I found it was there. So I add that file manually and succeeded finally.
Second, after I completing the installation of opencv, when I call the formula cv2.VideoCapture(path), it failed to open the video file. Now I don’t how to solve the problem out. Additionally, the video file I was trying to open is .mkv file. Can you give me some advice?
Thank you for your reply.
This seems to be an issue with the latest version of Homebrew definition files that many readers are encountering. Try running
brew update
to refresh your definitions. Otherwise, you might need to install OpenCV via source.As for opening a .mkv file, it sounds like you may have installed OpenCV without MKV codec support.
So how could I install it with MKV codec support?
You would need to install the MKV drivers then re-install OpenCV. I haven’t tried to compile OpenCV support with MKV support before, so I unfortunately cannot provide any more guidance than this.
Thank you for sharing the Tutorial. But when I use command ” brew install opencv3 –with-contrib –with-python3 –HEAD” to install Opencv3, there is a error
Error ” No such file or directory – /private/tmp/opencv3-20170421-20765-4mxj69/3rdparty/ippicv/downloader.cmake ”
What can I do to deal with it.
Please read the comments before posting. “Nidhi” mentioned this error above and “Creekee” provided the solution.
Hi Adrian,
in the phase when I use a
$ ls -l /usr/local/opt/opencv3/lib/python3.5/site-packages/
I dont see any packages for python3.6. How can I include it???
Hi I have python 3.6 installed without homebrew, but I followed rest of the case. But i do not have a python 3.x folder as mentioned in the Handling the python3 issue. I have tried mutliple things but they are not working.
This blog post assumes you are using Homebrew and the Homebrew paths to Python 3.6. I would still suggest that you install Python via Homebrew to ensure it’s separate from your system install.
When I do so, it throws me this warning
“python3-3.6.1 already installed, it’s just not linked.” What does this mean??
and when using ‘which python3’ it shows /usr/local/bin/python3.
Try running:
$ brew linkapps python3
And see if that resolves the issue.
Hello Adrian,
Thanks for your post ! Only with your tutorial did I find a way to make it work.
However, it only does when I am in the /usr/local/opt/opencv3/lib/python2.7 folder and launch python from there. Then it works and I can use cv2 package (check import and version ok).
However, when I try to launch python from my root folder (or any others), then it doesn’t work. I can launch python but I get the typical answer ImportError: No module name cv2
That is an issue as it prevents from using my favorite editors (Rodeo or Pycharm) as they also return the same error message.
Would you have some advice on how it could make it work from any folder and my editors?
Many thanks,
-Gilles
Hey Gilles — are you using Python from a virtual environment like I recommend in this tutorial? Or did you skip the virtual environment step?
hey, I need help
I did everything as the tuturial says, got the same messages on the terminal after installing opencv, renamed the file to cv2.so and everything, but opencv only works under python and not under python3
Thanks
I found out what it was. ‘brew doctor’ showed python3 was unlinked, I just followed brew doctor instructions and it worked fine.
Thanks for this tutorial 🙂
Congrats on resolving the error Laura! And thank you for sharing the solution as well.
Three things:
1. This was super helpful, thank you so much!
2.Your recommendation to compile from source, and use Homebrew as a fallback- that’s at the end! If I had read that first, I would have went with your recommendation, but in the beginning it sounded like this was the easier route.
3. Everything “worked” except for the very last part: testing the opencv install in the virtual environment. When I type “import cv2” I get the error message: “ModuleNotFoundError: No module named ‘cv2′”, which is odd. It works outside the virtual environment, and when I redo the step to sym-link, I get feedback: “ln: cv2.so: File exists” . I looked around stackoverflow / github, but did not see a proper solution.
Thanks again for everything!
Hi Cory, thanks for the feedback. You’re right, I probably should have recommended compiling from source at the top of the post.
As far as the sym-link existing, you can delete it using
rm
just like any other file. Double-check your path to thecv2.so
file before you create the sym-link — that is likely where the error is.I had this issue too, but removed cv2.so with rm from the site-packages inside my virtualenv. Then relinked cv2.so using the command Adrian provided and cv2 is now imported just fine in python (when in virtualenv mode).
Hi!
When trying to install using the syntax
brew install opencv3 –with-contrib –with-python3 –HEAD
I get the following error:
“Error: opencv3: Does not support building both Python 2 and 3 wrappers”
Does it mean that OpenCV doesn’t support wrappers for both Python verions?
Do I have to run it with the extra syntax –without-python to make it work and thereby sacrifice the Python 2 support?
I’m quite a newbie within this field so any suggestions would be appreciated!
Thanks!
Hi Andreas — I would make sure you run
brew update
to make sure the latest install definitions are pulled down. Homebrew should not have an issue compiling and installing OpenCV with Python bindings.Hi Adrian, I’m facing the same problem as Andreas. I followed your advice by running brew update and I got “Already up-to-date.”
I then tried to run brew install opencv3 –with-contrib –with-python3 –HEAD and I got the error again, really not sure what I can do to resolve the problem.
Any advice or help will be greatly appreciated!
I’m curious if there is an improper sym-link somewhere. Can you remove the previous Python sym-link and try again?
I would also suggest reading the comment thread started by “Nidhi” above as it also addresses the same issue.
Based on the two threads, it seems that there was an update to the actual Homebrew formula that’s causing the error.
UPDATE:
The solution to the problem can be found here. If you want to install with
--HEAD
, then you’ll need to update the Homebrew formula.Otherwise, just omit
--HEAD
$ brew install opencv3 --with-contrib --with-python3
Hi Adrian,
I have the same issue as Andreas and my homebrew is up-to-date. Any other suggestions?
Hi Adrian,
I tried the solutions mentioned above for installing with –HEAD and also tried without, I still get the same error?
It sounds like the issue is with the formula itself then. Please see the StackOverflow thread I linked to.
Basically, you’ll want to edit the formula:
$ brew edit opencv3
And then comment out the lines:
From there you should be able to compile with
--HEAD
Please give that a try and let us know if it works.
Replying to Adrian, I tried commenting out those lines as well as with or without the –HEAD option. Looking more at the opencv3.rb file, there’s a pretty plain and simple IF/ELSE block to me:
if build.with?(“python3”) && build.with?(“python”)
# Opencv3 Does not support building both Python 2 and 3 versions
odie “opencv3: Does not support building both Python 2 and 3 wrappers”
end
I even did try compiling having this built-in block commented out and it “worked” as in no error, but only built the library path for the 2.7 python and not python3 (under the opencv lib path it makes the python2.7 folder, not the python3.x
So my thought, is there a way to not simultaneously install opencv for both python 2x and 3x at same time, and force it to only do 3x (–without-python seems to skip python all together)? Because it almost seems as if it’s now built to only handle one at a time.
Hey Patrick — thanks for the comment. Homebrew would need to do two separate compiles of OpenCV for Python 2.7 and Python 3 as they are two entirely different Python versions and will thus bind with OpenCV differently. As the current Homebrew formula stands, it looks like you can compile Python 2.7 bindings, but there is a bug with the Python 3 bindings. As I mentioned to “Daniel”, I’ll have to look into this further as the Homebrew formula has clearly changed.
Unfortunately, I’m having the same issue.
Error: opencv3: Does not support building both Python 2 and 3 wrappers
I tried editing the formula as suggested. I’ve also tried without the contrib and head params but the failure persists on macOS Sierra.
Any other suggestions?
Unfortunately, I don’t have any other suggestions at this time. I will try to play around with installing OpenCV via Homebrew on a local machine, but it unfortunately seems it an issue with the actual OpenCV + Homebrew formula. Until they update the formula, the problem will persist.
What do you think of this possible solution?
http://stackoverflow.com/questions/43666806/install-opencv3-on-mac-for-python-3-6
Spontaneously it feels like there is a reason for this check in the code and simply omitting sounds like a “too simple solution”. Apparently it works for at least one user. At least the install anyway.
For the moment I will install without using the –HEAD option.
Thanks for the responses so far!
Hi Andreas — I actually linked to that StackOverflow thread in a separate comment 😉
My bad, missed that one! 🙂
Hi Daniel,
You need to edit the formula in two places, i.e comment in two places
First place
if build.with?(“python3”) && build.with?(“python”)
# Opencv3 Does not support building both Python 2 and 3 versions
odie “opencv3: Does not support building both Python 2 and 3 wrappers”
end
Second place
As mentioned in this post.
Hope it works it worked for me
Hi Francis — what you do mean by “First place”? Is there a second configuration file that you’re editing outside of
brew edit opencv3
? I just want to make sure we’re on the same page.Try using
brew install opencv3 --with-contrib --with-python3 --without-python
This will work if you need Python 3 bindings. It will not work if you need Python 2.7 bindings. I just drafted a blog post that will publish on 15 May 2017 to provide solutions to these issues.
Hi Adrian
As always very good tutorial.
One tiny suggestion from my end is that after Home brew install better to execute brew doctor.
Great tip, thanks for sharing Francis.
I was receiving an issue regarding webp. I was able to solve it by installing the webp package with homebrew (brew install webp).
Hi, I have found that my IDLE no longer has matplotlib as a module, although it was installed on my previous version of python 3.6.0. Could you advise me on what I have missed out? Thank you
I’m not sure what the exact problem may have been, but you can always install matplotlib via:
$ pip install matplotlib
How can I add the opencv3 parameters after I installed opencv3. Like I want to add ffmpeg parameter for opencv3
If you want to add FFMPEG parameters to OpenCV you would need to re-compile and re-install OpenCV. In this case, you would add the
--with-ffmpeg
flag to the Homebrew command.I recently updated my bash profile to show which github branch is active (master), etc. Now my command line just has a plain $ showing. It doesn’t show which virtual environment I am in… Do you know how to fix this, and also any good resources on configuring the command line. Thanks for this tutorial. Relative newb to python and coding in general.
This
$ cd ~/.virtualenvs/cv/lib/python3.5/site-packages/
$ ln -s /usr/local/opt/opencv3/lib/python3.5/site-packages/cv2.so cv2.so
$ cd ~
didn’t work for me. The file was still named “cv2.cpython-36m-darwin.so”. I created another symlink ln -s cv2.cpython-36m-darwin.so cv2.so” to solve it.
Great tutorial! Thank you very much.
Best,
Ben.
Hi Ben — the reason the original command did not work for you is because you used Python 3.6. This blog post was written for Python 3.5. In either case, be sure to pay attention to your Python versions and filenames as they will change based on your Python version.
Hi! I installed the installation following the tutorial and I was successful, but when I run the examples the images are not loaded, the highgui window opens with the command “cv2.imshow (” name “, image)” but does not show the image. This can be seen in the link below.
https://drive.google.com/file/d/0B-wW-2hdIvXteWU4ZXhKWVpQbEE/view?usp=sharing
Thank you very much in advance
This seems to be a bug with the latest OpenCV release in the repository. Remove the
--HEAD
flag from your Homebrew command when installing and it should resolve the issue.Hi Adrian… It worked perfectly … Thank you !!!
Fantastic, I’m glad to hear it 🙂 And congrats on getting OpenCV installed on your system!
Hi there,
great tutorial. Sadly, imshow() is not working. See my SO question: https://stackoverflow.com/questions/44686163/ Does anybody have some advice? Would be so thankfull.
Best,
Bernhard
Please see my reply to “TIAGO FREITAS” above. There is a problem with the latest commit, so simply remove the
--HEAD
switch from your Homebrew command and it will work perfectly.Thanks Adrian! These instructions work well for MacOS 10.12.5 and Python 3.6.1. One difference is that –with-python3 now installs ONLY the Python 3 bindings. Meanwhile, using –HEAD still produces the error described on Stack Overflow.
Despite any past grievances with Continuum, I highly recommend that most Python practitioners use conda-forge. It’s much simpler, faster, and well-contained, requiring just three commands:
conda config –add channels conda-forge
conda install opencv
conda update –all -c conda-forge
The only benefit I see in compiling from source using Homebrew is if one also desired C++ bindings and command line tools.
Hi Adam — thanks for the comment; however, I have already addressed the OpenCV + Python + Homebrew issue in this blog post. Definitely give it a read. You’ll also get finer grained control over the OpenCV compile. Nothing beats compiling from source in my opinion.
Thanks for the great post! I noticed on Mac OX El Capitan I received an error with webp – so I followed this instruction, but watch-out opencv expects version libwebp-0.5.2: https://developers.google.com/speed/webp/docs/compiling#building
For anyone who has trouble pointing python to /usr/local/bin:$PATH , I forgot where i read this solution but the fix was
export PATH=”/usr/local/opt/python/libexec/bin:$PATH”
The guy said this is the new way ? i’m not that sure but it seemed to fix my issue.
Hi Adrian,
I have a problem with the following commands:
$ brew linkapps python
$ brew linkapps python3
Error:
Unfortunately `brew linkapps` cannot behave nicely with e.g. Spotlight using
either aliases or symlinks and Homebrew formulae do not build “proper” `.app`
bundles that can be relocated. Instead, please consider using `brew cask` and
migrate formulae using `.app`s to casks.
Linking: /usr/local/opt/python/IDLE.app
Linking: /usr/local/opt/python/Python Launcher.app
Linked 2 apps to /Applications
Any idea how to replace linkapps or fix this issue?
You can skip the
brew linkapps
step with the latest release of Homebrew.Hi Adrian,
Great post, followed most of your steps: https://robferguson.org/blog/2017/10/06/how-to-install-opencv-and-python-using-homebrew-on-macos-sierra/
Cheers
Rob
Thanks for the nice tutorial. I followed carefully the steps on installing Python using Homebrew. However, when I run “which python”, I get:
/usr/bin/python
It is working well for python3 though. For instance, “which python3”, returns:
/usr/local/bin/python3
Any ideas why “python” is not working as expected?
Thanks so much.
This is due to a recent update in Homebrew which I’ll be addressing in a new macOS install post. I would suggest using either
python2
orpython3
(depending on which version of Python you are compiling OpenCV for) in place ofpython
. I hope that helps!So can we leave it as it is? I mean having the stated faulty path for python and then having the correct one for python3 or do we have to completely install and change path to say python2?
The path isn’t necessarily “faulty” — it’s just how Homebrew is handling the paths now. Just supply either “python2” or “python3” via your command line. My suggestion would be to use this command to create your Python virtual environment:
$ mkvirtualenv cv -p python2
And once you are inside the “cv” Python virtual environment the “python” command would be aliased to “python2”.
Hello. Much thanks… This is the issue i’ve been having. The which python has */local * missing. I’ve have repeated step 2 severally but still no changes. What can I do please? Although I did previously have python installed on my laptop like a year back. I have not tried installing openCV yet though since you said we should make sure this part is fixed before proceeding. Thank you again.
tests-MBP:~ test$ which python
/usr/bin/python
tests-MBP:~ test$ which python3
/usr/local/bin/python3
Homebrew does not alias the “python” command in this case. Use “python2” or “python3” when you create your Python virtual environment:
$ mkvirtualenv cv -p python2
Or:
$ mkvirtualenv cv -p python3
And from there you’ll be all set!
Just use `brew install opencv3 –with-contrib –with-python` Useless article! If you have python3 just use `–with-python3` flag instead.
This tutorial covers how to install OpenCV via Homebrew (as your command does). It also covers best practices when using the Python programming language, such as utilizing Python virtual environments and how to get OpenCV to work inside your virtual environments as well. I also cover common gotchas that may trip readers up. I’m sorry you found it “useless”, but others have found it very helpful getting up and running with OpenCV 🙂
Sorry, maybe useless is a wrong word, I meant overcomplicated for such a simple task as most users don’t want virtual environments etc. Also, it would be good to mention that now its possible to install OpenCV using pip. `pip install opencv-contrib-python`
I would disagree. Python virtual environments are a best practice in Python development. Just because we are using OpenCV does not mean we should skip using Python virtual environments. Secondly, I would recommend caution when installing OpenCV via pip. Depending on your operating system you may not have the GUI components installed (in particular the “highgui” module) which would prevent you from using OpenCV’s GUI functionality. Personally, I like to compile OpenCV from source (which you can find in all my author tutorials) which allows me to further optimize the install. If you decide you don’t to use Python virtual environments, by all means, don’t use them. But they are a best practice in Python development and I saying “most users” is a large exaggeration.
brew tap homebrew/science is deprecated
I will be providing a new, updated install tutorial for macOS High Sierra soon. Stay tuned!
please do!
Hi Adrian,
Any update on the macOS High Sierra tutorial for opencv ?
Thanks !!
I haven’t done it yet but it’s on my radar 🙂 I have a really cool series of deep learning posts coming up and then I’ll be able to do some more install tutorials. I’m also evaluating five different ways of installing OpenCV on macOS High Sierra so it’s taking some time (as I want to report the best method).
Hi, Adrian!
Is there any update on “brew tap homebrew/science is deprecated” issue?
Thanks.
I’ll be releasing a brand new macOS post within the next month, stay tuned! 😀
Hi adrian,
Thanks a lot for that awesome tutorial!
Just a small noob question : install seems OK as cv2.__version__ print out ‘3.4.0’
But when I try to run your next tutorial cat-detector.py script, i get stuck in initialize openCL runtime…
Any ideas where this could come from?
Hey guillaume — can you link to a GitHub Gist of the exact error message you are receiving?
Hi,
here it is
https://gist.github.com/guillaumesoul/4a1c08d546a9d85087d229981bb46a15
Thank you for sharing, Guillaume. To be honest, I have not encountered that error before. I would suggest re-compiling and re-installing OpenCV with OpenCL disabled and see if that resolves the issue.
Hi, Ok I’ll do that and see, thank you very much
The command “$ brew install python python3” and even “$ brew install python” only installs python 3. You have to use $ brew install python2″ to install py 2.7.
Can I use Opencv on a mac o sx 10.6.8
Mac OS 10.6 is Snow Leopard, right? To be honest I have not tried this tutorial on Snow Leopard. I highly doubt it would work — you should use a more recent version of OSX. Snow Leopard is almost 10 years old at this point.
“Homebrew team lately changed the name from opencv3 to opencv”..
This little piece of information that I read somewhere on the comments SAVED my life 😀
I struggled with “no such file….” but things magically worked perfectly after I omitted the “3” after “opencv” on all paths..
Thank you so much Adrian.. I really appreciate your generosity on sharing your knowledge with us..
Awesome, I’m glad the tutorial helped you Linah! Congrats on getting OpenCV installed on your macOS machine 🙂
linkapps was deprecated what can i do ? Any suggestion and also my python3 is in wrong direction. Can u suggest something ?
You can skip the “linkapps” command as it is now deprecated. I’m working on a new, updated High Sierra tutorial as well. What is the path your “python3” is reporting?
Hi Adrian, first of all for doing this installation tutorial. I’m pretty new with Python and this is the first time I’ve tried to install OpenCV in my High Sierra. I tried following the steps from another website but found it too complicated and I failed, then I ended up here. 🙂 just saying because I don’t know if the problem I have might be also for this previous try.
I have followed all your steps and everything seemed to be ok, but at the last step I had a problem when testing openCv in the virtual environment. When I type “import cv2” I also get the error message: “ModuleNotFoundError: No module named ‘cv2′”. I’ve read someone else had this problem before and you recommended to remove cv2.so, so I did but still have that message.
You also suggested to double check the path to the cv2.so file before you create the sym-link, which one should be the right one?
Any idea how to proceed?
Many thanks in advance again.
Br
Hey Tanaan, thanks for the comment and I’m sorry to hear about the issues installing OpenCV. I’m working on a dedicated High Sierra + OpenCV install tutorial but it’s not ready yet. As for your “cv2” module not importing are you sure you are in the “cv” Python virtual environment before importing?
Secondly, you are correct that you should double-check your sym-link path. Your exact path may be slightly different depending on your system but you should find the “cv2.so” file in the “site-packages” directory of your system install of Python.
Hi Adrian, many thanks for the quick prompt. That tutorial would be awesome, could you maybe include at the beginning how to remove any previous installation if that is the case just to be sure we do everything from scratch?
Yes, I’m totally sure I am in the virtual environment since the first thing I do in the terminal is type “workon cv”. The next line starts with “(cv)”. So I assume I’m in the virtual environment.
I asked you about the path because I’ve found several “site-packages” directories in my system (maybe that’s why I got that error?). I have this two paths as my main doubt
usr>local>bin>python2.7>site-packages
usr>local>Cellar>opencv>3.4.1_5>lib>python2.7>site-packages
It doesn’t matter where I put the cv2.so file, one of them, both of them or no one because I still getting that error. 🙁
Many thanks again for your help, Adrian
Br.
If you installed via brew you could do a “brew uninstall opencv” which should remove any brew-based installs of OpenCV. Homebrew has become a bit more of a pain lately but your OpenCV bindings should be in the
/usr/local/lib/python2.7/site-packages
directory (or “python3” if you used Python 3).Hi Adrian, thanks for the tutorial. I just run the “brew install opencv3 –with-contrib –with-python3 –HEAD” code line and it appears “ERROR: no head is defined for opencv”.
Any idea what is going on? I tried using “opencv” instead of “opencv3” as I saw in some comments above but still nothing.
I am new on all of this, sorry if there are some rookie’s mistakes. Thanks for the help.
Hey Carlos, this is not a rookie mistake. Homebrew has changed how OpenCV is installed. I’m working on a new tutorial to handle installing OpenCV. In the meantime, I recommend compiling from source.
Thank you for this tutorial. I ran into some issues symlinking my opencv to the virtualenv one. This site solved a lot of my issues.
https://medium.com/@nuwanprabhath/installing-opencv-in-macos-high-sierra-for-python-3-89c79f0a246a
My latest tutorial on installing OpenCV 4 on macOS should also help clear up any of your confusion as well 🙂
Hi;
I followed a separate tutorial to install OpenCV on Mac OS X High Sierra and couldn’t get openCV to run in virtualenvwrapper. I then found your guide (which I should have looked for first off!!) anyway all was going well until I tried to brew tap homebrew/science:
$ brew tap homebrew/science
Updating Homebrew…
…
Error: homebrew/science was deprecated. This tap is now empty as all its formulae were migrated.
Hi Bill!
Homebrew actually deprecated the “homebrew/science” tap. I would actually recommend you follow this updated OpenCV 4 and macOS install post.
Working now 🙂
I messed up the symlink
Congrats on resolving the issue, Bill 🙂
For anyone else reading this comment I no longer recommend installing OpenCV via Homebrew. This post, along with my pip install OpenCV posts are my two recommended resources.
I have tried to follow this but without installing the virtual environment. Firstly, homebrew/science is no longer a repo but as far as I can tell I still managed to install everything but not the symlinks because I don’t want the virtual environments. Needless to say it doesn’t work for me. If I run Python and try import vc2 it just says ‘no module named cv2’. How do I get around this. I’m not a Python developer, I just occasionally use it for quick testing.
Hey Darren — you might be interested in instead installing OpenCV via pip.
I would recommend updating the tutorial for the “brew tap homebrew/science” step. That command has been deprecated.
It should be replaced with: brew tap brewsci/science
Thanks for putting this together!
Hey Anshul — you should actually be following this tutorial instead.