When it comes to working with deep learning + Python I highly recommend that you use a Linux environment.
Deep learning tools can be more easily configured and installed on Linux, allowing you to develop and run neural networks quickly.
Of course, configuring your own deep learning + Python + Linux development environment can be quite the tedious task, especially if you are new to Linux, a beginner at working the command line/terminal, or a novice when compiling and installing packages by hand.
In order to help you jump start your deep learning + Python education, I have created an Ubuntu virtual machine with all necessary deep learning libraries you need to successful (including Keras, TensorFlow, scikit-learn, scikit-image, OpenCV, and others) pre-configured and pre-installed.
This virtual machine is part of all three bundles of my book, Deep Learning for Computer Vision with Python. After you purchase your copy you’ll be able to download the virtual machine and get started with deep learning immediately.
In the remainder of this tutorial I’ll show you:
- How to download and install VirtualBox for managing, creating, and importing virtual machines.
- How to import the pre-configured Ubuntu virtual machine for deep learning.
- How to access the pre-installed deep learning libraries on the virtual machine.
Let’s go ahead and get started.
Your deep learning + Python virtual machine
Your purchase of Deep Learning for Computer Vision with Python includes a pre-configured Ubuntu virtual machine for deep learning. In the following sections I’ll show you how easy it is to import your Ubuntu deep learning virtual machine.
This tutorial is broken down into three parts to make it easy to digest and understand:
- Download and install VirtualBox.
- Download and import your pre-configured Ubuntu deep learning virtual machine.
- Access the Python development environment inside the deep learning virtual machine.
Step #1: Download and install VirtualBox
The first step is to download VirtualBox, a free open source platform for managing virtual machines.
VirtualBox will run on macOS, Linux, and Windows.
We call the physical hardware VirtualBox is running on your host machine. The virtual machine that will be imported into VirtualBox is the guest machine.
To install VirtualBox, first visit the downloads page and then select the appropriate binaries for your operating system:
From there install the software on your system following the provided instructions — I’ll be using macOS in this example, but again, these instructions will also work on Linux and Windows as well:
Step #2: Download your deep learning virtual machine
Now that VirtualBox is installed you need to download the pre-configured Ubuntu virtual machine associated with your purchase of Deep Learning for Computer Vision with Python:
The file is approximately 4GB so depending on your internet connection this download make take some time to complete.
Once you have downloaded the VirtualMachine.zip
file, unarchive it and you’ll find a file named DL4CV Ubuntu VM.ova
. I have placed this file on my Desktop:
This is the actual file that you will be importing into the VirtualBox manager.
Step #3: Import the deep learning virtual machine into VirtualBox
Go ahead and open up the VirtualBox manager.
From there select File => Import Appliance...
:
Once the dialog opens you’ll want to navigate to where the DL4CV Ubuntu VM.ova
file resides on disk:
Finally, you can click “Import” and allow the virtual machine to import:
The entire import process should take only a few minutes.
Step #4: Boot the deep learning virtual machine
Now that the deep learning virtual machine has been imported we need to boot it.
From the VirtualBox manager select the “DL4CV Ubuntu VM” on the left pane of the window and then click “Start”:
Once the virtual machine has booted you can login using the following credentials:
- Username:
pyimagesearch
- Password:
deeplearning
Step #5: Access the deep learning Python virtual environment
The next step after logging into the VM is to launch a terminal:
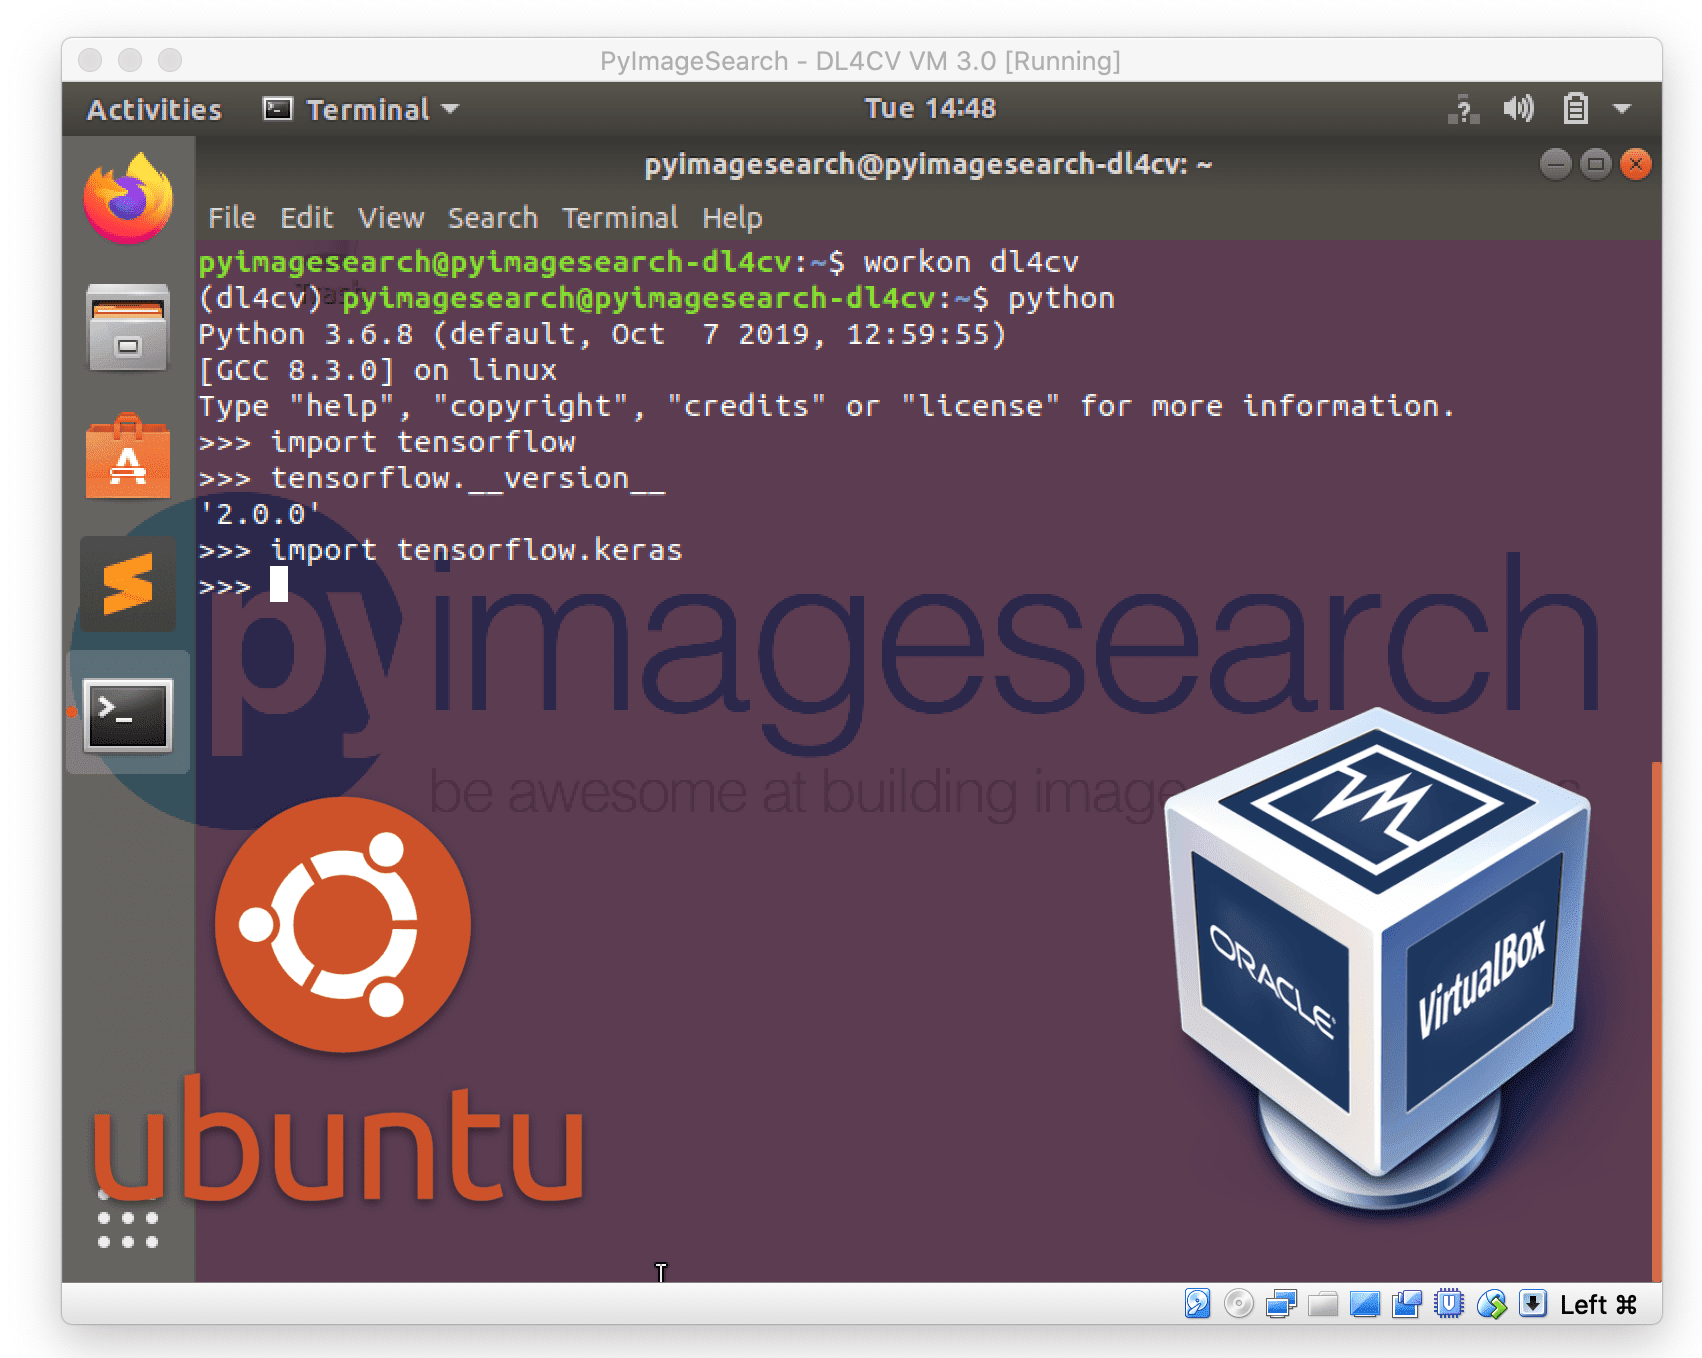
From there, execute workon dl4cv
to access the Python + deep learning development environment:
Notice that my prompt now has the text (dl4cv)
preceding it, implying that I am inside the dl4cv
Python virtual environment.
You can run pip freeze
to see all the Python libraries installed.
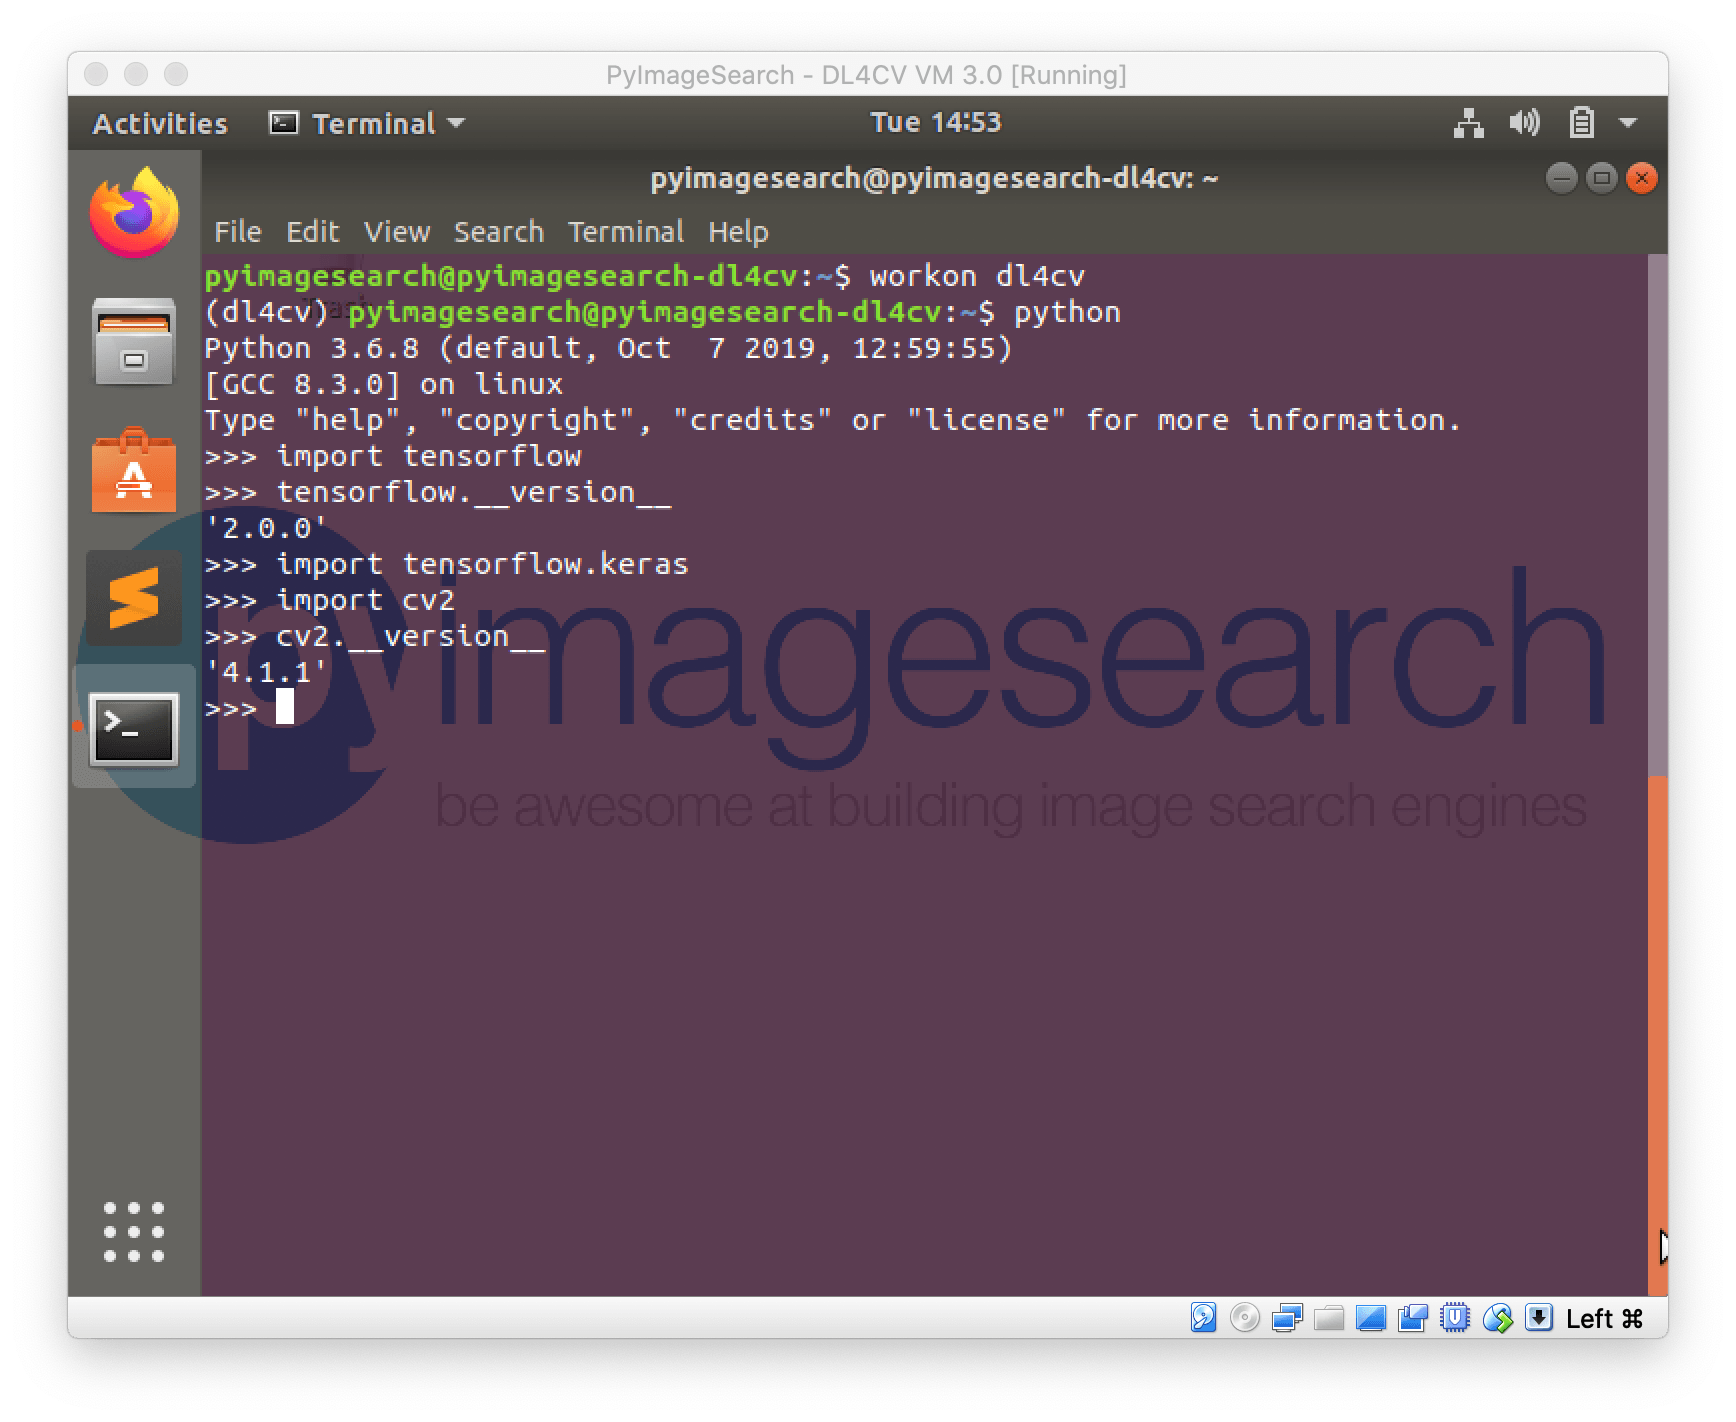
I have included a screenshot below demonstrating how to import Keras, TensorFlow, and OpenCV from a Python shell:
Step #6: (Optional) Install Guest Additions on virtual machine
An optional step you may wish to perform is installing the VirtualBox Guest Additions on your machine.
The Guest Additions package allow you to:
- Copy and paste from the virtual machine to your host (and vice versa)
- Share folders between the virtual machine and host
- Adjust screen resolution
- etc.
You can install the Guest Additions by selecting Devices => Install Guest Additions...
from the VirtualBox menu at the top of your screen.
Executing code from Deep Learning for Computer Vision with Python on your virtual machine
There are multiple methods to access the Deep Learning for Computer Vision with Python source code + datasets from your virtual machine.
By far the easiest method is to simply open Firefox and download the .zip archives from the “Your Purchase” page after buying your copy of Deep Learning for Computer Vision with Python. I would recommend forwarding the receipt email to yourself so you can login to your inbox via Firefox and then download the code + datasets.
You may also use your favorite SFTP/FTP client to transfer the code from your host machine to the virtual machine.
Of course, you can always manually write the code inside Ubuntu virtual machine using the built-in text editor as you follow along with the book.
Tips for using the deep learning virtual machine
When using the Ubuntu VirtualBox virtual machine for deep learning I recommend the following:
- Use Sublime Text as a lightweight code editor. Sublime Text is my favorite code editor for Linux. It’s simple, easy to use, and very lightweight, making it ideal for a virtual machine.
- Use PyCharm as a full blown IDE. When it comes to Python IDEs, it’s hard to beat PyCharm. I personally don’t like using PyCharm inside a virtual machine as it’s quite resource hungry. You’ll also need to configure PyCharm to use the
dl4cv
Python environment once installed.
Troubleshooting and FAQ
In this section I detail answers to frequently asked questions and problems regarding the pre-configured Ubuntu deep learning virtual machine.
How do I boot my deep learning virtual machine?
Once your VM has been imported, select the “DL4CV Ubuntu VM” on the left-hand side of the VirtualBox software, then click the “Start” button. Your VM will then boot.
What is the username and password for the Ubuntu deep learning virtual machine?
The username is pyimagesearch
and the password is deeplearning
.
The username and password is not working for me.
The keyboard layout chosen for the Ubuntu virtual machine is the standard English layout. If you are using a keyboard in a different language than English please add the keyboard layout for your specific language.
To accomplish this, first open the system settings application and select “Keyboard”. From there, click the “Text Entry” button at the bottom of the panel:
Lastly, click the “+” icon, select your keyboard layout, and click “Add”:
You may need to reboot your system for these changes to take effect.
How do I run Python scripts that access deep learning libraries?
The Deep Learning for Computer Vision with Python virtual machine uses Python virtual environments to help organize Python modules and keep them separate from the system install of Python.
To access the virtual environment simply execute workon dl4cv
from the shell. Form there you’ll have access to deep learning/computer vision libraries such as TensorFlow, Keras, OpenCV, scikit-learn, scikit-image, etc.
How can I access my GPU from the Ubuntu virtual machine?
The short answer is that you cannot access your GPU from the virtual machine.
A virtual machine abstracts your hardware and creates an artificial barrier between your host machine and your guest machine. Peripherals such as your GPU, USB ports, etc. on your physical computer cannot be accessed by the virtual machine.
If you would like to use your GPU for deep learning I would suggest configuring your native development environment.
I am receiving an error message related to “VT-x/AMD-V hardware acceleration is not available for your system”. What do I do?
If you are getting an error message similar to the following:
Then you likely need to check your BIOS and ensure virtualization is enabled. If you’re on Windows you might also need to disable Hyper-V mode.
To resolve the problem:
- Disable Hyper-V mode from the Windows control panel (if using the Windows operating system). Take a look at the answers to this question, which is the same problem you are having. Disabling Hyper-V is different on different Windows versions, but following the answer to the question above you should be able to find your solution. That said, also make sure you do step 2 below as well.
- Check your BIOS. The next time you boot your system, go into the BIOS and ensure that Virtualization is enabled (normally it’s under some sort of “advanced setting”). If virtualization is not enabled, then the VM will not be able to boot.
What's next? I recommend PyImageSearch University.
30+ total classes • 39h 44m video • Last updated: 12/2021
★★★★★ 4.84 (128 Ratings) • 3,000+ Students Enrolled
I strongly believe that if you had the right teacher you could master computer vision and deep learning.
Do you think learning computer vision and deep learning has to be time-consuming, overwhelming, and complicated? Or has to involve complex mathematics and equations? Or requires a degree in computer science?
That’s not the case.
All you need to master computer vision and deep learning is for someone to explain things to you in simple, intuitive terms. And that’s exactly what I do. My mission is to change education and how complex Artificial Intelligence topics are taught.
If you're serious about learning computer vision, your next stop should be PyImageSearch University, the most comprehensive computer vision, deep learning, and OpenCV course online today. Here you’ll learn how to successfully and confidently apply computer vision to your work, research, and projects. Join me in computer vision mastery.
Inside PyImageSearch University you'll find:
- ✓ 30+ courses on essential computer vision, deep learning, and OpenCV topics
- ✓ 30+ Certificates of Completion
- ✓ 39h 44m on-demand video
- ✓ Brand new courses released every month, ensuring you can keep up with state-of-the-art techniques
- ✓ Pre-configured Jupyter Notebooks in Google Colab
- ✓ Run all code examples in your web browser — works on Windows, macOS, and Linux (no dev environment configuration required!)
- ✓ Access to centralized code repos for all 500+ tutorials on PyImageSearch
- ✓ Easy one-click downloads for code, datasets, pre-trained models, etc.
- ✓ Access on mobile, laptop, desktop, etc.
Summary
In today’s tutorial I demonstrated:
- How to download and install VirtualBox, the software used to manage virtual machines.
- How to import and launch your Ubuntu deep learning virtual machine.
- How to access the deep learning development environment once Ubuntu has booted.
All purchases of my book, Deep Learning for Computer Vision with Python, include a copy of my pre-configured virtual machine.
This virtual machine is by far the fastest way to get up and running with deep learning and computer vision using the Python programming language.
If you would like to learn more about my new book (and pick up a copy yourself), just click here.
Join the PyImageSearch Newsletter and Grab My FREE 17-page Resource Guide PDF
Enter your email address below to join the PyImageSearch Newsletter and download my FREE 17-page Resource Guide PDF on Computer Vision, OpenCV, and Deep Learning.
Hi Adrian,
Maybe you think migrate VM to Docker?
I find this 😉
https://docs.docker.com/machine/drivers/virtualbox/#options
I’ve given it a lot of thought, but at the present time we’ll be using VirtualBox. I personally don’t like VirtualBox as much as Docker; however, it’s easier for many other readers to use VirtualBox (especially if they are new to computer vision, deep learning, or the command line).
There are also many moving parts for the release of the new book. I’d like to limit these moving pieces as much as possible for the initial release. From there the book can be iterated on and more tools released.
Thank you Adrian!
Such a nice information on how to setup Ubuntu and use deep learning libraries. Thank you
Hey Adrian, I already have Ubuntu as my operating system and would prefer not installing an extra virtual machine with Ubuntu. I have the standard deep learning and computer vision tools installed in my system(tensorflow,keras,opencv) what other libraries are required for your book?
Hi Sergio — I will be releasing instructions to configure your own native deep learning development environment on Monday.
Hi Adrian,
thanks for this post. I seem to have s different version of the VM. I downloaded it from the link after my purchase and while the login works, i don’t have a virtual environment called “dl4cv”. Running lsvirtualenv shows me that there is just one environment called “deeplearning”. Should I just work there or do I have an old version of the VM?
I just released the brand new VM as discussed in this post. You are indeed using the old version. Please check your inbox for the download of the new version.
how to run your code ?
Hi Hendrick — I’m not sure what your specific question is. Can you please elaborate?
I bought the complete bundle in March 2016. Do I need to wait until Monday to access the VM? Thanks
Hi Steve — I actually just released the book now. Please check your inbox for the download link.
is there going to be lighweight installation for pi 3 for our neural networks?
You shouldn’t be training neural networks on your Raspberry Pi. Train on a laptop/desktop that either has a faster CPU and more RAM, or ideally a GPU. You can then take the trained network and deploy it to the Raspberry Pi.
I don’t see how we can do deep learning without a GPU. Everything will take 10 times as long
The VM will work just fine if you are getting started with deep learning and going through the “Starter Bundle”. Yes, running on the CPU does take considerably longer. However, if you are just learning the basics (similar to learning the basics of programming) a CPU is sufficient. Once you get to the point where you are training larger, deeper networks you would want to use a GPU.
In order to share files between the virtual box and my windows I found this tutorial helpful:
https://www.youtube.com/watch?v=I5cV0V7vLJw
Thank you for sharing, Gilad!
sudo usermod -aG vboxsf $(whoami) – this cmd will help you if you have that access denied problem for your host windows shared folder!
Hi Adrian! Kinda of a dumb question but here it goes. We should install PyCharm on our VM right? If so, how do we configure it to work on our dl4cv enviroment? Thanks in advance!
Hi Stefan — you can use PyCharm on your VM if you wanted a Python IDE. You can set the “Project Interpreter” for the project to be the “dl4cv” Python. From there you’ll be able to use the “dl4cv” environment within PyCharm. This tutorial was written for macOS awhile ago but it demonstrates the steps you need to take.
Thank you for quick response! I have fixed it!
Congrats on resolving the issue Stefan!
Hi Adrian, this is super helpful, thanks!
What do you think I’m doing wrong if I can’t get the host to copy/paste to the VM?
I did the Insert Guest Additions within the VM and I configured the Virtual Box settings menu to have bidirectional shared clipboard.
I’ve had this issue before. I would suggest a shutdown of the VM. And then boot the VM.
Hi, I am using WinSCP to transfer my Files from my computer to virtual machine. i am trying to connect VM via Inet add:10.0.2.15 user: pyimagesearch and Password deeplearning. but unable to connect VM. what is wrong? seeking help
Hi Naushad — thanks for your question. You should make a “host only network” in Virtual Box. This will allow your host to connect to your VM. From there, restart the VM and run
ifconfig
on the VM to figure out what its IP address is. On mine it is192.168.56.102
. So then to SCP files to my VM from the terminal (you’ll have to adapt to WinSCP), I typescp files.zip pyimagesearch@192.168.56.102:~
and enter the password when prompted. The files will then reside on your VM in your home folder. Let me know if this helps!I have the VM running, After downloading chapters, I can’t find the datasets.
Hey Erich — after you have the VM running you need to download the .zip files to the VM. You can do this either via SFTP or by logging into your email address sand downloading the files from there. Be sure to see the “Executing code from Deep Learning for Computer Vision with Python on your virtual machine” section of this guide.
Hi Adrian!
I’m running the VM – (first time using Linux) – I tried adding a shared folder from my Mac in the VirtualBox Settings, but once it’s mounted, it says I don’t have the right permissions to access the folder. Any ideas?
Hi Grishma — David here. My suggestion is to take a look at your Mac security settings — you might have to enable file sharing. You should also review Section 4.3 of the VirtualBox manual. There are also a lot of VirtualBox forums with help on this feature that you can review. That being said, I’ve used this feature in the past and I found it to be unreliable (requiring restarts of the VM, etc.). For file sharing my preferred method is SCP. If you setup a “host only network” via VirtualBox VM settings, you can then SCP files from your host OS (Mac) to your guest OS (Ubuntu). For DL4CV, you can zip individual chapters and datasets and SCP them to the VM. Give both a shot and see which you like better.
Hey Adrian,
I have installed the VM and everything runs perfectly.
But I have a windows system with a partition running ubuntu.Can I run the similar development environment with all the libraries in the ubuntu partition , because at times the VM tends to be slow.
Would this be advisable or should I stick with the VM?
Yes, you can absolutely run the code on your Ubuntu partition. I have a tutorial on configuring your Ubuntu machine for deep learning here.
Hey Adrian, I am grateful for your kind reply every time.
I am taking your pyimagesearch gurus course.( I also purchased a deep learning course. )
So I have already built a virtual machine once.
( https://gurus.pyimagesearch.com/pyimagesearch-virtual-machine/ )
I think it is wasteful to build a virtual machine again.
Is there a way I can install only the Deep Learning module(tensorflow?) in my existing virtual machine?
Hi Yoon-Soo — the Gurus course VM and DL4CV VM actually has different libraries installed on it. I do that to ensure the VMs work out of the box with no errors for you. Yes, having two VMs will require slightly more hard drive space for you but it also guarantees that they will work regardless on your machine. Please make sure you download both.
Hi Adrian,
What is a password for the super user for Virtual Machine?
When I tried to Install Guest Additions, it said
“Authentication is needed to run ‘/bin/sh’ as the super user” …
Thanks.
The password is “deeplearning”, all lowercase and no quotes.
Hey Adrian!
I was wondering, why do I need a virtual machine to run this? I have conda installed and I can import keras, tensorflow or any other package with a simple pip install or conda install, why the virtual machine? Are things configured differently there, do you really recommend linux or can I just run like this on my mac OS?
If your local machine is properly configured than you can by all means use it — you don’t need the VM. I provide the VM as an easy way to get readers started, but if your machine is properly configured you can skip the VM.
I downloaded and powered on the virtual machine. The default user is set to “GURU” and the password is not available. Can you provide the password pl.
Regards,
S.KUMAR
Are you referring to the PyImageSearch Gurus VM? Or to the Deep Learning for Computer Vision with Python VM? It sounds like you may be confusing the two. Please clarify and then send me an email if you have any questions.
That password not working for me. Keyboard layout is correct? How I can login??
I hack it 😀 , nvm… It some reason didn’t work. I try it many times… but it said wrong password…
Congrats on resolving the issue, Niko. The VM does assume an English keyboard layout. If you are using a non-English keyboard layout then the key mappings will be different.
Hi Niko H, I am facing the same issue. How did you hack it?
Adrian, the username password combination mentioned by you is not working.
What is your keyboard layout? Switch your keyboard layout to US/English, the enter the username and password.
I installed the virtual machine to make it easier to get started, and ran the first test program, the default knn classifier, and got the expected output. However, going forward, to learn anything at all about the algorithms, I will need to step through the code, being able to see lots of context and easily examine all the values at once. Especially when writing anything original. The native pdb would be ok if the issue were debugging, but it isn’t. The issue is understanding, and pdb is no good at all for that, at least from my attempted use of it before. The spyder ide worked ok for that purpose on some other projects I tried. You mentioned pyCharm, so maybe that has a good “debugger” also? Is there already a gui interfaced debugger installed in the dl4cv box? What do you use when writing some original code for the first time, and you are exploring how it works?
PyCharm is a really nice IDE and I highly recommend it. If you like working with the GUI then absolutely go with PyCharm. There is no GUI interface debugger on the VM, you would need to install whichever one you want to try.
As far as writing code for the first time I use a lot of print statements and pdb. That’s honestly about it.
I did manage to install pycharm in the VM, though it required an unexpected fix for that to happen: in trying to install pycharm, at some point I encountered “failed to load module canberra-gtk-module”, and would not proceed. Thanks to stackexchange or some other online help (I forget) I ran sudo apt install libcanberra-gtk*, whatever that means or does, and then pycharm would indeed install. So now I can step through your code and see what happens and see the values, etc, so am off and running. My son however didn’t mess with the VM and simply used his anaconda/spyder setup he already had with the tools like Keras and TensorFlow, so he just added OpenCV, and then your code ran fine in Spyder, which also has a nice “debugger” (not really debugging, just code tracking and exploring, that’s the point). So I think that it what I will end up doing, just because that was familiar from the past, not saying it is any better than pycharm. Anything that works. Thanks.
Hi adrian,
After installing VM and sublime in it,
How do i access all the liberies of the environment inside sublime?
It doeant recognize any liberies..
How are you currently executing your code? I would recommend you execute the code via the command line, ensuring you are in the Python virtual environment.
Thank you
Hi Adrian,
I have just purchased your book (tree bundles) which I love reading. My question is about the Virtual Machine you provide and it is two folded.
First, is VM running more efficiently when the host machine does include a fast NVIDIA GPU, or the existence of a GPU in case of VM makes no difference to the performance of VM?
Second, is it better, in terms of performance, to use VM instead of configuring the environment of the PC by my own, regardless the convinience the VM provides the users with?
Thanks for your time.
Best regards
Hi Adrian again,
I just got the answer of my previous question. The answer is derived from: Troubleshooting and FAQ, by searching for the lemma “GPU”.
Hence, do not bother with answering my previous question on October 30, 2019 at 5:36 pm.
The answers I got at Troubleshooting and FAQ, are cristal clear.
Thanks a lot.
No problem John, let me know if you have any other questions!
In my case having the following configuration, tensorflow-gpu did not work.
Ubuntu 18.03.04, Nvidia GPU MX110, Nvidia driver 440 and CUDA toolkit 10.2
I had to use -> pip install tf-nightly
and it works.
hope all is well. I Installed pycharm on the VM system. I’ve been trying to figure on how to configure the pycharm environment so that I can access the dl4cv environment.
I looked in the pycharm RUN – CONFIGURATION menu and tried several options but know luch. Can you help ?
You need to set PyCharm’s “Project Interpreter” to point to the DL4CV virtual environment. This tutorial will show you how to do that.
why I have no module named keras error
Are you using the latest version of the VM? If so, the latest version of the VM uses TensorFlow 2.0 which has Keras as part of TensorFlow. You access Keras via:
from tensorlfow.keras. ... import ...
Hello Dear Dr. Rosebrock,
After configuring my ENV to start, I’m looking for the links of .zip file of source codes and datasets associated with the Starter Bundle.
Could you please guid me where can I find these files?
Thanks so much.
They are associated with your purchase of the Starter Bundle. You need to download them and transfer them to the VM. See the “Executing code from Deep Learning for Computer Vision with Python on your virtual machine” section of this post for instructions on how to do so.