Today’s blog post is the long-awaited tutorial on real-time drowsiness detection on the Raspberry Pi!
$ workon cv $ pip install RPi.GPIO $ pip install gpiozero
From there, if you want to check that everything is installed properly in your virtual environment you may run the Python interpreter directly:
$ workon cv $ python >>> import RPi.GPIO >>> import gpiozero >>> import numpy >>> import dlib >>> import cv2 >>> import imutils
Note: I’ve made the assumption that the virtual environment you are using already has the above packages installed in it. My cv
virtual environment has NumPy, dlib, OpenCV, and imutils already installed, so by using pip
to install the RPi.GPIO
and gpiozero
to install the respective GPIO packages, I’m able to access all six libraries from within the same environment. You may pip install
each of the packages (except for OpenCV). To install an optimized OpenCV on your Raspberry Pi, then just follow this previous post. If you are having trouble getting dlib installed, please follow this guide.
The driver drowsiness detection algorithm is identical to the one we implemented in our previous tutorial.
To start, we will apply OpenCV’s Haar cascades to detect the face in an image, which boils down to finding the bounding box (x, y)-coordinates of the face in the frame.
Given the bounding box the face we can apply dlib’s facial landmark predictor to obtain 68 salient points used to localize the eyes, eyebrows, nose, mouth, and jawline:
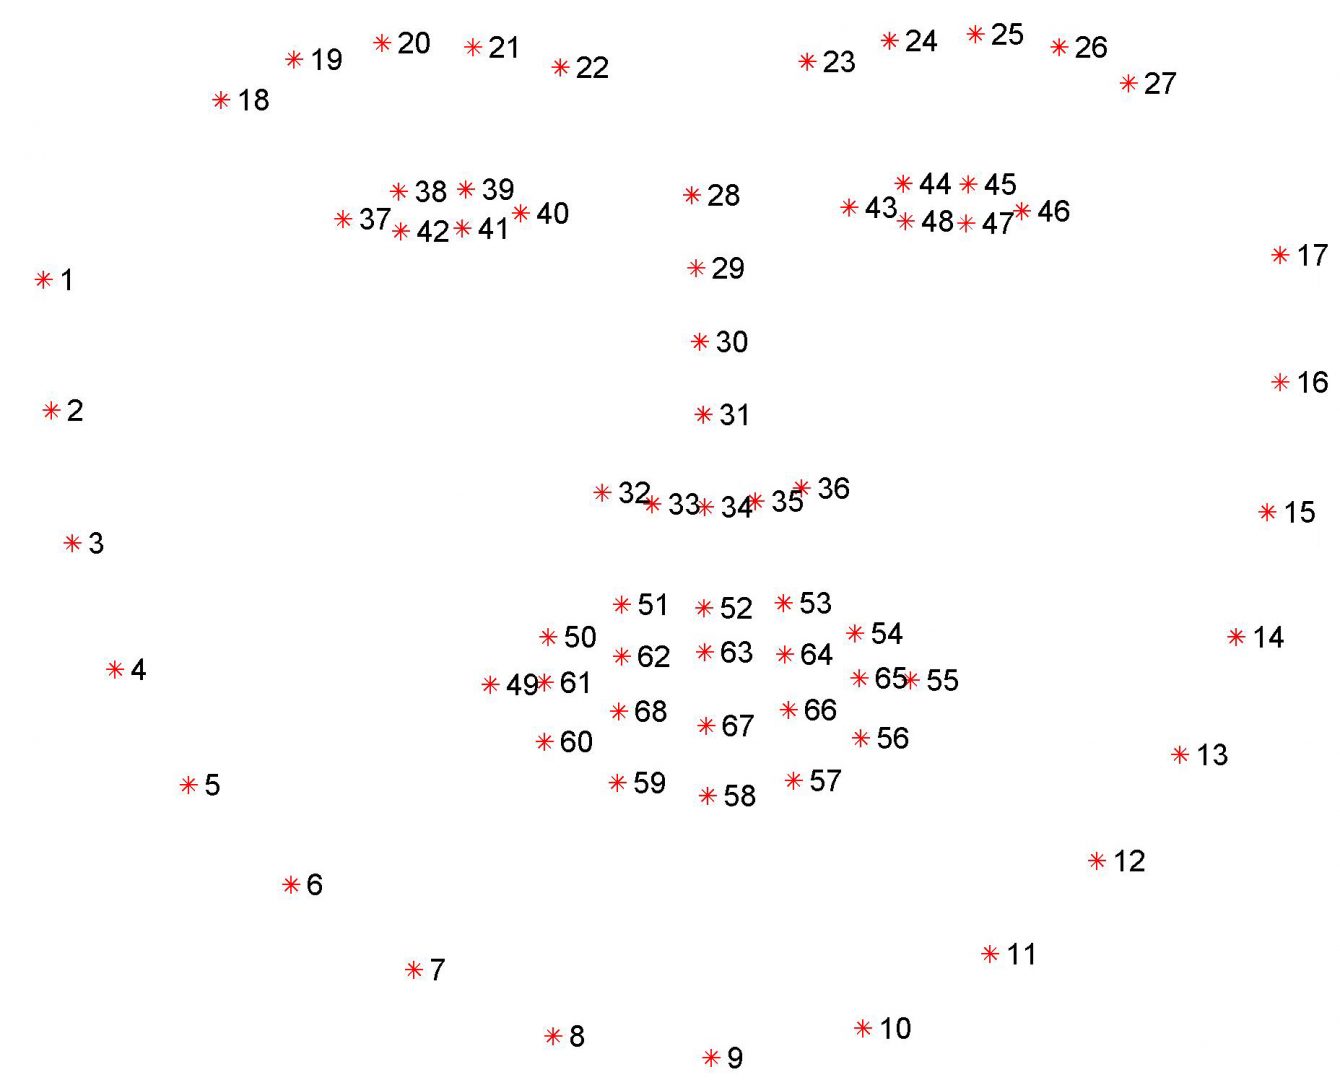
As I discuss in this tutorial, dlib’s 68 facial landmarks are indexable which enables us to extract the various facial structures using simple Python array slices.
Given the facial landmarks associated with an eye, we can apply the Eye Aspect Ratio (EAR) algorithm which was introduced by Soukupová and Čech’s in their 2017 paper, Real-Time Eye Blink Detection suing Facial Landmarks:
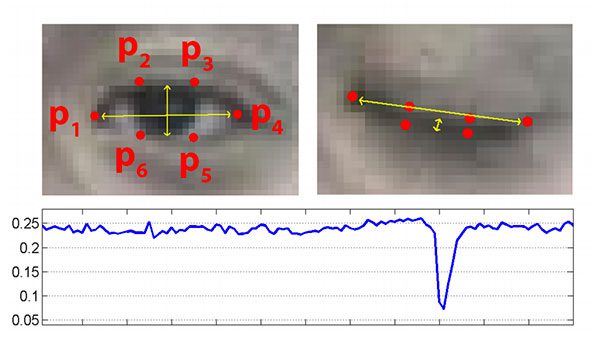
On the top-left we have an eye that is fully open and the eye facial landmarks plotted. Then on the top-right we have an eye that is closed. The bottom then plots the eye aspect ratio over time. As we can see, the eye aspect ratio is constant (indicating that the eye is open), then rapidly drops to close to zero, then increases again, indicating a blink has taken place.
You can read more about the blink detection algorithm and the eye aspect ratio in this post dedicated to blink detection.
In our drowsiness detector case, we’ll be monitoring the eye aspect ratio to see if the value falls but does not increase again, thus implying that the driver/user has closed their eyes.
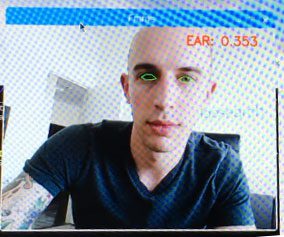
Once implemented, our algorithm will start by localizing the facial landmarks on extracting the eye regions:
We can then monitor the eye aspect ratio to determine if the eyes are closed:
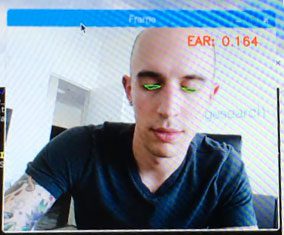
And then finally raising an alarm if the eye aspect ratio is below a pre-defined threshold for a sufficiently long amount of time (indicating that the driver/user is tired):
In the next section, we’ll implement the optimized drowsiness detection algorithm detailed above on the Raspberry Pi using OpenCV, dlib, and Python.
A real-time drowsiness detector on the Raspberry Pi with OpenCV and dlib
Open up a new file in your favorite editor or IDE and name it pi_drowsiness_detection.py
. From there, let’s get started coding:
# import the necessary packages from imutils.video import VideoStream from imutils import face_utils import numpy as np import argparse import imutils import time import dlib import cv2
Lines 1-9 handle our imports — make sure you have each of these installed in your virtual environment.
From there let’s define a distance function:
def euclidean_dist(ptA, ptB): # compute and return the euclidean distance between the two # points return np.linalg.norm(ptA - ptB)
On Lines 11-14 we define a convenience function for calculating the Euclidean distance using NumPy. Euclidean is arguably the most well known and must used distance metric. The Euclidean distance is normally described as the distance between two points “as the crow flies”.
Now let’s define our Eye Aspect Ratio (EAR) function which is used to compute the ratio of distances between the vertical eye landmarks and the distances between the horizontal eye landmarks:
def eye_aspect_ratio(eye): # compute the euclidean distances between the two sets of # vertical eye landmarks (x, y)-coordinates A = euclidean_dist(eye[1], eye[5]) B = euclidean_dist(eye[2], eye[4]) # compute the euclidean distance between the horizontal # eye landmark (x, y)-coordinates C = euclidean_dist(eye[0], eye[3]) # compute the eye aspect ratio ear = (A + B) / (2.0 * C) # return the eye aspect ratio return ear
The return value will be approximately constant when the eye is open and will decrease towards zero during a blink. If the eye is closed, the eye aspect ratio will remain constant at a much smaller value.
From there, we need to parse our command line arguments:
# construct the argument parse and parse the arguments ap = argparse.ArgumentParser() ap.add_argument("-c", "--cascade", required=True, help = "path to where the face cascade resides") ap.add_argument("-p", "--shape-predictor", required=True, help="path to facial landmark predictor") ap.add_argument("-a", "--alarm", type=int, default=0, help="boolean used to indicate if TrafficHat should be used") args = vars(ap.parse_args())
We have defined two required arguments and one optional one on Lines 33-40:
--cascade
: The path to the Haar cascade XML file used for face detection.--shape-predictor
: The path to the dlib facial landmark predictor file.--alarm
: A boolean to indicate if the TrafficHat buzzer should be used when drowsiness is detected.
Both the --cascade
and --shape-predictor
files are available in the “Downloads” section at the end of the post.
If the --alarm
flag is set, we’ll set up the TrafficHat:
# check to see if we are using GPIO/TrafficHat as an alarm if args["alarm"] > 0: from gpiozero import TrafficHat th = TrafficHat() print("[INFO] using TrafficHat alarm...")
As shown in Lines 43-46 if the argument supplied is greater than 0, we’ll import the TrafficHat function to handle our buzzer alarm.
Let’s also define a set of important configuration variables:
# define two constants, one for the eye aspect ratio to indicate # blink and then a second constant for the number of consecutive # frames the eye must be below the threshold for to set off the # alarm EYE_AR_THRESH = 0.3 EYE_AR_CONSEC_FRAMES = 16 # initialize the frame counter as well as a boolean used to # indicate if the alarm is going off COUNTER = 0 ALARM_ON = False
The two constants on Lines 52 and 53 define the EAR threshold and number of consecutive frames eyes must be closed to be considered drowsy, respectively.
Then we initialize the frame counter and a boolean for the alarm (Lines 57 and 58).
From there we’ll load our Haar cascade and facial landmark predictor files:
# load OpenCV's Haar cascade for face detection (which is faster than # dlib's built-in HOG detector, but less accurate), then create the # facial landmark predictor print("[INFO] loading facial landmark predictor...") detector = cv2.CascadeClassifier(args["cascade"]) predictor = dlib.shape_predictor(args["shape_predictor"])
Line 64 differs from the face detector initialization from our previous post on drowsiness detection — here we use a faster detection algorithm (Haar cascades) while sacrificing accuracy. Haar cascades are faster than dlib’s face detector (which is HOG + Linear SVM-based) making it a great choice for the Raspberry Pi.
There are no changes to Line 65 where we load up dlib’s shape_predictor
while providing the path to the file.
Next, we’ll initialize the indexes of the facial landmarks for each eye:
# grab the indexes of the facial landmarks for the left and # right eye, respectively (lStart, lEnd) = face_utils.FACIAL_LANDMARKS_IDXS["left_eye"] (rStart, rEnd) = face_utils.FACIAL_LANDMARKS_IDXS["right_eye"]
Here we supply array slice indexes in order to extract the eye regions from the set of facial landmarks.
We’re now ready to start our video stream thread:
# start the video stream thread print("[INFO] starting video stream thread...") vs = VideoStream(src=0).start() # vs = VideoStream(usePiCamera=True).start() time.sleep(1.0)
If you are using the PiCamera module, be sure to comment out Line 74 and uncomment Line 75 to switch the video stream to the Raspberry Pi camera. Otherwise if you are using a USB camera, you can leave this unchanged.
We have one second sleep so the camera sensor can warm up.
From there let’s loop over the frames from the video stream:
# loop over frames from the video stream while True: # grab the frame from the threaded video file stream, resize # it, and convert it to grayscale # channels) frame = vs.read() frame = imutils.resize(frame, width=450) gray = cv2.cvtColor(frame, cv2.COLOR_BGR2GRAY) # detect faces in the grayscale frame rects = detector.detectMultiScale(gray, scaleFactor=1.1, minNeighbors=5, minSize=(30, 30), flags=cv2.CASCADE_SCALE_IMAGE)
The beginning of this loop should look familiar if you’ve read the previous post. We read a frame, resize it (for efficiency), and convert it to grayscale (Lines 83-85).
Then we detect faces in the grayscale image with our detector on Lines 88-90.
Now let’s loop over the detections:
# loop over the face detections for (x, y, w, h) in rects: # construct a dlib rectangle object from the Haar cascade # bounding box rect = dlib.rectangle(int(x), int(y), int(x + w), int(y + h)) # determine the facial landmarks for the face region, then # convert the facial landmark (x, y)-coordinates to a NumPy # array shape = predictor(gray, rect) shape = face_utils.shape_to_np(shape)
Line 93 begins a lengthy for-loop which is broken down into several code blocks here. First we extract the coordinates and width + height of the rects
detections. Then, on Lines 96 and 97 we construct a dlib rectangle
object using the information extracted from the Haar cascade bounding box.
From there, we determine the facial landmarks for the face region (Line 102) and convert the facial landmark (x, y)-coordinates to a NumPy array.
Given our NumPy array, shape
, we can extract each eye’s coordinates and compute the EAR:
# extract the left and right eye coordinates, then use the # coordinates to compute the eye aspect ratio for both eyes leftEye = shape[lStart:lEnd] rightEye = shape[rStart:rEnd] leftEAR = eye_aspect_ratio(leftEye) rightEAR = eye_aspect_ratio(rightEye) # average the eye aspect ratio together for both eyes ear = (leftEAR + rightEAR) / 2.0
Utilizing the indexes of the eye landmarks, we can slice the shape
array to obtain the (x, y)-coordinates each eye (Lines 107 and 108).
We then calculate the EAR for each eye on Lines 109 and 110.
Soukupová and Čech recommend averaging both eye aspect ratios together to obtain a better estimation (Line 113).
This next block is strictly for visualization purposes:
# compute the convex hull for the left and right eye, then # visualize each of the eyes leftEyeHull = cv2.convexHull(leftEye) rightEyeHull = cv2.convexHull(rightEye) cv2.drawContours(frame, [leftEyeHull], -1, (0, 255, 0), 1) cv2.drawContours(frame, [rightEyeHull], -1, (0, 255, 0), 1)
We can visualize each of the eye regions on our frame by using cv2.drawContours
and supplying the cv2.convexHull
calculation of each eye (Lines 117-120). These few lines are great for debugging our script but aren’t necessary if you are making an embedded product with no screen.
From there, we will check our Eye Aspect Ratio (ear
) and frame counter (COUNTER
) to see if the eyes are closed, while sounding the alarm to alert the drowsy driver if needed:
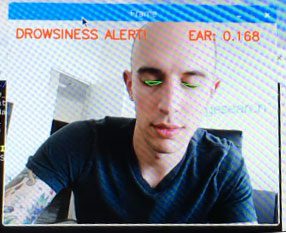
# check to see if the eye aspect ratio is below the blink # threshold, and if so, increment the blink frame counter if ear < EYE_AR_THRESH: COUNTER += 1 # if the eyes were closed for a sufficient number of # frames, then sound the alarm if COUNTER >= EYE_AR_CONSEC_FRAMES: # if the alarm is not on, turn it on if not ALARM_ON: ALARM_ON = True # check to see if the TrafficHat buzzer should # be sounded if args["alarm"] > 0: th.buzzer.blink(0.1, 0.1, 10, background=True) # draw an alarm on the frame cv2.putText(frame, "DROWSINESS ALERT!", (10, 30), cv2.FONT_HERSHEY_SIMPLEX, 0.7, (0, 0, 255), 2) # otherwise, the eye aspect ratio is not below the blink # threshold, so reset the counter and alarm else: COUNTER = 0 ALARM_ON = False
On Line 124 we check the ear
against the EYE_AR_THRESH
— if it is less than the threshold (eyes are closed), we increment our COUNTER
(Line 125) and subsequently check it to see if the eyes have been closed for enough consecutive frames to sound the alarm (Line 129).
If the alarm isn’t on, we turn it on for a few seconds to wake up the drowsy driver. This is accomplished on Lines 136-138.
Optionally (if you’re implementing this code with a screen), you can draw the alarm on the frame as I have done on Lines 141 and 142.
That brings us to the case where the ear
wasn’t less than the EYE_AR_THRESH
— in this case we reset our COUNTER
to 0 and make sure our alarm is turned off (Lines 146-148).
We’re almost done — in our last code block we’ll draw the EAR on the frame
, display the frame
, and do some cleanup:
# draw the computed eye aspect ratio on the frame to help # with debugging and setting the correct eye aspect ratio # thresholds and frame counters cv2.putText(frame, "EAR: {:.3f}".format(ear), (300, 30), cv2.FONT_HERSHEY_SIMPLEX, 0.7, (0, 0, 255), 2) # show the frame cv2.imshow("Frame", frame) key = cv2.waitKey(1) & 0xFF # if the `q` key was pressed, break from the loop if key == ord("q"): break # do a bit of cleanup cv2.destroyAllWindows() vs.stop()
If you’re integrating with a screen or debugging you may wish to display the computed eye aspect ratio on the frame as I have done on Lines 153 and 154. The frame is displayed to the actual screen on Lines 157 and 158.
The program is stopped when the ‘q’ key is pressed on a keyboard (Lines 157 and 158).
You might be thinking, “I won’t have a keyboard hooked up in my car!” Well, if you’re debugging using your webcam and your computer at your desk, you certainly do. If you want to use the button on the TrafficHAT to turn on/off the drowsiness detection algorithm, that is perfectly fine — the first reader to post the solution in the comments to using the button to turn on and off the drowsiness detector with the Pi deserves an ice cold craft beer or a hot artisan coffee.
Finally, we clean up by closing any open windows and stopping the video stream (Lines 165 and 166).
Drowsiness detection results
To run this program on your own Raspberry Pi, be sure to use the “Downloads” section at the bottom of this post to grab the source code, face detection Haar cascade, and dlib facial landmark detector.
I didn’t have enough time to wire everything up in my car and record the screen while as I did previously. It would have been quite challenging to record the Raspberry Pi screen while driving as well.
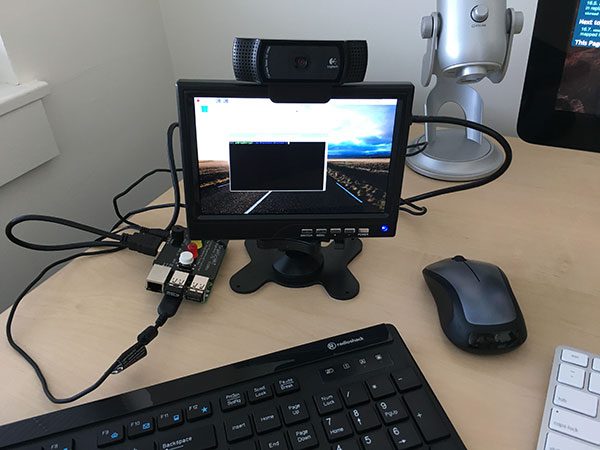
Instead, I’ll demonstrate at my desk — you can then take this implementation and use it inside your own car for drowsiness detection as you see fit.
You can see an image of my setup below:
To run the program, simply execute the following command:
$ python pi_detect_drowsiness.py --cascade haarcascade_frontalface_default.xml \ --shape-predictor shape_predictor_68_face_landmarks.dat --alarm 1
I have included a video of myself demoing the real-time drowsiness detector on the Raspberry Pi below:
Our Raspberry Pi 3 is able to accurately determine if I’m getting “drowsy”. We were able to accomplish this using our optimized code.
Disclaimer: I do not advise that you rely upon the hobbyist Raspberry Pi and this code to keep you awake at the wheel if you are in fact drowsy while driving. The best thing to do is to pull over and rest; walk around; or have a coffee/soda. Have fun with this project and show it off to your friends, but do not risk your life or that of others.
How do I run this program automatically when the Pi boots up?
This is a common question I receive. I have a blog post covering the answer here: Running a Python + OpenCV script on reboot.
What's next? I recommend PyImageSearch University.
30+ total classes • 39h 44m video • Last updated: 12/2021
★★★★★ 4.84 (128 Ratings) • 3,000+ Students Enrolled
I strongly believe that if you had the right teacher you could master computer vision and deep learning.
Do you think learning computer vision and deep learning has to be time-consuming, overwhelming, and complicated? Or has to involve complex mathematics and equations? Or requires a degree in computer science?
That’s not the case.
All you need to master computer vision and deep learning is for someone to explain things to you in simple, intuitive terms. And that’s exactly what I do. My mission is to change education and how complex Artificial Intelligence topics are taught.
If you're serious about learning computer vision, your next stop should be PyImageSearch University, the most comprehensive computer vision, deep learning, and OpenCV course online today. Here you’ll learn how to successfully and confidently apply computer vision to your work, research, and projects. Join me in computer vision mastery.
Inside PyImageSearch University you'll find:
- ✓ 30+ courses on essential computer vision, deep learning, and OpenCV topics
- ✓ 30+ Certificates of Completion
- ✓ 39h 44m on-demand video
- ✓ Brand new courses released every month, ensuring you can keep up with state-of-the-art techniques
- ✓ Pre-configured Jupyter Notebooks in Google Colab
- ✓ Run all code examples in your web browser — works on Windows, macOS, and Linux (no dev environment configuration required!)
- ✓ Access to centralized code repos for all 500+ tutorials on PyImageSearch
- ✓ Easy one-click downloads for code, datasets, pre-trained models, etc.
- ✓ Access on mobile, laptop, desktop, etc.
Summary
In today’s blog post, we learned how to optimize facial landmarks on the Raspberry Pi by swapping out a HOG + Linear SVM-based face detector for a Haar cascade.
Haar cascades, while less accurate, are significantly faster than HOG + Linear SVM detectors.
Given the detections from the Haar cascade we were able to construct a dlib.rectangle
object corresponding to the bounding box (x, y)-coordinates in the image. This object was fed into dlib’s facial landmark predictor which in turn gives us the set of localized facial landmarks on the face. From there, we applied the same algorithm we used in our previous post to detect drowsiness in a video stream.
I hope you enjoyed this tutorial!
To be notified when new blog posts are published here on the PyImageSearch blog, be sure to enter your email address in the form below — I’ll be sure to notify you when new content is released!
Download the Source Code and FREE 17-page Resource Guide
Enter your email address below to get a .zip of the code and a FREE 17-page Resource Guide on Computer Vision, OpenCV, and Deep Learning. Inside you'll find my hand-picked tutorials, books, courses, and libraries to help you master CV and DL!
Great article! Do you plan an article (or series) on low light environment face/eye blink detection. Followed your guide recently, but really excited to know how to raise the detection quality on low-light environments/low quality video stream.
It’s always easier to write code for (reliable) computer vision algorithms for higher quality video streams than try to write code that compensates for a poor environment. If you’re running into situations where you are considering writing code for a poor environment I would encourage you to first examine the environment and see if you can update to make it higher quality.
Due to business requirements I can’t force our clients to shot themselves only in good-to-process conditions. They could be using our software anywhere they want, so… I’d like to read of any approaches available to solve this problem. Just as an idea for you for future publications.
Other readers have suggested infrared cameras and infrared lights. I would expect that solution to solve the problem when it is dark outside. There are other “poor conditions” such as reflection and glare which you would need to overcome too. This blog post will get you started but it isn’t intended to be a solution that you can sell.
I would suggest taking a look at iPhone X, Intel Realsense F200/R200, Logitech C922 and the Structure sensor (structure.io) to name a few. Also take a look at how Google Tango approaches depth for AR. I personally think everything (apps and sensors) are moving to 3D now…
hi,I am chinese,I like your essay.
Do you know TrafficHAT,Buy link invalidation.
Can you use raspberry pi to write an article about face recognition using tensorflow, opencv, Dlib?
sir, im getting problem with — cascade path… plz resolve issue asap.
It sounds like you’re struggling with command line arguments. Make sure you read this post first.
Raspberry Pi has “night vision” camera boards. They have IR LED spotlights and some of the cameras come without IR filter. Your eyes are not able to see the infrared light, but the camera is. Add light to low light and create higher quality video stream…
There is also IR webcams available and it is possible to use infrared light with some of the standard non IR webcam. Most of the webcams have IR blocking filter, but some of them doesn’t filter properly. (And it is possible to remove the filters in some cases. Use google for this.)
Maybe this could help you?
(The articles are excellent! Thank you Adrian!)
WoooooooooooooooooooooooooooooooW
That is great
now this is what i need
very very thank you Adrian
Thanks Fariborz, I’m glad you enjoyed the tutorial 🙂
Hi Dr. Rosebrock, great article as usual! Thank you for the good consistent content. I’m learning a lot 🙂
Thank you 🙂
Hi Adrian,
Thanks for posting this.
In this post from May ’17 about running dlib on a raspberry pi, you mention that a Raspberry Pi3 is not fast enough to do dlib’s face landmark detection in realtime.
https://www.pyimagesearch.com/2017/05/01/install-dlib-raspberry-pi/
Since the drowsiness detection also uses dlib’s face landmarks, does it have similar performance issues as you mention in your older post? Or have you figured out some optimizations for RPi3 to improve performance?
Thanks,
Rohit
Hi Rohit — please see the section entitled “Haar cascades: less accurate, but faster than HOG”. This is where our big speedup comes from.
Logitech webcam is better than Pi camera?
It depends on how you define “better”. What is your use case? How do you intend on deploying it? Both cameras can be good for different reasons. The Raspberry Pi camera module is cheaper but the Logitech C920 is technically “better” for many uses. It is nice being able to connect the camera directly to the Pi though.
oh Come on man i just wrote this idea two weeks ago in C++
obviously ideas could go beyond pacific through continents
but good news for me is i optimized it with an awesome idea and now i can process drowsiness with almost 30 frame per second from 1 megapixel image stream in Raspberry Pi
WOOOOW…..
I beg u Dr. Rosebrock do not publish such ideas, image processing fans and researchers will get it with just a hint
Hey Arash — I actually wrote the original drowsiness detection tutorial way back in May. Secondly, I tend to write blog posts 2-3 weeks ahead of time before they are actually published. I’m not sure what your point is — you would prefer I note publish tutorials?
Where can i see your blogs?
Hi Arash,
Can you share the source codes ? is this c++ using dlib in Rapberry Pi and 30 fps ? is it around 1280×960 . resolution ?
I would love to discuss you if you have contact address
Best..
How to download updated imutils?
I would suggest using “pip”:
$ pip install --upgrade imutils
If you are using a Python virtual environment please make sure you activate it before installing/upgrading.
Hey Adrian,
Thanks for sharing!
As always a great job !!
I tested with webcom and verified a great performance in the identification of drowsiness, with a processing load of 70%. Perhaps there is something that can be improved to reduce PLOAD, perhaps by altering Haarcascade, perhaps by using the one haarcascade_eye.xml or similar, targeting only the eye area. I wanted you to share your opinion with us. Can you comment on the subject?
Thanks for all help, Adrian
In order to apply drowsiness detection we need to detect the entire face — this enables us to localize the eyes. We could use a Haar cascade to detect eyes but the problem is that we need to train a facial landmark detector for just the eyes. That wouldn’t do much to improve processing speed.
Hi Adrian,
I’m impressed with the tutorial!
Please let me know what Operating System used in the Raspberry Pi 3.
Hi Raghu — Raspbian is the official operating system and the one used. You can download it here.
Hey Adrian,
First thank you for sharing this great edition !!
Doing some tests I found the following error in the code, when I used the “PICamera”, I got the following TypeError:
from:
vs = VideoStream(usePicamera=True).start()
to:
vs = VideoStream(usePiCamera=True).start()
This corrects the following failure:
vs = VideoStream(usePicamera=True).start()
TYpeError: __init__() got an unexpected keyword argument ‘usePicamera’
Thanks,
Marvin
Thank you Marvin — you are correct. I’ve updated the post, and I’ll update the download soon. Thanks for bringing this to my attention.
I have now updated the code download as well. Thanks again!
Hey!
So there’s something which bothers me here:
Your original article used something like HOG+SVM and a sliding window for detection.
I got to say, that face detector that you have provided does work most of the time (~75%).
However, doesn’t RCNN (or faster RCNN etc,whatever you get the point) just work better than pre-deep learning techniques? I mean,that’s what Justin from stanford claims (https://www.youtube.com/watch?v=nDPWywWRIRo&index=11&list=PL3FW7Lu3i5JvHM8ljYj-zLfQRF3EO8sYv&t=1950s).
Is that really the case? If so, when should I NOT prefer RCNN & Why?
RCNN-based methods will be more accurate than both Haar cascades and/or HOG + Linear SVM (provided the network is properly trained and deployed). The problem can be speed — we need to achieve that balance on the Raspberry Pi.
Cool, thx for the answer.
Just another thing: Does RCNN require more training data as well?
I mean, it requires a bounding box for each object for each picture.
HOG+SVM requires negative and positive examples, and for the false positives, we need to manually tell the learning algo that those are false positives.
So,in your experience, which learning algo requires more training data to work decently?
It will vary on a dataset to dataset basis, but in general, you can assume that your CNN will need more example images.
Hello Adrian,
Just started Image processing and sounds like fun but really tired of installing libraries, I have been “setting” up my pi for about a week now.
Stuck on pip install scipy.
running setup.py bdist_wheel for scipy … takes forever.
Any tips?
Thanks
Hi Muhammad — yes setting up the Pi can be quite frustrating. For some of the PIP installs you must be patient and let the Pi finish. If you’re interested in a pre-configured and pre-installed Raspbian image, it comes with the Quickstart and Hardcopy Bundles of my book, Practical Python and OpenCV + Case Studies.
Hi Adrian,
I think it is now time to use cnn based algorithms for face detection part. Is it slow?! not anymore. You can make an awesome binarization model method tutorial in your website which face detector part would be more accurate and faster. Let me know if you need help.
Best and Greeting from Venice ICCV17,
Hi Majid — thanks for the suggestion. Enjoy your conference!
Hi Majid,
I am a university student (not in computer field) and I have interest in face detection with many methods but I have a less information about cnn-based methods.Would you mind to show me the name of the paper about cnn-based for face detection in ICCV17 (or maybe not in that conference) or relate paper in this topic.
Hi Adrian
Recently I came to know about thin client. Can you please tell me the difference between thin client and a Pi with a SD card. Is there any additional memory support?. Is it possible to connect a thin client with a portable display?(7”). Please reply.
Hi Suganya, see this information about thin clients. Basically thin clients rely on a server for storage and applications. You don’t store or process much locally on a thin client. A Raspberry Pi is not a thin client, but I suppose you could make it into one. Raspberry Pis (at least the Raspbian OS), allow for processing and storage on the device — it’s a fully functional small computer. Yes, you can attach a display to a thin client.
Hello Adrian,
I’m a high school student and I would like to reproduce your project for my science class and try some variables of my own. I wonder what camera and other equipments did you use for this experiment. Would it be possible to specify?
Thank you in advance.
If you want, I can share with you the results of my experiment at the end of my project.
best regards
Fred
Hi Fred, thanks for the comment. It’s great to hear you are interested in computer vision! I was in high school as well when I first got into image processing.
The camera for this tutorial doesn’t matter a whole lot. I like the Raspberry Pi camera module but it might be easier for you to use the Logitech C920 which is plug-and-play compatible with the Raspberry Pi.
For this specific blog post I used the Logitech C920.
Thank you so much,
I’ll give it a try and let you know how far I can get.
Cheers
Fred
Hi Adrian,
in which folded should I extract the zip file?
Thank you for you help
I think I got everything else ready now for my testing.
Thank you so much
Fred
It doesn’t matter where you download and extract the .zip file. Extract it, change directory into it, and execute the script.
Hi Adrian, i run the code, but its very slowly. What is the problem ?
Hi Hien — what type of system are you executing the code on? What are the specs of the machine?
Hi adrian. If i use a night vision cam, do i need change the code?
You might have to. I would verify that faces can still be detected and the facial landmarks localized when switching over to the night vision cam.
Hello Adrian. I am a student and want to make this as my project .Traffic hat is not available so I’m planning on using the 3.5mm audio jack on playing the alarm. Im really a newbie in image processing. The part of the codes in replacing the alarm really confuses me. Can you help me out in replacing the codes instead of using traffic hat? Thank you.
Hi Liz — congrats on working on your project, that’s fantastic. I haven’t used the audio jack or associated audio libraries on a Raspberry Pi so unfortunately I can’t give any direct advice. But in general you’ll need to remove all TrafficHat imports and then play your audio file on Lines 136-138.
If you’re new to computer vision and OpenCV I would suggest you work through Practical Python and OpenCV. I created this book to help beginners and it would certainly help you get quickly up to speed and complete your project.
Hi, dr. ROSEBROCK. your work is very good and thank you for your sharing. I just started raspberry. I installed dlib and OpenCV. I ran those codes on raspberry. How can I just run this project when the Raspberry is opened? How can I add .and .xml and .dat files to code? thanks in advance
Hello, thanks for the comment. Can you be a bit more specific when you say “run the project when Raspberry is opened”? Are you referring to running the project on reboot? Secondly, I’m not sure what you mean by “add .xml and .dat files to code”? You are trying to hardcode the paths to the files in the code?
thank you dr. your reply made me very happy:
yes, I want to run the project during reboot. I would also like to add the paths of xml and dat files to hardcoding. Finally I use a buzzer instead of traffichat and I did not get the sound output. my goal is just to learn something … thanks …
If you are using a buzzer you should read up on GPIO and the Raspberry Pi. You should also consult the manual/documentation for your particular buzzer. You can hardcode the paths to the XML file if you so wish. Just create a variable that points to the paths. Or you can execute the script at boot and include the full paths to the XML files as command line arguments. Either method will work. For more information on running a script on reboot, take a look at this blog post.
Dr Rosebrock, thank you so much. I ran the project. Your article was very useful.
( for buzzer…… buzzer + pin = raspbbery 29 pin, buzzer – pin = raspberry 25 pin gnd). I can send a video for work ..
Yorulmaz can you please send me the code with this buzzer implementation.
Swathi can you please send me the buzzer implemented code.
Would testing for a yawn follow a similar approach??? Thanks.
Yes, monitoring the aspect ratio of the mouth would be a reasonable method to detect a yawn.
The only problem is occlusion (when the hand moves in front of the mouth) or if the user is singing a song. I think one might need to use a deep learning training and classification approach. Thoughts?
Deep learning might be helpful but it could also be overkill. If a hand, coffee cup, or breakfast sandwich moves in front of the mouth, I’m not sure that matters provided it’s only an occlusion for a short period of time. I doubt many people yawn once and then immediately fall asleep unless they have a specific condition. A more robust drowsiness detector should involve sensor fusion, such as body temperate, heart rate, oxygen levels, etc.
this error is shown when i run it, please help… i did not change anything from the code.
File “pi_detect_drowsiness.py”, line 145
cv2.putText(frame, “DROWSINESS ALERT!”, (10, 30),
^
IndentationError: expected an indented block
Make sure you use the “Downloads” section of this blog post to download the source code. It looks like you formatted the code incorrectly when copying and pasting.
Hi Adrian,
I’m impressed with your Drowsiness Detection algorithm for Raspberry Pi.
why don’t you develop the algorithm for iOS and Android phones so that it would reduce the cost of buying Raspberry Pi.
what is the dlib face landmarks detection speed on raspberry pi when people number is big(about 10)?
The facial landmark detector is extremely fast, it’s the face detection that tends to be slow. It really depends on what your goal is. Are you trying to apply drowsiness detection to all ten people in the input frame?
Hi Dr Rosebrock.
I have a question. As I reviewed your code in my raspberry and more or less there are 5 frames per second. And in your video you can see the photoprograms much faster. Maybe there is some way to take more frames per second?
Just to clarify — did you use my code exactly (downloaded via the “Downloads” form of this blog post)? Did you make any modifications? It would also be helpful to know which model of the Raspberry Pi you are using.
I tried to use the same code in the above, but i have the problem in installing the dlib in my windows.can you please tell how to install that in windows.I download dlib package directly from net but its not working.
Hi Adrian, Thank you very much.
I run the code which download from this blog on raspberry pi3 model B(raspbian stretch), but its very slowly. What is the problem ?
I followed blogs to install opencv3 and dlib on my raspberry pi3 ( optimizing opencv on raspberry pi and install dlib ( the easy, complete guide ) ).
Can you elaborate on what you mean by “slowly”? Are you using a Raspberry Pi camera module or a USB camera? Additionally, how large are the input frames that you are processing? Make sure you are using the Haar cascades for face detection rather than the HOG + Linear SVM face detector provided by dlib. This will give you additional speed as we do in this blog post.
Hi Adrian,
Thanks for your sharing. I have the same problem as zjfsharp. I did exactly as the post (with optimizing opencv installed )and ran the downloaded and unchange code in my raspberry pi3 model B successfully. But the fps is around 4. The operating system is raspbian stretch lite with GUI. while runing the code the, the cpu runs at 600MHz(half of 1.2GHz). The memory usage is about 40 percent. The result is far less smooth as your video shown above.
Hey Charlie — just to clarify, how are you accessing your Raspberry Pi? Via SSH or VNC? Or via a standard keyboard + HDMI monitor setup? Additionally, are you using a USB webcam or a Raspberry Pi camera module?
I’m using a usbcam(logitech em2500) via a standard Keyboard+HDMI setup to access. Low fps seems has nothing to with cpu frequency(boosted to 1.2GHz), cpu and memory usage and power supply(5v,2A).
Thanks for sharing the hardware setup, Charlie. Are you using Python 2.7 or Python 3?
Python 3. I’m still stuck here. Do you have any idea? Thanks for your reply.
I know Python 3 handles threading and queuing slightly different than Python 2. Would you be able to try Python 2 and see if you have the same results?
hello did you solve your problem charlie ?
Hello Adrian,
OS is Rasbian Stretch hw is raspberry pi 2.
OpenCV and all other imports are OK
but the result is “AttributeError: ‘NoneType’ object has no attribute ‘shape'” 🙂
any comments?
thanks in advance
Emre
$ python pi_detect_drowsiness.py –cascade haarcascade_frontalface_default.xml –shape-predictor shape_predictor_68_face_landmarks.dat –alarm 1
[INFO] using TrafficHat alarm…
[INFO] loading facial landmark predictor…
[INFO] starting video stream thread…
Traceback (most recent call last):
File “pi_detect_drowsiness.py”, line 88, in
frame = imutils.resize(frame, width=450)
…
(h, w) = image.shape[:2]
AttributeError: ‘NoneType’ object has no attribute ‘shape’
If you are getting a “NoneType” error than OpenCV cannot read the frame from your Raspberry Pi camera module or USB webcam. Double-check that OpenCV can access your Raspberry Pi camera by following this post. Additionally, you should read up on NoneType errors and how to debug them here.
installing cam driver solved my problem 🙂
sudo modprobe bcm2835-v4l2
thanks a lot
hi Adrian, I have confirmed that the camera captures video and photos as I followed ur previous camera setup tutorial.
however, I’m having exactly the same error with Emre. Im using raspberry pi camera for my project. what should I do?. any other idea?
emre’s solution also worked for me. now working alhamdulillah
additionally;
using “Raspberry Pi camera module” not a USB one.
This is awesome. Can I execute this program on boot though? I tried using your tutorial on crontab and instead of using “python pi_reboot_alarm.py” I replaced it with this
python pi_detect_drowsiness.py –cascade haarcascade_frontalface_default.xml \
–shape-predictor shape_predictor_68_face_landmarks.dat –alarm 1
But it did not work at all. Can you help me out?
See this tutorial on running a script on reboot.
You’ll either need to access your Python virtual environment and then execute the script (best accomplished via a shell script) or supply the full path to the Python binary (which I think is a bit easier).
hello adrian …..
iam a having a doubt that is iam using a rasberry pie controller iam in coded in the python
whether i need the laptop needs to be attached with the module
else the coded program can uploaded to the controller and detached the laptop
can you explain me
iam a very beginner
If you’re a beginner I would suggest coding directly on the Raspberry Pi, that way you won’t be confused on which system the code is executing on.
can i put the codes inside the python shell in the virtual environment? i am having a big trouble on how to start scripting and what ide i should use and also i dont know how to run it. i am very sorry if i look dumb but i am really new to this kind of tech can someone help me?
Instead of trying to use the Python shell or IDE to recommend the code, simply open up a terminal, access your Python virtual environment via the “workon” command execute the script from the terminal. There is no need to launch a shell or IDE.
sir,
i am facing this error.please help.
[INFO] loading facial landmark predictor…
[INFO] starting video stream thread…
…
from picamera.array import PiRGBArray
ImportError: No module named ‘picamera’
You need to install the picamera library with NumPy array support:
$ pip install "picamera[array]"
Im facing issue with the buzzer, can u help me to fix the buzzer and also share me a code, which runs with buzzer. it would be a great help. Thank you.
What is the exact error/issue you are having?
Hi Adrian,
I’m unable to implement the buzzer to my code. can you please share a code with a buzzer, it would be really helpful. Espeak is not working properly. I’m unable to hear the sound from the buzzer, if u could provide a correct code, it would be really helpful. Thank you.
Also need to know which gpio pin i should connect the buzzer for for I/O Pin.
i have used this code with logitech c270 but processing is slow on raspberry pi 3B model
can you help to increase the speed
the delay is of 1.5 – 2 seconds
same code works on laptop very seamlessly .
I HAVE USED IT WITH PYTHON 2
How are you access your Raspberry Pi? Via HDMI monitor and keyboard? Over SSH? Over VNC? It sounds like you may be using SSH or VNC.
Hi Adrian , thank you for this tutorial it’s really helpful !
i want to extract x and y for a specific point from the face ,for example eye[2], how can i do that please? thank in advance 🙂
Take a look at this post as it demonstrates how to extract the various facial features. Once you have them you can extract individual (x, y)-coordinates as well.
Hello sir, I have installed all the dependencies and opencv properly but can not run the file from command prompt. Here is the path that I have included
ap.add_argument(“-c”, “-/home/pi/Downloads/pi-drowsiness-detection/haarcascade_frontalface_default.xml”, required=True,
help = “/home/pi/Downloads/pi-drowsiness-detection”)
ap.add_argument(“-p”, “-/home/pi/Downloads/pi-drowsiness-detection/shape_predictor_68_face_landmarks.dat”, required=True,
help=”/home/pi/Downloads/pi-drowsiness-detection”)
Is it ok?
while I go for running the file from cmd shell it gives me so such file or directory error.
The code itself doe snot need to be modified. You can resolve your error by reading up on command line arguments.
could you write a post about gaze tracking
Sure, I will consider this for a future tutorial.
i am getting black frame screen on executing the program.
pi camera led is on. But frame screen is blackout.
i am using -picamera module, it’s high resolution picamera module
This is likely a firmware and/or picamera version issue. I discuss how to resolve the problem in this blog post.
Thanks
Hi Adrian, i am wondering can be use the Dlib’s 5-point Face Landmark Detector here instead of 68 point? If so, what are the necessary changes i have to make here in this code for running it on Pi. Can you please specify or advice for the same? Also what do you think how much does it help in improving the performance in terms of speed and accuracy and memory size?
No, you cannot use the 5-point model for drowsiness detection (at least in terms of this code). I discuss why you cannot use the 5-point model inside the 5-point facial landmark post. Be sure to give it a read.
good morning i have try to simplement this algorithme un python 3.6.4
line 50 ans 66 are giving error ans there are some library that do not work.
what can i do to solve thé problèmes.
tanks
What are the exact errors that you are getting? Keep in mind that if I, or other PyImageSearch readers, do not know what problems or errors you are having we will be unable to help.
Hi Adrian
When I run your code via python 3 on terminal, it gives me an attribute error on line 69.
predictor = dlib.shape_predictor(args[“shape-predictor”])
AttributeError: ‘module’ object has no attribute ‘shape_predictor’
Could you please help me out ?
Hey Mario — what version of dlib are you using?
Hi Adrian
I installed OpenCV and all the requirements from scratch by following your tutorial again, and now everything works like a charm. Thanks anyway!
Awesome, I’m glad to hear it Mario! Congrats on getting OpenCV installed!
i adrian i have same error
Is there a reason you chose to use VideoSteam over VideoCapture to get frames?
I’m trying to add code to record the video to a file using a VideoWriter object. I am having trouble getting the video to record at a regular speed video though, it seems to be in slow mode. I think it has to do with the VideoStream object getting frames. I tried recording with the VideoCapture object (in a test script) and it runs much faster. Any advice would be great! Thanks so much!
Hi Eric.
VideoStream
is part of my own threaded implementation inimutils
. I also havefileVideoStream
which usesVideoCapture
. Check out the source here on GitHub.Hi Adrian,
When i m running this code on my raspberry pi3, th results which i m getting are with delay pf 8 to 10 seconds. Can you please suggest something to make this faster??
Thanks
Dlib now has a 5-point facial landmark detector that will be significantly faster than the 68-point one. Please see this blog post introducing the 5-point detector.
But as you have mentioned in the blog, in 5-point facial landmark detector, we get only two points for eyes and cannot calculate EAR…
I have to detect drowsiness in RPi 3..Please help me to find as solution..
Thanks!!
You cannot use the 5-point facial landmark detector to compute EAR. The 5-point facial landmark detector cannot be used for drowsiness detection.
Hey Adrian, I’ve followed your guide, and everything has been finished except sound. As I don’t use TrafficHat, I think I should change the code in line 40-44,
# check to see if we are using GPIO/TrafficHat as an alarm
if args[“alarm”] > 0:
from gpiozero import TrafficHat
th = TrafficHat()
print(“[INFO] using TrafficHat alarm…”)
I want to make noise from 3.5mm speaker output. Should I change or delete the log?
I really appreciate your help.
Best Regards, Sa-rang.
If you have no intention of using TrafficHat then delete all TrafficHat code from the file.
hello adrian, i have the same problem as Charlie, i have raspberry pi 3 with a webcam longitech c920, and i run it with python 3 but it gives me 5 fps
What about Python 2.7? Does it give you the same FPS as well?
i need source code for raspberry pi
You can use the “Downloads” section of this blog post to download the source code.
may i ask what are the limitations of this device?
and what python version are you using here?
I’m not sure what you mean by “limitations”, you’ll need to be more specific as I don’t know if you’re referring to computational limitations, deployment, etc. To address your second question, I used Python 3 but this code will also work with Python 2.7.
i mean like how about in night time the light is very minimal does it able to detect the eyes and perform its function? And is the design of the device is not blocking the view of the driver? Thanks sir
Provided you can detect the face and facial landmarks this method will work. If you cannot detect the face, such as if the face is obscured, it will not work.
hi
is this possible drowsiness alert can be send to mobile r web-page
Technically yes, but you would need to modify the code to upload the alert to a web server first. Again, 100% possible but you would need to decide which web service you are using and then read the corresponding documentation.
is it okay to use python latest version here (python 3.7? )
Yes, it should be okay.
Sir if i used the Raspberry Pi model 3 b+ here, is there any changes in terms of peformance?
The Pi 3B+ is slightly faster so you will see a small increase in speed but not a massive amount.
Sir I need to implement this in dark as my project. Can you help me out with the code changes as I am not able to get the changes done.
It’s unfortunately not as simple as changing a few lines of code here and there. What have you already done to get this project working in low light or no light conditions? What camera are you using?
Thanks Adrian. I really enjoy this tutorial.
1.Can i upload this system’s information to a database using the raspberry pi. if yes, which database do you recommend? (firebase, sql or…?)
2. If i intend to use a buzzer instead of the traffic hat, would there be significant difference in the code you provided?
1. Exactly which database you use is really dependent on your project specifications. You should do your own research there. But typically a good first start is a SQL-based database and then go from there.
2. No, there would not be a significant change. Just swap out the TrafficHat code for the GPIO code specific to your buzzer.
Hii….
I am new to image processing and python as well…can u give detailed information regarding installations to carry out this project?
Thanks in advance.
You should refer to one of my OpenCV install guides to help get you started.
Good Day Doctor Adrian!
Your project is amazing! I would like to ask about if you had already tried using IR camera for low light conditions for detecting drowsiness? Your reply will be highly appreciated. How about sir using PI Noir Camera?
Thanks and Regards
Hey there Rendhel, I have not tried the code directly with a Pi Noir camera.
hi adrian, Im new to IOT. I need ur clarifications. As for the traffic hat and the raspberry PI 3 , are they 2 different things or the same( PI combined with traffci hat).? u made them sound like 2 but according to your image its 1? so which is which?
The TrafficHat is a component that connects to the Raspberry Pi itself. They are two different pieces of hardware that connect together.
hi adrian,
thanks for taking ur time to reply to us
if i plan to use a night vision camera for this program, does anything of the code needs to be modified or can i use the same code to detect faces in low light/darkness?
Potentially, but I would start by trying with the night vision camera first before you plan on making any changes.
hi adrian.
is it possible to control the volume of the trafficHat buzzer.? as in, start from low to high according to the frequency of eye closure. in other words the deeper the sleep, the louder the sound.
pls reply sir
thanks
As far as I know it’s not but you should reach out to the creators of the TrafficHat to verify.
Hi Adrian!
Great work as you do!
But I have the same problem with Charlie.
I’m using a usbcam (Logitech c920) via a standard Keyboard+HDMI setup to access. Unfortunately, when I ran this script by using Haar cascade and 68 facial landmarks with python2.7 I got a bad performance which fps is low and the speed of video stream is slow. How can I get a better performance?
Thanks in advance.
Hey Tim — I haven’t been able to replicate the problem that both you and Charlie have had, unfortunately. Try to debug the issue by writing a separate Python script that only pulls frames from your camera and display them to your screen. Is the lag as bad? If so, probably an OpenCV or hardware issue. If not, then you can further debug which part of the code is really slowing you down.
i want to add a condition to this code that if no eyes detected it should also start alarm like driver is sleeping and fall aside from camera i want to apply if condition so where should i apply if condition and on which value plz help
I would instead modify the code that if “no face is detected for N frames”, where N is a value you define, then you sound the alarm.
using the same system, is it possible to emit vibration when drowsiness is detected.? what extra, do i need to attach?
You would need a hat for your Pi that has a vibration functionality.
Sir Adrian,
Does the camera you use cuts infrared? I am planning to use NoIR camera so it can be applied in low light condition. Thanks for the reply.
Regards
No, I used a standard USB camera for this project but you could use a NoIR camera if you wished.
will there be any to change in your set up sir Adrian?
I would suggest you try and see. It’s nearly impossible for me to predict without seeing your actual environment and where you intend on deploying it. The best way to learn is to learn by doing — it is now your turn 🙂
Hi Adrian!
Great Work, I run the project, it’s working fine but, I don’t have the TrafficHat. instead of using TrafficHat I want to use directly gpio to operate a relay module. please suggest me in which section of the code should i change. and whice code should i put?
thanks
Anywhere you see TrafficHat code you’ll want to swap that out for your GPIO code. Exactly what that code looks like is 100% dependent on which relay module you’re using, which GPIO pins you’re using, etc.
Hi. I just read this article and I would like to know if it would be possible to create a program that would let the rpi automatically select between the Rpi cam or webcam if the two of them are simultaneously connected on the Raspberry pi, depending on which of the two cameras detect a face.
Im trying to create a drowsy system like yours only with multiple cameras attached(probably 2 or 3). And the cameras would only start capturing depending on which of them detects a face
It’s absolutely possible. Start by reading this tutorial on multiple cameras with the Pi. Each frame will need to be read and face detection applied. If a face is found, hand off the face to a separate process to perform recognition then highlight that show the stream of that camera on your desktop.
Hi. I tried using three cameras.I used if-else statements to interchange between which cameras are detecting a face and then lock on that face as long as that specific camera is still detecting a face. I ran dlib facial detection on each cameras frames. However, I noticed a decrease in speed of the frames captured. The alarm triggers a little bit later than usual after detecting closed eyes. Is it because of my code or because of the facial detection function running on 3 different camera frames? I’d like to know your thought about it.
You’re running face detection + recognition on 3 separate cameras? If so, that’s the issue. The Raspberry Pi just isn’t powerful enough for that.
When you said from your previous comment that what I want to do is absolutely possible, does it include the slowing down of the frame capture? Or what you had in mind doesn’t really follow what i’m doing with the code?
I would just like to know if there is a way to optimize my code to be able to use three separate camera to capture the drivers face without really slowing the Rpi very much
Hey Pacquier — I would suggest keeping an eye on the PyImageSearch blog for my upcoming Computer Vision + Raspberry Pi book. I’ll be covering how to optimize the Pi fo computer vision applications covering both the hardware and software side of things. It’s too much for me to address in a single comment on this post so I hope you’ll take a look at the book. I’ll be sharing more details soon.
Hi Adrain
I am facing two error in drowsiness detection program using facial landmarks
1) Import error imutils
No such module named imutils
2) Import error dlib
No such module named dlib
I have installed both dlib and imutils via pip install on virtual envoirnment
You may be forgetting to access your Python virtual environment before executing the script:
$ workon your_env_name
Hi Adrian, i have a fuzzy error can you help me please:
…
ImportError: No module named imutils.video
You need to install the “imutils” library:
$ pip install imutils
Hi Adrian,I know that the Raspberry Pi can’t do very good real-time, can you recommend a development board for better real-time performance?
It actually depends on what you’re trying to do. For some applications of computer vision the Raspberry Pi can run in real-time. And in other cases you should just use the Movidius NCS to speed it up. Otherwise I recommend the Jetson TX2 if you’re interested in embedded deep learning.
hy sir can it detect eye at night time or when person wearing eye site glasses?
No, this method is intended for use when you can clearly detect the eye regions of the user.
if we use night vision camera then its possible to do it at night?
Sir Adrian,
Thank you for your amazing introduction and idea, I’ve set my pi and run the code you provided. However the IDE says that is an error :
pi_detect_drowsiness.py: error: the following arguments are required: -c/–cascade, -p/–shape-predictor
It maybe a easily-dealed problem but I just have no idea to fix it.
Would you plz help me?
Once again, Thanks a lot !
Sir Adrian,
I found that the code should be run on the shell ,and it says
ImportError: No module named imutils.video
But I have intall imutils , how’s this happen?
According to your error it sounds like imutils it not actually installed. You can install it via:
$ pip install imutils
If you’re new to command line arguments and argparse, that’s okay, but you need to read this tutorial first. Once you read the guide you will understand how to supply the proper command line arguments to the script.
Hi Adrian, I’m from the Philippines and i love your work on this. But i need help on how to sound the alarm using speakers via the audio jack since traffic hat isn’t available here in our country. Thanks!
I demonstrate how to do use a speaker with the Raspberry Pi in this guide.
Hi Adrian, Amazing article!
If i want to use pi camera, do i just only comment out Line 74 and uncomment Line 75 to switch the video stream to the Raspberry Pi camera?
Also, if i use the infrared camera, can i detect the drowsy at night? Thanks:)
You are correct in both counts. An infrared camera will help with the drowsiness detection at night.
hi Adrian, the alarm does not sound accurately upon eye closure. sometimes I close my eyes and the alarm is not sounded(detected). like….. the accuracy is very low. what should I do to make real time?
Hi Sir Adrian,
Thank you for your project. May I ask how do you power up your raspberry pi in your car? If by powerbank, what brand of powerbank do you used? Reply is very much appreciated.
Thanks!
Hello Sir,
I need to know if this project can be implemented on Raspberry pi zero?(1ghz Processor & 512mb ram?)
The Raspberry Pi Zero will unfortunately be too slow for this project. I would highly recommend you use a Pi 3.
how to connect raspberry-pi to laptop sir. please reply soon
Unless I’m misunderstanding your question, typically we just SSH into our Raspberry Pi via a laptop/desktop:
$ ssh pi@your_ip_address
I am getting a error when we run your code sir.
It is no module named cv2. But we have installed opencv using your tutorial. What should we do to clear this error sir.
Unfortunately it sounds like you do not have OpenCV properly installed. You should refer to my OpenCV install guides. Which one did you follow? Make sure you refer to the “FAQ” section at the bottom of each post which explains common errors such as yours.
It is not working when i put glasses so kindly tell what i can do ?
This method will not work reliably with glasse.
Hello Sir Adrian, can i get the full code for this project?.
You can use the “Downloads” section of this post to download the source code.
Hi. Thanks to this post, I am the student who completes the detection of the eyes. Thank you first.
Can I ask you a few questions?
I am currently using Raspberry Pie 3b + and pi camera.
First, there is source code using Haar cascades. Is there source code using HOG and LInear SVM? I’m having a problem with accuracy.
Secondly, do you want to use the infrared pi camera and proceed with the same source code?
Answers I’ll wait. Thank you.
HOG + Linear SVM will be very slow on the Pi. If you want to try you can follow this tutorial.
Hello This is a wonderful post!
I have a few questions.
First, I want to use an infrared pi camera. Is there anything to modify in the source code section?
Second, is there any code for HOG + Linear SVM?
1. I haven’t tested this code with an infrared camera. You would need to test it and see.
2. You mean HOG + Linear SVM for face detection? Or arbitrary object detection?
Pls does anyone have an idea on how i can change the video source to be streamed in a python GUI???
. I have already created the GUI but i cannot stream the video to the GUI interface. Im using GUI because i added some features that need to be in the gui
Have you tried this tutorial?
thanks. exactly what im looking for
Hello!
I implemented the project according to the posting, but the fps is about 5-7. So I’m going to add Movidius NCS.
Movidius NCS is based on caffe and tensorflow, and can it help projects in this posting?
I have purchased Movidius NCS and I do not know how to do the initial setup and installation.
I would appreciate your help.
hi Guys,
i tried adding some functions in the for loop (main loop of the program). i
even tried using threading (declaring functions out of the loop and using threading
to call them) in the for loop so as to avoid the video streaming from
slowing down. however, with all these precautions, the streaming is quite slow. pls
what do u suggest i do in order to add some functions in the for loop and at the
same maintain a normal streaming speed?
I would rather say, the for loop is quite fragile. Ur suggestions will really help.
Thanks
Hey, Can I use Infra Red web camera instead of camera used here?
I haven’t tried this code with an infrared camera. Give it a try and see! I would love to know.
if i dont use traffic hat what should i do to make alarm to driver and what are the updation in code please can you give any sugestion
Have you tried using a speaker instead?
I am using a simple 5v piezo buzzer instead of traffic hat please help me out in this case which lines I need to change in the code
Sorry, I am not familiar with that buzzer. You should refer to the documentation associated with your buzzer.
hey, i’m getting an error as the following arguments are required: -c/–cascade, -p/–shape-predictor. I’ve read your tutorial on Python, argparse, and command line arguments. But Both the files are nn the same directory as others but getting these error. Please help me out.
Read this tutorial on command line arguments and how to use them.
Fantastic Article !
Thanks a lot Adrian.
I’m glad you enjoyed it 🙂
Dear Dr. Adrian,
Your projects are very very amazing and important. Thak you to share your knowledge.
Right now, my drowsiness detector is working on my Raspberry Pi in real time. It was difficult to implement some libraries but at the end, it’s working very good.
Could you illuminate to me, how can I detect the eyes through sunglasses? Help me please!!!
Greetings and hugs from Ecuador
Hello,
This might be a basic question, but how can I check my pi camera’s frame rate?
I also saw “Drowsiness detection with OpenCV” article too, but I still cannot know my pi camera’s frame rate. Where can I read it from …? Everyone here knows it, but I do not. Can you please help me?
Also, I tried haar cascade method from your instructions, and it speed up! (But still have no idea about the frame rate). But it detects my eyes and nose too, so is there any solution for that?
See this tutorial on measuring (and improving) your FPS throughput rate.
great projects ever ,
I was asking about how i can run both object detection and drowsiness detection at the same time is that possible to use one camera pi to run the 2 codes that you have discussed in the tutorials and if it is not possible what should i do two integrate this 2 function to open together
I need to know,how to connect the vibrator motor with Raspberry pi 3???
Can u give me solution asap..
Take a look at Raspberry Pi for Computer Vision where you’ll learn how to connect other hardware to your RPi.
Hi adrian
I’m doing your tutorial but it’s not perfect because there’s no traffichat
So I’m trying using piezo buzzer
Doesn’t it matter if you use a piezo buzzer to code to make a sound when drowsiness is detected?
I’ll wait for your reply
Thanks ~
Sorry, I don’t have any experience with the piezo buzzer. I would suggest referring to the documentation for it.
Hey…
Is there any website from where I can download data sets in videos with ground truth given….
I need to verify my network on the basis of that ground truth..
like videos of drowsy person (eyelid Closure, Eye Blinking rate ) etc.
Sorry, I don’t think there is such a dataset.
sir is it possible to do this project in raspberry 3 instead of traffic hat
Yes, you can use an RPi 3.
Hey!
We are facing a problem while importing the scipy module in opencv environment on raspberry Pi. The module has already been installed but it’s displaying an error NoModuleFound.. Then we tried to install it again but it’s showing ‘requirements already satisfied’.. But we aren’t able to import it. Can u please help us with it?
It still sounds like SciPy isn’t properly installed. Try using:
$ pip install scipy --no-cache-dir
which camera you have used in this.i want to order the same USB camera that you have used in this tutorial.
I used a Logitech C-920 for this tutorial.