
Today’s blog post is inspired by a number of PyImageSearch readers who have commented on previous deep learning tutorials wanting to understand what exactly OpenCV’s blobFromImage function is doing under the hood.
You see, to obtain (correct) predictions from deep neural networks you first need to preprocess your data.
In the context of deep learning and image classification, these preprocessing tasks normally involve:
- Mean subtraction
- Scaling by some factor
OpenCV’s new deep neural network (dnn ) module contains two functions that can be used for preprocessing images and preparing them for classification via pre-trained deep learning models.
In today’s blog post we are going to take apart OpenCV’s cv2.dnn.blobFromImage and cv2.dnn.blobFromImages preprocessing functions and understand how they work.
To learn more about image preprocessing for deep learning via OpenCV, just keep reading.
Deep learning: How OpenCV’s blobFromImage works
OpenCV provides two functions to facilitate image preprocessing for deep learning classification:
cv2.dnn.blobFromImagecv2.dnn.blobFromImages
These two functions perform
- Mean subtraction
- Scaling
- And optionally channel swapping
In the remainder of this tutorial we’ll:
- Explore mean subtraction and scaling
- Examine the function signature of each deep learning preprocessing function
- Study these methods in detail
- And finally, apply OpenCV’s deep learning functions to a set of input images
Let’s go ahead and get started.
Deep learning and mean subtraction
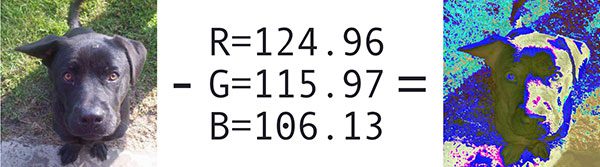
Before we dive into an explanation of OpenCV’s deep learning preprocessing functions, we first need to understand mean subtraction. Mean subtraction is used to help combat illumination changes in the input images in our dataset. We can therefore view mean subtraction as a technique used to aid our Convolutional Neural Networks.
Before we even begin training our deep neural network, we first compute the average pixel intensity across all images in the training set for each of the Red, Green, and Blue channels.
This implies that we end up with three variables:
 ,
,  , and
, and 
Typically the resulting values are a 3-tuple consisting of the mean of the Red, Green, and Blue channels, respectively.
For example, the mean values for the ImageNet training set are R=103.93, G=116.77, and B=123.68 (you may have already encountered these values before if you have used a network that was pre-trained on ImageNet).
However, in some cases the mean Red, Green, and Blue values may be computed channel-wise rather than pixel-wise, resulting in an MxN matrix. In this case the MxN matrix for each channel is then subtracted from the input image during training/testing.
Both methods are perfectly valid forms of mean subtraction; however, we tend to see the pixel-wise version used more often, especially for larger datasets.
When we are ready to pass an image through our network (whether for training or testing), we subtract the mean,  , from each input channel of the input image:


We may also have a scaling factor,  , which adds in a normalization:
 / \sigma")
 / \sigma")
 / \sigma")
The value of may be the standard deviation across the training set (thereby turning the preprocessing step into a standard score/z-score). However, may also be manually set (versus calculated) to scale the input image space into a particular range — it really depends on the architecture, how the network was trained, and the techniques the implementing author is familiar with.
It’s important to note that not all deep learning architectures perform mean subtraction and scaling! Before you preprocess your images, be sure to read the relevant publication/documentation for the deep neural network you are using.
As you’ll find on your deep learning journey, some architectures perform mean subtraction only (thereby setting  ). Other architectures perform both mean subtraction and scaling. Even other architectures choose to perform no mean subtraction or scaling. Always check the relevant publication you are implementing/using to verify the techniques the author is using.
Mean subtraction, scaling, and normalization are covered in more detail inside Deep Learning for Computer Vision with Python.
OpenCV’s blobFromImage and blobFromImages function
Let’s start off by referring to the official OpenCV documentation for cv2.dnn.blobFromImage :
[blobFromImage] creates 4-dimensional blob from image. Optionally resizes and crops
imagefrom center, subtractmeanvalues, scales values byscalefactor, swap Blue and Red channels.
Informally, a blob is just a (potentially collection) of image(s) with the same spatial dimensions (i.e., width and height), same depth (number of channels), that have all be preprocessed in the same manner.
The cv2.dnn.blobFromImage and cv2.dnn.blobFromImages functions are near identical.
Let’s start with examining the cv2.dnn.blobFromImage function signature below:
blob = cv2.dnn.blobFromImage(image, scalefactor=1.0, size, mean, swapRB=True)
I’ve provided a discussion of each parameter below:
image: This is the input image we want to preprocess before passing it through our deep neural network for classification.scalefactor: After we perform mean subtraction we can optionally scale our images by some factor. This value defaults to `1.0` (i.e., no scaling) but we can supply another value as well. It’s also important to note thatscalefactorshould be as we’re actually multiplying the input channels (after mean subtraction) by
 scalefactor.size: Here we supply the spatial size that the Convolutional Neural Network expects. For most current state-of-the-art neural networks this is either 224×224, 227×227, or 299×299.mean: These are our mean subtraction values. They can be a 3-tuple of the RGB means or they can be a single value in which case the supplied value is subtracted from every channel of the image. If you’re performing mean subtraction, ensure you supply the 3-tuple in `(R, G, B)` order, especially when utilizing the default behavior ofswapRB=True.swapRB: OpenCV assumes images are in BGR channel order; however, the `mean` value assumes we are using RGB order. To resolve this discrepancy we can swap the R and B channels inimageby setting this value to `True`. By default OpenCV performs this channel swapping for us.
 as we’re actually multiplying the input channels (after mean subtraction) by
 The cv2.dnn.blobFromImage function returns a blob which is our input image after mean subtraction, normalizing, and channel swapping.
The cv2.dnn.blobFromImages function is exactly the same:
blob = cv2.dnn.blobFromImages(images, scalefactor=1.0, size, mean, swapRB=True)
The only exception is that we can pass in multiple images, enabling us to batch process a set of images .
If you’re processing multiple images/frames, be sure to use the cv2.dnn.blobFromImages function as there is less function call overhead and you’ll be able to batch process the images/frames faster.
Deep learning with OpenCV’s blobFromImage function
Now that we’ve studied both the blobFromImage and blobFromImages functions, let’s apply them to a few example images and then pass them through a Convolutional Neural Network for classification.
As a prerequisite, you need OpenCV version 3.3.0 at a minimum. NumPy is a dependency of OpenCV’s Python bindings and imutils is my package of convenience functions available on GitHub and in the Python Package Index.
If you haven’t installed OpenCV, you’ll want to follow the latest tutorials available here, and be sure to specify OpenCV 3.3.0 or higher when you clone/download opencv and opencv_contrib .
The imutils package can be installed via pip :
$ pip install imutils
Assuming your image processing environment is ready to go, let’s open up a new file, name it blob_from_images.py , and insert the following code:
# import the necessary packages
from imutils import paths
import numpy as np
import cv2

# load the class labels from disk
rows = open("synset_words.txt").read().strip().split("\n")
classes = [r[r.find(" ") + 1:].split(",")[0] for r in rows]

# load our serialized model from disk
net = cv2.dnn.readNetFromCaffe("bvlc_googlenet.prototxt",
	"bvlc_googlenet.caffemodel")

# grab the paths to the input images
imagePaths = sorted(list(paths.list_images("images/")))
First we import imutils , numpy , and cv2 (Lines 2-4).
Then we read synset_words.txt (the ImageNet Class labels) and extract classes , our class labels, on Lines 7 and 8.
To load our model model from disk we use the DNN function, cv2.dnn.readNetFromCaffe , and specify bvlc_googlenet.prototxt as the filename parameter and bvlc_googlenet.caffemodel as the actual model file (Lines 11 and 12).
Note: You can grab the pre-trained Convolutional Neural Network, class labels text file, source code, and example images to this post using the “Downloads” section at the bottom of this tutorial.
Finally, we grab the paths to the input images on Line 15. If you’re using Windows you should change the path separator here to ensure you can correctly load the image paths.
Next, we’ll load images from disk and pre-process them using blobFromImage :
# (1) load the first image from disk, (2) pre-process it by resizing
# it to 224x224 pixels, and (3) construct a blob that can be passed
# through the pre-trained network
image = cv2.imread(imagePaths[0])
resized = cv2.resize(image, (224, 224))
blob = cv2.dnn.blobFromImage(resized, 1, (224, 224), (104, 117, 123))
print("First Blob: {}".format(blob.shape))
In this block, we first load the image (Line 20) and then resize it to 224×224 (Line 21), the required input image dimensions for GoogLeNet.
Now we’re to the crux of this post.
On Line 22, we call cv2.dnn.blobFromImage which, as stated in the previous section, will create a 4-dimensional blob for use in our neural net.
Let’s print the shape of our blob so we can analyze it in the terminal later (Line 23).
Next, we’ll feed blob through GoogLeNet:
# set the input to the pre-trained deep learning network and obtain
# the output predicted probabilities for each of the 1,000 ImageNet
# classes
net.setInput(blob)
preds = net.forward()

# sort the probabilities (in descending) order, grab the index of the
# top predicted label, and draw it on the input image
idx = np.argsort(preds[0])[::-1][0]
text = "Label: {}, {:.2f}%".format(classes[idx],
	preds[0][idx] * 100)
cv2.putText(image, text, (5, 25),  cv2.FONT_HERSHEY_SIMPLEX,
	0.7, (0, 0, 255), 2)

# show the output image
cv2.imshow("Image", image)
cv2.waitKey(0)
If you’re familiar with recent deep learning posts on this blog, the above lines should look familiar.
We feed the blob through the network (Lines 28 and 29) and grab the predictions, preds .
Then we sort preds (Line 33) with the most confident predictions at the front of the list, and generate a label text to display on the image. The label text consists of the class label and the prediction percentage value for the top prediction (Lines 34 and 35).
From there, we write the label text at the top of the image (Lines 36 and 37) followed by displaying the image on the screen and waiting for a keypress before moving on (Lines 40 and 41).
Now it’s time to use the plural form of the blobFromImage function.
Here we’ll do (nearly) the same thing, except we’ll instead create and populate a list of images followed by passing the list as a parameter to blobFromImages :
# initialize the list of images we'll be passing through the network
images = []

# loop over the input images (excluding the first one since we
# already classified it), pre-process each image, and update the
# `images` list
for p in imagePaths[1:]:
	image = cv2.imread(p)
	image = cv2.resize(image, (224, 224))
	images.append(image)

# convert the images list into an OpenCV-compatible blob
blob = cv2.dnn.blobFromImages(images, 1, (224, 224), (104, 117, 123))
print("Second Blob: {}".format(blob.shape))
First we initialize our images list (Line 44), and then, using the imagePaths , we read, resize, and append the image to the list (Lines 49-52).
Using list slicing, we’ve omitted the first image from imagePaths on Line 49.
From there, we pass the images into cv2.dnn.blobFromImages as the first parameter on Line 55. All other parameters to cv2.dnn.blobFromImages are identical to cv2.dnn.blobFromImage above.
For analysis later we print blob.shape on Line 56.
We’ll next pass the blob through GoogLeNet and write the class label and prediction at the top of each image:
# set the input to our pre-trained network and obtain the output
# class label predictions
net.setInput(blob)
preds = net.forward()

# loop over the input images
for (i, p) in enumerate(imagePaths[1:]):
	# load the image from disk
	image = cv2.imread(p)

	# find the top class label from the `preds` list and draw it on
	# the image
	idx = np.argsort(preds[i])[::-1][0]
	text = "Label: {}, {:.2f}%".format(classes[idx],
		preds[i][idx] * 100)
	cv2.putText(image, text, (5, 25),  cv2.FONT_HERSHEY_SIMPLEX,
		0.7, (0, 0, 255), 2)

	# display the output image
	cv2.imshow("Image", image)
	cv2.waitKey(0)
The remaining code is essentially the same as above, only our for loop now handles looping through each of the imagePaths (again, omitting the first one as we have already classified it).
And that’s it! Let’s see the script in action in the next section.
OpenCV blobfromImage and blobFromImages results
Now we’ve reached the fun part.
Go ahead and use the “Downloads” section of this blog post to download the source code, example images, and pre-trained neural network. You will need the additional files in order to execute the code.
From there, fire up a terminal and run the following command:
$ python blob_from_images.py
The first terminal output is with respect to the first image found in the images folder where we apply the cv2.dnn.blobFromImage function:
First Blob: (1, 3, 224, 224)
The resulting beer glass image is displayed on the screen:
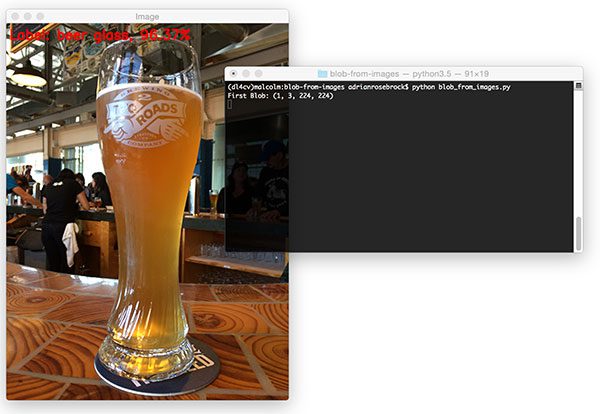
blobFromImage are displayed in the terminal.That full beer glass makes me thirsty. But before I enjoy a beer myself, I’ll explain why the shape of the blob is (1, 3, 224, 224) .
The resulting tuple has the following format:
(num_images=1, num_channels=3, width=224, height=224)
Since we’ve only processed one image, we only have one entry in our blob . The channel count is three for BGR channels. And finally 224×224 is the spatial width and height for our input image.
Next, let’s build a blob from the remaining four input images.
The second blob’s shape is:
Second Blob: (4, 3, 224, 224)
Since this blob contains 4 images, the num_images=4 . The remaining dimensions are the same as the first, single image, blob.
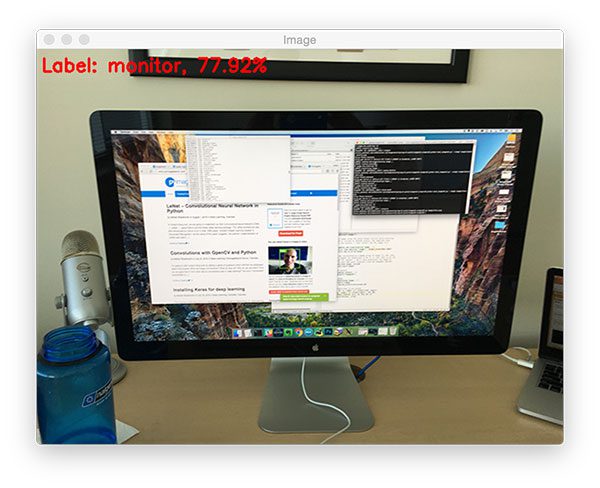
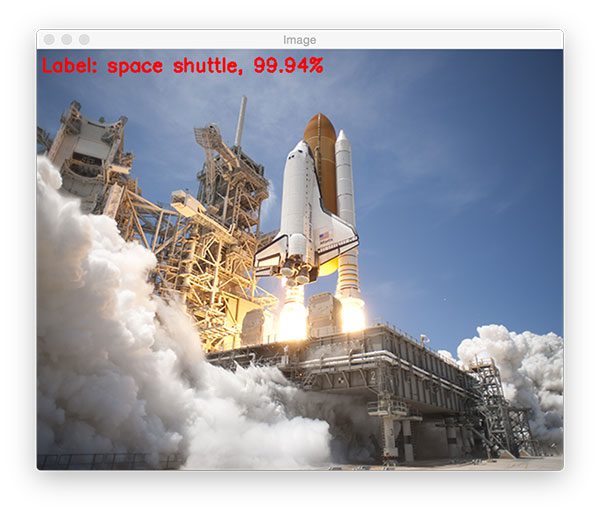
I’ve included a sample of correctly classified images below:

What's next? I recommend PyImageSearch University.
30+ total classes • 39h 44m video • Last updated: 12/2021
★★★★★ 4.84 (128 Ratings) • 3,000+ Students Enrolled
I strongly believe that if you had the right teacher you could master computer vision and deep learning.
Do you think learning computer vision and deep learning has to be time-consuming, overwhelming, and complicated? Or has to involve complex mathematics and equations? Or requires a degree in computer science?
That’s not the case.
All you need to master computer vision and deep learning is for someone to explain things to you in simple, intuitive terms. And that’s exactly what I do. My mission is to change education and how complex Artificial Intelligence topics are taught.
If you're serious about learning computer vision, your next stop should be PyImageSearch University, the most comprehensive computer vision, deep learning, and OpenCV course online today. Here you’ll learn how to successfully and confidently apply computer vision to your work, research, and projects. Join me in computer vision mastery.
Inside PyImageSearch University you'll find:
- ✓ 30+ courses on essential computer vision, deep learning, and OpenCV topics
- ✓ 30+ Certificates of Completion
- ✓ 39h 44m on-demand video
- ✓ Brand new courses released every month, ensuring you can keep up with state-of-the-art techniques
- ✓ Pre-configured Jupyter Notebooks in Google Colab
- ✓ Run all code examples in your web browser — works on Windows, macOS, and Linux (no dev environment configuration required!)
- ✓ Access to centralized code repos for all 500+ tutorials on PyImageSearch
- ✓ Easy one-click downloads for code, datasets, pre-trained models, etc.
- ✓ Access on mobile, laptop, desktop, etc.
Summary
In today’s tutorial we examined OpenCV’s blobFromImage and blobFromImages deep learning functions.
These methods are used to prepare input images for classification via pre-trained deep learning models.
Both blobFromImage and blobFromImages perform mean subtraction and scaling. We can also swap the Red and Blue channels of the image depending on channel ordering. Nearly all state-of-the-art deep learning models perform mean subtraction and scaling — the benefit here is that OpenCV makes these preprocessing tasks dead simple.
If you’re interested in studying deep learning in more detail, be sure to take a look at my brand new book, Deep Learning for Computer Vision with Python.
Inside the book you’ll discover:
- Super practical walkthroughs that present solutions to actual, real-world image classification problems, challenges, and competitions.
- Detailed, thorough experiments (with highly documented code) enabling you to reproduce state-of-the-art results.
- My favorite “best practices” to improve network accuracy. These techniques alone will save you enough time to pay for the book multiple times over.
- ..and much more!
Sound good?
Click here to start your journey to deep learning mastery.
Otherwise, be sure to enter your email address in the form below to be notified when future deep learning tutorials are published here on the PyImageSearch blog.
See you next week!

Download the Source Code and FREE 17-page Resource Guide
Enter your email address below to get a .zip of the code and a FREE 17-page Resource Guide on Computer Vision, OpenCV, and Deep Learning. Inside you'll find my hand-picked tutorials, books, courses, and libraries to help you master CV and DL!

Email notification squad, where you at!
Hey Adrian, I’m really enjoying your series of articles on deep learning. I love the powerful technology we can create by tying in computer vision and neural networks… It really is the combination that allows us to make *magic* software that makes people say “Wow!”
Anyways, this is a bit off topic, but I was wondering if you would be so kind as to write an article on making a “people counter” with OpenCV — that is, a program that counts people going in and out of a building via a live webcam feed. There are no great resources available online for this, so if you would write one I’m sure it would drive plenty of traffic to your site. It’s a win win for both of us!
That being said, I love all the content you’re putting out now. Keep doing your thing 🙂
Take care!
Sure, I can absolutely do a blog post on that. I’m right in the middle of a deep learning series, but I’ll add it to the idea queue. Thanks for the suggestion.
Hi,
you can check out the post of Adrian where he sets the face counter using dlib. Your project can be created on the same lines. I hope it helps.
Hi
Thank for a new post. I tried to experiment with dnn modul of opencv for semantic segmentation tasks but I had to refuse from it. Maybe I just didnt find a suitable network. although, later on I didnt find a suitable solution and with using original frameworks. (or quality is poor or size of pretrained net is too huge). Maybe you, Adrian, have some suggestion what network can be used in mobile devices for semantic segmentation tasks?
I would suggest doing some research on MobileNet and then trying out MobileNet + semantic segmentation.
MobileNet is attended for classifications. Models which made on base of MobileNet also is not perfect unfortunately. UNet is too big. Pretrained caffe model what I found is 124Mb and it is not suitable for mobile devices. PSPNet is about 30Mb, it is better, but quality is poor. Even their web demo on site is not work well on arbitrary images. It is a common problem of all segmentation networks. They work fine on images on which these were trained (i.e. from cityscapes set) but on any random photo results are too far from desirable. I found only one network what works moreless fine on random images – it is Sharpnet by facebook. But their size is more 500Mb 🙁
Ideally, it was needed to combine i.e. ENet + SharpNet and make a compact net, but I didnt find this already done. To make it self – this task will require to drop all other tasks and devote all time to studying NN more deeply. And the most defensively is what so kind of already done mobile network will be available 1-2 year later, but not now yet.
MobileNet by itself is used for image classification. MobileNet + SSD can become an object detector. MobileNet can also be combined with a segmentation framework as well.
You also mentioned “they work fine on images they were trained on” which is actually what all machine learning algorithms do. There is no such thing as a “perfect generalizability” to images a network were not trained on, especially if your input images dramatically vary from the training set.
Deep learning-based segmentation will get better for sure, but that also implies that our datasets need to become more robust as well.
Good advise. I’ll try to find some project with pretrained model on base of MobileNet. (havent yet found)
Regarding “perfect generalizability” – when I’ve becomes acquainted with MachineLearning then for task of classification and object detection it looks like a miracle, and usually it works fine on random pictures. And only with a segmentation task I’ve met a disappointment. Of course, it is more complicated task than previous two but a faith in a miracle dead last. Even monstrous networks like SharpMask doesnt see stable results. They are interested for experiments but not yet applicable for real tasks. During google searching I’ve met several commercial projects what promise a good result and appropriate sizes for mobile solution. But they havent demo versions and I cannot estimate do they say true or it is just advertising promises. But they motivate to continue to experiment with existed open source projects
Can you write a post that introduce deep learning feature on OpenCV 3.3.0? Thank article!
Hi Tuan — I have already done this. Please see this post.
Hey,
Thanks for amazing tutorial. Is there any help available for image segmentation using dnn module of openCV?
Thank you for the very informative blog & newsletter. I was wondering whether you can advise necessary tools for applying these techniques in production environment around RESTful APIs 😉
Hi Mustafa — I’m covering how to build scalable deep learning APIs inside my book, Deep Learning for Computer Vision with Python.
very good job!!! i want to ask if that can work on real time object detection??
Absolutely. Please see this blog post.
thnx for your answer but on this link you have only 20 model. how i can import this model!!! thnx again for your time
The object detection model supports the 20 COCO classes. The image classification model was trained on the 1,000 ImageNet labels. You cannot take a model trained for image classification and use it for object detection. You would instead need to train your object detection model from scratch OR apply transfer learning via fine-tuning. For what it’s worth, I’m covering object detection in detail inside Deep Learning for Computer Vision with Python.
Hey Adrian
For me, a blob is a set of connected pixels, or a connected component, usually found in binary images. Why did they choose “blob” for this operation, which seems like has nothing to do with traditional blob?
Calling the output of these functions a “blob” is a decision by the OpenCV developers — I had nothing to do with this choice. I’m not sure why they choose the name blob, I suppose you would need to ask them.
Hi Adrian,
How to “rectangle” for detected object? Based on your code, I could not do that! (If I use MobileNet module, it can help me but less accurate)
I cover how to compute the bounding box rectangle for a given object in this blog post. You cannot take a model that was trained for image classification and use it for object detection. Object detection deep learning models follow a specific framework and need to be trained in a very specific way. I’m covering object detection deep learning models inside my book, Deep Learning for Computer Vision with Python.
I am interested in your book and your website. But i have no money to buy it. Hope you successfully!
good
Hi Adrian,
Thanks for the very informative post.
I have a question regarding mean subtraction.
I’m trying to load another model published in the caffe model zoo (https://github.com/BVLC/caffe/wiki/Model-Zoo#models-for-age-and-gender-classification).
Apart from the `.prototxt` and `.caffemodel` files it also provides a `mean.binaryproto` file. Do you happen to know how can we figure out the mean and scalefactor parameters values from this file ?
Hi Fábio — you’ll need to use the “caffe” Python bindings (which will require you to install and compile Caffe). Something like this would be a step in the right direction.
Hi Adrian
Please tell me is this function only works for OpenCV3.3 ?? or it will work for 3.2 as well?
This function is only available in OpenCV 3.3.0 and greater. It is not available in OpenCV 3.2.
———
News
———
Newly added in DNN module : imagesFromBlob method
Example of use in C++ :: https://github.com/Pandinosaurus/visualizeDnnBlobsOCV
Hey Adrian, thank you so much, I understood blobFromImage() well, but I am really confused as to what net.forward() returns.
What is the structure of the variable ‘preds’?
Please help me out.
The exact structure of what is returned depends on the network. A classification network will return class labels and probabilities. An object detection network will return labels, probabilities, and bounding box coordinates. Take a look at this blog post for more information.
As per my knowledge, labels are used during training of the neural network, then why do we need labels file while classifying real world data?
Hey Mayank — we train a network on both its data + labels. However, we need the names of the labels when deploying the model as the names are the “human readable” names of the labels.
Hi Adrian, thank you so much and now I get a better understanding of dnn.
But there is one question bothering me a lot. I learn that scalefactor should be 1/delta, but how to calculate “delta”? Is there any direct formula of delta?
Please help me out.
Please ignore this question! Sorry for asking the same question twice!
Congrats on resolving the issue, Jasper!
Hy Adrian !
Thank you for your great tutorials. I have a question , how to load keras model on OpenCV 3?
In this tutorial you are using caffe model.
Please help me out.
Keras models are not yet supported with OpenCV 3. Hopefully in the future though!
That said you can still use Keras models to classify input images loaded by OpenCV — it’s something I do in many PyImageSearch tutorials. Take a look at this post to get you started.
I’m having a weird issue with net.forward() where it appears to return the detection from a previous detection instead of a new detection. I’m having the issue on two systems (Pi2 and Pi3) both using V1 5 Mpixel pi cameras and getting images via videostream from your imutils module. Changing frame rate or image resolution seems to have no influence. Pi temperures seems to not be an issue as I’ve seen it when “high” in the 70s and “low” in the 40s
Three sequential images showing the problem can be viewed here:
https://1drv.ms/f/s!AnWizTQQ52YzgRq6irVVpWPhys1t
I do not have this issue with the Movidius version of the MobileNetSSD detection which of course gets a much higher frame rate, but one frame every 2 seconds is good for “ring doorbell” type usages and other than these previous detection error I’m seeing a near zero false alarm rate which is what makes push notifications so useful.
I got started on this project when we were having dinner with some friends and her Ring Doorbell kept interrupting us with false alarms — the PyImageSearch DNN tutorials I’d been playing with made a light go off in my head 🙂
Hey Wally, congrats on the progress on the project, that’s awesome! As far as the detections on previous frames go, are you using code from a previous PyImageSearch blog post? Or did you code up the method from scratch?
Sorry for getting confused and posting to two threads, that was not my intention, although I wasn’t sure which would be most appropriate. Basically I’ve merged code from two PyImageSearch tutorials and added the MQTT code to interface with node-red for control and notification.
My loop to process the AI is:
image = vs.read()
(h, w) = image.shape[:2]
blob = cv2.dnn.blobFromImage(cv2.resize(image,
PREPROCESS_DIMS), 0.007843, PREPROCESS_DIMS, 127.5)
net.setInput(blob)
detections = None
detections = net.forward()
# loop over the detections
Which is straight from PyImageSearch tutorial code. I added the detections = None in hopes of throwing an error if there was something wrong with the blob that was making net.forward() return without doing anything which could leave the previous detection to be reused. But it didn’t change anything.
I’m stumped by this to say the least! However, its now looking like it might be some weird SD card corruption as the SD card showed the same problem run in a third Pi2 system. But ssh -X and gpicview, etc. and all other Raspbian stuff seemed to be working fine — cron job to delete old image files, etc.
I have re-cloned the SD card from my master copy using dd and so far its worked fine for 12+ hours. I’m about to disable boot to GUI (which is default for my master copy to aid reconfiguration) and put the card back into the dedicated system. I did drill some vent holes in the case, but temp monitoring didn’t seem to show correlations with the issue appearing or not.
Do you know if net.forward() creates a persistent temporary file?
I’ve read that SD cards don’t stand up well to this, which is why I write the images to a USB stick. But re-writing the same SD card and so far not having the issue argues against this unless the SD card is doing some kind of bad-block substitution when dd writes it again.
I’ve had USB sticks and SD cards “die” in the past and they’ve never recovered with a reformat, being cheap and wanting to learn things I always try 🙂
Its particularly curious that two systems developed the issue after approximately the same running time with one “premium” brand-name SD card and one Microcenter “house brand”.
Thanks again for being such a great resource.
This system has worked well enough that a couple of friends and neighbors who’ve seen it in action want one, which has made me discover the issues while testing the systems I’d setup for them.
The Movidius version that uses images transferred by ftp from my Flir Lorex HD security DVR has been running 24/7 for over a month now without issues.
I’ll followup when I learn more, but it took over 36 hours of continuous running for the issue to appear initially and it seems to happen more frequently with more running time. If it turns out to be SD card “wear out” issues, this could be very important to all your Raspberry Pi using readers.
Hi Adrian. Your tutorial has been very helpful. I think I found one issue: you are subtracting the means from the wrong channels. See https://github.com/opencv/opencv/blob/4560909a5e5cb284cdfd5619cdf4cf3622410388/modules/dnn/misc/face_detector_accuracy.py#L148
From OpenCV’s own face detection benchmarking program:
net.setInput(cv.dnn.blobFromImage(img, 1.0, (300, 300), (104., 177., 123.), False, False))
By default, blobFromImage is going to assume the given mean values are in RGB order and will reorder them. However, it seems the 104, 177, 123 values are already in BGR order, so we don’t want OpenCV to reorder them. Thus, OpenCV we see the parameters set to False in OpenCV’s code.
Thanks for the great post Sir.
Will you please take a look at this-
“However, in some cases the mean Red, Green, and Blue values may be computed channel-wise rather than pixel-wise, resulting in an MxN matrix. In this case the MxN matrix for each channel is then subtracted from the input image during training/testing.”
I think it should be “may be computed pixel-wise rather than channel-wise” instead of “may be computed channel-wise rather than pixel-wise”. Because we generally do channel-wise mean subtraction generally and MxN matrix would be useful for pixel-wise means I think.
Yes, I was confused by this expression too.
Hello
Thanks for awesome post!
I have one doubt though….How did you calculate mean RGB values (104., 177., 123.) to be passed to function ?
Do these values always same?
cv2.dnn.blobFromImage(cv2.resize(image, (300, 300)), 1.0, (300, 300), (104.0, 177.0, 123.0))
The mean RGB values are the means for each individual RGB channel across all images in your training set. Since the networks we are using here are pre-trained we just supply the mean values for the training set which most authors will provide.
Hi Adrian,
Can you please tell me what exactly a blob is? and why it’s 4 dimensional and what does all the 4 dimensions contain.
I read your bolg https://www.pyimagesearch.com/2017/11/06/deep-learning-opencvs-blobfromimage-works/ and understood mean subtraction, scaling and all, but am not able to understand what exactly a blob is in blobfromimage().
Thanks
The first dimension is your batch size (# of images). The second dimension is the number of channels in the image. The third dimension is the height. And the fourth dimension is the width. Having the second dimension contain the channels is “channels first” ordering. Having the channels as the last dimension is called “channels last” ordering.
Hi Adrian,
Thank you for your share, a very useful articles! But I still have a question about “cv.dnn.blobfromimages”,
see, now I use opencv dnn module to output my tiny-yolo model result. And I found that if I just input 1 image, the output shape is (3072, 6). But if I input 3 images, the output shape is still the same. I just want to know why. Also, since my model is only one class, so the output channel will be [xmin, ymin, xmax, ymax, total_confidence, class_confidence], right? But I cannot find a channel to distinguish results from different images. Would you tell me how can I figure it out?
BTW, seems the time of batch process is the same as the time to process single image.
Thanks
Take a look at my latest blog post, YOLO Object Detection with OpenCV, where I discuss the volume size. Working with YOLO and OpenCV is much harder than some other architectures as you need to explicitly supply your output layers.
I’m a bit fuzzy on the width/height parameters: Does it scale down the image to a square of this size? For a large input image (eg HD video frame), this seems very small, and would lead to a lot of lost data, especially if trying to detect distant faces in the video frame.
Or am I misunderstanding what it means by “input width and height”?
It depends if you set
cropto eitherTrueorFalse. A value ofTruewill crop the center of an image based on the input width and height. Otherwise the entire image is used.I’m using this to detect faces in classroom recordings. The size of faces is too small to use the entire frame, so I split the image into two pieces and run them as a batch. After some testing I found that the best aspect ratio to use for the cropped images is 1.376:1. My cropped images are 750×545. I don’t need to detect faces in the entire frame, but if you need to do it over the whole image you may need to split it into 4 pieces. You will also need to overlap the cropped images slightly to detect faces that are right between them. I’m also doing object tracking for when they turn around, so the overlap is not critical for my application.
Excellent post, Everything well explained! Thanks 😀
Thanks so much, Luis!
Can u explain how the multiplications for bounding box works
After the bounding box has been detected we need to rescale the coordinates back to the (relative) coordinates of the original image.
I have been using this as an image preprocessor for my face recognition project. I see that when the image quality is good and when the faces are closer to the camera then doing the following will generate good results:
blob = cv2.dnn.blobFromImage(f, 1.0,(300, 300), (104.0, 177.0, 123.0))
However, doing the same on those images whose quality is moderate and when the faces are small and are farther away from the camera yields bad face detection results. As a solution to that I am processing the image in the following manner which yields much better results.
blob = cv2.dnn.blobFromImage(f, 1.0,(w, h), (104.0, 177.0, 123.0)) where h,w is the image size.
I would like to understand why it works the way it works and also would like to take your advise on best way to generalise the code when I have both small and large faces in my images.
Hi,
As always a very interesting read!
I’m a bit confused about the swapRB parameter:
When you write:
image = cv2.imread(imagePaths[0])
resized = cv2.resize(image, (224, 224))
blob = cv2.dnn.blobFromImage(resized, 1, (224, 224), (104, 117, 123))
1) why do you do a resize first ? : resized = cv2.resize(image, (224, 224)) ? it is performed by blobFromImage no?
2) For me openCV gives you back a BGR image…and the default value for swapRB in cv2.dnn.blobFromImage is … False so why not put swapRB=True?
Thanks for your help!
Thanks a lot for the great post
One wuestion, How can I use cv2.dnn.blobFromImage to ne on channel last order and not in channel firsy order
Thanks Adrian for the Informative blog.This is really helpful
You are welcome!
Dear Adrian ,
Thanks for your great work.
I have a problem when I use this blog to identify different objects in underwater. The blog does not work well for example when I have a tire underwater the blog detect it as sea cumcumber . I need to add other objects in library and make it workable for underwater object.
please help to solve this issue.
Thanks for your support.
I would suggest reading through Deep Learning for Computer Vision with Python. That book will teach you how to train your own custom models.
If I provide it with a photo from a cat, it does not frame it. What should I do in order to have it framing cats faces too ?
I’m not sure what you mean. Are you trying to train a custom cat detector?