Today’s blog post is the most fun I’ve EVER had writing a PyImageSearch tutorial.
It has everything we have been discussing the past few weeks, including:
- Deep learning
- Raspberry Pis
- 3D Christmas trees
- References to HBO’s Silicon Valley “Not Hotdog” detector
- Me dressing up as Santa Clause!
In keeping with the Christmas and Holiday season, I’ll be demonstrating how to take a deep learning model (trained with Keras) and then deploy it to the Raspberry Pi.
But this isn’t any machine learning model…
This image classifier has been specifically trained to detect if Santa Claus is in our video stream.
And if we do detect Santa Claus…
Well. I won’t spoil the surprise (but it does involve a 3D Christmas tree and a jolly tune).
Enjoy the tutorial. Download the code. Hack with it.
And most of all, have fun!
Keras and deep learning on the Raspberry Pi
Today’s blog post is a complete guide to running a deep neural network on the Raspberry Pi using Keras.
I’ve framed this project as a Not Santa detector to give you a practical implementation (and have some fun along the way).
In the first part of this blog post, we’ll discuss what a Not Santa detector is (just in case you’re unfamiliar with HBO’s Silicon Valley “Not Hotdog” detector which has developed a cult following).
We’ll then configure our Raspberry Pi for deep learning by installing TensorFlow, Keras, and a number of other prerequisites.
Once our Raspberry Pi is configured for deep learning we’ll move on to building a Python script that can:
- Load our Keras model from disk
- Access our Raspberry Pi camera module/USB webcam
- Apply deep learning to detect if Santa Clause is in the frame
- Access our GPIO pins and play music if Santa is detected
These are my favorite types of blog posts to write here on PyImageSearch as they integrate a bunch of techniques we’ve discussed, including:
- Deep learning on the Raspberry Pi
- Accessing your Raspberry Pi camera module/USB webcam
- Working with GPIO + computer on the Raspberry Pi
Let’s get started!
What is a Not Santa detector?
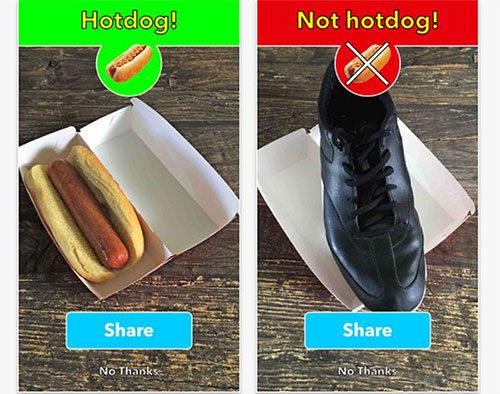
A Not Santa detector is a play off HBO’s Silicon Valley where the characters create a smartphone app that can determine if an input photo is a “hot dog” or is “not a hot dog”:
The show is clearly poking fun at the Silicon Valley startup culture in the United States by:
- Preying on the hype of machine learning/deep learning
- Satirically remaking on the abundance of smartphone applications that serve little purpose (but the creators are convinced their app will “change the world”)
I decided to have some fun myself.
Today we are creating a Not Santa detector that will detect if Santa Claus is in an image/video frame.
For those unfamiliar with Santa Claus (or simply Santa” for short), he is a jolly, portly, white-bearded, fictional western culture figure who delivers presents to boys and girls while they sleep Christmas Eve
However, this application is not totally just for fun and satire!
We’ll be learning some practical skills along the way, including how to:
- Configure your Raspberry Pi for deep learning
- Install Keras and TensorFlow on your Raspberry Pi
- Deploy a pre-trained Convolutional Neural Network (with Keras) to your Raspberry Pi
- Perform a given action once a positive detection has occurred
But before we can write a line of code, let’s first review the hardware we need.
What hardware do I need?
In order to follow along exactly with this tutorial (with no modifications) you’ll need:
- A Raspberry Pi 3 (or the Raspberry Pi 3 Starter Kit which I also highly recommend)
- A Raspberry Pi camera module or a USB camera. For the purposes of this tutorial, I went with the Logitech C920 as it’s a great camera for the price (and having a USB cable gives you a bit of extra room to work with versus the short ribbon on the Pi camera)
- The 3D Christmas Tree for the Raspberry Pi (designed by Rachel Rayns)
- A set of speakers — I recommend these from Pi Hut, the stereo speakers from Adafruit, or if you’re looking for something small that still packs a punch, you could get this speaker from Amazon
Of course, you do not need all these parts.
If you have just a Raspberry Pi + camera module/USB camera you’ll be all set (but you will have to modify the code so it doesn’t try to access the GPIO pins or play music via the speakers).
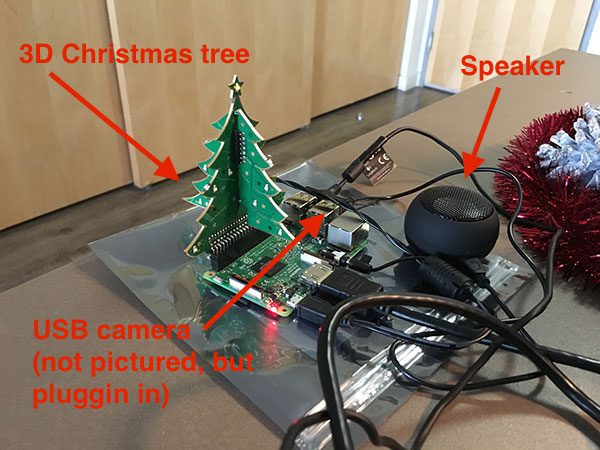
Your setup should look similar to mine in Figure 2 above where I have connected my speakers, 3D Christmas Tree, and webcam (not pictured as it’s off camera).
I would also recommend hooking up an HDMI monitor + keyboard to test your scripts and debug them:
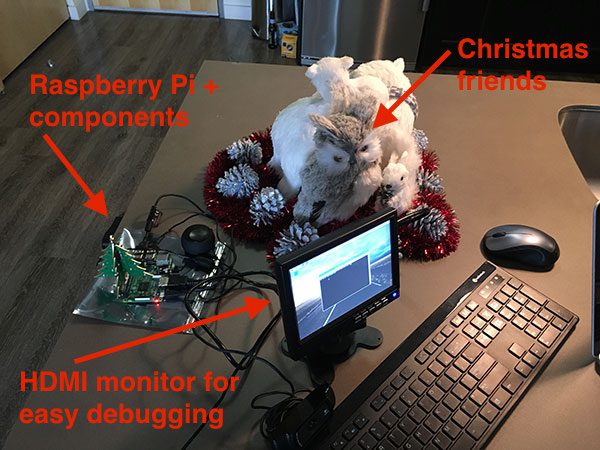
In the image above, you can see my Raspberry Pi, HDMI, keyboard, and Christmas critter friends keeping me company while I put together today’s tutorial.
How do I install TensorFlow and Keras on the Raspberry Pi?
Last week, we learned how to train a Convolutional Neural Network using Keras to determine if Santa was in an input image.
Today, we are going to take the pre-trained model and deploy it to the Raspberry Pi.
As I’ve mentioned before, the Raspberry Pi is not suitable for training a neural network (outside of “toy” examples). However, the Raspberry Pi can be used to deploy a neural network once it has already been trained (provided the model can fit into a small enough memory footprint, of course).
I’m going to assume you have already installed OpenCV on your Raspberry Pi.
If you have not installed OpenCV on your Raspberry Pi, start by using this tutorial where I demonstrate how to optimize your Raspberry Pi + OpenCV install for speed (leading to a 30%+ increase in performance).
Note: This guide will not work with Python 3 — you’ll instead need to use Python 2.7. I’ll explain why later in this section. Take the time now to configure your Raspberry Pi with Python 2.7 and OpenCV bindings. In Step #4 of the Raspberry Pi + OpenCV installation guide, be sure to make a virtual environment with the -p python2
switch.
From there, I recommend increasing the swap space on your Pi. Increasing the swap will enable you to use the Raspberry Pi SD card for additional memory (a critical step when trying to compile and install large libraries on the memory-limited Raspberry Pi).
To increase your swap space, open up /etc/dphys-swapfile
and then edit the CONF_SWAPSIZE
variable:
# set size to absolute value, leaving empty (default) then uses computed value # you most likely don't want this, unless you have a special disk situation # CONF_SWAPSIZE=100 CONF_SWAPSIZE=1024
Notice that I am increasing the swap from 100MB to 1024MB.
From there, restart the swap service:
$ sudo /etc/init.d/dphys-swapfile stop $ sudo /etc/init.d/dphys-swapfile start
Note: Increasing swap size is a great way to burn out your memory card, so be sure to revert this change and restart the swap service when you’re done. You can read more about large sizes corrupting memory cards here.
Now that your swap size has been increased, let’s get started configuring our development environment.
To start, create a Python virtual environment named not_santa
using Python 2.7 (I’ll explain why Python 2.7 once we get to the TensorFlow install command):
$ mkvirtualenv not_santa -p python2
Notice here how the -p
switch points to python2
, indicating that Python 2.7 will be used for the virtual environment.
If you are new to Python virtual environments, how they work, and why we use them, please refer to this guide to help get you up to speed as well as this excellent virtualenv primer from RealPython.
You’ll also want to make sure you have sym-linked your cv2.so
bindings into your not_santa
virtual environment (if you have not done so yet):
$ cd ~/.virtualenvs/not_santa/lib/python2.7/site-packages $ ln -s /usr/local/lib/python2.7/site-packages/cv2.so cv2.so
Again, make sure you have compiled OpenCV with Python 2.7 bindings. You’ll want to double-check your path to your cv2.so
file as well, just in case your install path is slightly different than mine.
If you compiled Python 3 + OpenCV bindings, created the sym-link, and then tried to import cv2
into your Python shell, you will get a confusing traceback saying that the import failed.
Important: For these next few pip commands, be sure that you’re in the not_santa
environment (or your Python environment of choice), otherwise you’ll be installing the packages to your Raspberry Pi’s system Python.
To enter the environment simply use the workon
command at the bash prompt:
$ workon not_santa
From there, you’ll see “(not_santa)
” at the beginning of your bash prompt.
Ensure you have NumPy installed in the not_santa
environment using the following command:
$ pip install numpy
Since we’ll be accessing the GPIO pins for this project we’ll need to install both RPi.GPIO and gpiozero:
$ sudo pip install RPi.GPIO gpiozero
We are now ready to install TensorFlow on your Raspberry Pi.
The problem is that there is not an official (Google released) TensorFlow distribution.
We can follow the long, arduous, painful process of compiling TensorFlow from scratch on the Raspberry Pi…
Or we can use the pre-compiled binaries created Sam Abrahams (published on GitHub).
The problem is that there are only two types of pre-compiled TensorFlow binaries:
- One for Python 2.7
- And another for Python 3.4
The Raspbian Stretch distribution (the latest release of the Raspbian operating system at the time of this writing) ships with Python 3.5 — we, therefore, have a version mismatch.
To avoid any headaches between Python 3.4 and Python 3.5, I decided to stick with the Python 2.7 install.
While I would have liked to use Python 3 for this guide, the install process would have become more complicated (I could easily write multiple posts on installing TensorFlow + Keras on the Raspberry Pi, but since installation is not the main focus of this tutorial, I decided to keep it more straightforward).
Let’s go ahead and install TensorFlow for Python 2.7 using the following commands:
$ wget https://github.com/samjabrahams/tensorflow-on-raspberry-pi/releases/download/v1.1.0/tensorflow-1.1.0-cp27-none-linux_armv7l.whl $ pip install tensorflow-1.1.0-cp27-none-linux_armv7l.whl
Note: You will need to expand the code block above to copy the full URL. I recommend pressing the “<>” button before you copy the commands.
Once TensorFlow compiles and installs (which took around an hour on my Raspberry Pi) you’ll need to install HDF5 and h5py. These libraries will allow us to load our pre-trained model from disk:
$ sudo apt-get install libhdf5-serial-dev $ pip install h5py
I Install HDF5 + h5py without the time
command running so I can’t remember the exact amount of time it took to install, but I believe it was around 30-45 minutes.
And finally, let’s install Keras and the other prerequisites required for this project:
$ pip install pillow imutils $ pip install scipy --no-cache-dir $ pip install keras==2.1.5
The SciPy install in particular will take a few hours so make sure you let the install run overnight/while you’re at work.
It is very important that you install Keras version 2.1.5 for compatibility with TensorFlow 1.1.0.
To test your configuration, open up a Python shell (while in the not_santa
environment) and execute the following commands:
$ workon not_santa $ python >>> import h5py >>> from gpiozero import LEDBoard >>> from gpiozero.tools import random_values >>> import cv2 >>> import imutils >>> import keras Using TesnsorFlow backend. >>> print("OpenCV version: {}".format(cv2.__version__)) 'OpenCV version: 3.3.1' >>> print("Keras version: {}".format(keras.__version__)) 'Keras version: 2.1.5' >>> exit()
If all goes as planned you should see Keras imported using the TensorFlow backend.
As the output above demonstrates, you should also double-check that your OpenCV bindings (cv2
) can be imported as well.
Finally, don’t forget to reduce your swap size from 1024MB back down to 100MB by:
- Opening up
/etc/dphys-swapfile
. - Resetting
CONF_SWAPSIZE
to 100MB. - Restarting the swap service (as we discussed earlier in this post).
As mentioned in the note above, setting your swap size back to 100MB is important for memory card longevity. If you skip this step, you may encounter memory corruption issues and a decreased lifespan of the card.
Running a Keras + deep learning model on the Raspberry Pi
We are now ready to code our Not Santa detector using Keras, TensorFlow, and the Raspberry Pi.
Again, I’ll be assuming you have the same hardware setup as I do (i.e., 3D Christmas Tree and speakers) so if your setup is different you’ll need to hack up the code below.
To get started, open a new file, name it not_santa_detector.py
, and insert the following code:
# import the necessary packages from keras.preprocessing.image import img_to_array from keras.models import load_model from gpiozero import LEDBoard from gpiozero.tools import random_values from imutils.video import VideoStream from threading import Thread import numpy as np import imutils import time import cv2 import os
Lines 2-12 handle our imports, notably:
keras
is used to preprocess input frames for classification and to load our pre-trained model from disk.gpiozero
is used to access the 3D Christmas tree.imutils
is used to access the video stream (whether Raspberry Pi camera module or USB).threading
is used for non-blocking operations, in particular when we want to light the Christmas tree or play music while not blocking execution of the main thread.
From there, we’ll define a function to light our 3D Christmas tree:
def light_tree(tree, sleep=5): # loop over all LEDs in the tree and randomly blink them with # varying intensities for led in tree: led.source_delay = 0.1 led.source = random_values() # sleep for a bit to let the tree show its Christmas spirit for # santa clause time.sleep(sleep) # loop voer the LEDs again, this time turning them off for led in tree: led.source = None led.value = 0
Our light_tree
function accepts a tree
argument (which is assumed be an LEDBoard
object).
First, we loop over all LEDs in the tree
and randomly light each of the LEDs to create a “twinkling” effect (Lines 17-19).
We leave the lights on for a period of time for some holiday spirit (Line 23) and then we loop over the LEDs again, this time turning them off (Lines 26-28).
An example of the 3D Christmas tree lights turned on can be seen below:
Our next function handles playing music when Santa is detected:
def play_christmas_music(p): # construct the command to play the music, then execute the # command command = "aplay -q {}".format(p) os.system(command)
In the play_christmas_music
function, we make a system call to the aplay
command which enables us to play a music file as we would from the command line.
Using the os.system
call is a bit of a hack, but playing the audio file via pure Python (using a library such as Pygame) is overkill for this project.
From there, let’s hardcode the configurations we’ll use:
# define the paths to the Not Santa Keras deep learning model and # audio file MODEL_PATH = "santa_not_santa.model" AUDIO_PATH = "jolly_laugh.wav" # initialize the total number of frames that *consecutively* contain # santa along with threshold required to trigger the santa alarm TOTAL_CONSEC = 0 TOTAL_THRESH = 20 # initialize is the santa alarm has been triggered SANTA = False
Lines 38 and 39 hardcode paths to our pre-trained Keras model and audio file. Be sure to use the “Downloads” section of this blog post to grab the files.
We also initialize parameters used for detection which include TOTAL_CONSEC
and TOTAL_THRESH
. These two values represent the number of frames containing Santa and the threshold at which we’ll both play music and turn on the tree respectively (Lines 43 and 44).
The last initialization is SANTA = False
, a boolean (Line 47). We’ll use the SANTA
variable later in the script as a status flag to aid in our logic.
Next, we’ll load our pre-trained Keras model and initialize our Christmas tree:
# load the model print("[INFO] loading model...") model = load_model(MODEL_PATH) # initialize the christmas tree tree = LEDBoard(*range(2, 28), pwm=True)
Keras allows us to save models to disk for future use. Last week, we saved our Not Santa model to disk and this week we’re going to load it up on our Raspberry Pi. We load the model on Line 51 with the Keras load_model
function.
Our tree
object is instantiated on Line 54. As shown, tree
is an LEDBoard
object from the gpiozero
package.
Now we’ll initialize our video stream:
# initialize the video stream and allow the camera sensor to warm up print("[INFO] starting video stream...") vs = VideoStream(src=0).start() # vs = VideoStream(usePiCamera=True).start() time.sleep(2.0)
To access the camera, we’ll use VideoStream
from my imutils package (you can find the documentation to VideoStream here) on either Line 58 or 59.
Important: If you’d like to use the PiCamera module (instead of a USB camera) for this project, simply comment Line 58 and uncomment Line 59.
We sleep
for a brief 2 seconds so our camera can warm up (Line 60) before we begin looping over the frames:
# loop over the frames from the video stream while True: # grab the frame from the threaded video stream and resize it # to have a maximum width of 400 pixels frame = vs.read() frame = imutils.resize(frame, width=400)
On Line 63 we start looping over video frames until the stop condition is met (shown later in the script).
First, we’ll grab a frame
by calling vs.read
(Line 66).
Then we resize frame
to width=400
, maintaining the aspect ratio (Line 67). We’ll be preprocessing this frame
prior to sending it through our neural network model. Later on we’ll be displaying the frame to the screen along with a text label.
From there let’s preprocess the image and pass it through our Keras + deep learning model for prediction:
# prepare the image to be classified by our deep learning network image = cv2.resize(frame, (28, 28)) image = image.astype("float") / 255.0 image = img_to_array(image) image = np.expand_dims(image, axis=0) # classify the input image and initialize the label and # probability of the prediction (notSanta, santa) = model.predict(image)[0] label = "Not Santa" proba = notSanta
Lines 70-73 preprocess the image
and prepare it for classification. To learn more about preprocessing for deep learning, be sure to check out the Starter Bundle of my latest book, Deep Learning for Computer Vision with Python.
From there, we query model.predict
with our image
as the argument. This sends the image
through the neural network, returning a tuple containing class probabilities (Line 77).
We initialize the label
to “Not Santa” (we’ll revisit label
later) and the probability, proba
, to the value of notSanta
on Lines 78 and 79.
Let’s check to see if Santa is in the image:
# check to see if santa was detected using our convolutional # neural network if santa > notSanta: # update the label and prediction probability label = "Santa" proba = santa # increment the total number of consecutive frames that # contain santa TOTAL_CONSEC += 1
On Line 83 we check if the probability of santa
is greater than notSanta
. If that is the case, we proceed to update the label
and proba
followed by incrementing TOTAL_CONSEC
(Lines 85-90).
Provided enough consecutive “Santa” frames have passed, we need to trigger the Santa alarm:
# check to see if we should raise the santa alarm if not SANTA and TOTAL_CONSEC >= TOTAL_THRESH: # indicate that santa has been found SANTA = True # light up the christmas tree treeThread = Thread(target=light_tree, args=(tree,)) treeThread.daemon = True treeThread.start() # play some christmas tunes musicThread = Thread(target=play_christmas_music, args=(AUDIO_PATH,)) musicThread.daemon = False musicThread.start()
We have two actions to perform if SANTA
is False
and if the TOTAL_CONSEC
hits the TOTAL_THRESH
threshold:
- Create and start a
treeThread
to twinkle the Christmas tree lights (Lines 98-100). - Create and start a
musicThread
to play music in the background (Lines 103-106).
These threads will run independently without stopping the forward execution of the script (i.e., a non-blocking operation).
You can also see that, on Line 95, we set our SANTA
status flag to True
, implying that we have found Santa in the input frame. In the next pass of the loop, we’ll be looking at this value as we did on Line 93.
Otherwise (SANTA
is True
or the TOTAL_THRESH
is not met), we reset TOTAL_CONSEC
to zero and SANTA
to False
:
# otherwise, reset the total number of consecutive frames and the # santa alarm else: TOTAL_CONSEC = 0 SANTA = False
Finally, we display the frame to our screen with the generated text label:
# build the label and draw it on the frame label = "{}: {:.2f}%".format(label, proba * 100) frame = cv2.putText(frame, label, (10, 25), cv2.FONT_HERSHEY_SIMPLEX, 0.7, (0, 255, 0), 2) # show the output frame cv2.imshow("Frame", frame) key = cv2.waitKey(1) & 0xFF # if the `q` key was pressed, break from the loop if key == ord("q"): break # do a bit of cleanup print("[INFO] cleaning up...") cv2.destroyAllWindows() vs.stop()
The probability value is appended to the label
containing either “Santa” or “Not Santa” (Line 115).
Then using OpenCV’s cv2.putText
, we can write the label (in Christmas-themed green) on the top of the frame before we display the frame to the screen (Lines 116-120).
The exit condition of our infinite while loop is when the ‘q’ key is pressed on the keyboard (Lines 121-125).
If the loop’s exit condition is met, we break
and perform some cleanup on Lines 129 and 130 before the script itself exits.
That’s all there is to it. Take a look back at the 130 lines we reviewed together — this framework/template can easily be used for other deep learning projects on the Raspberry Pi as well.
Now let’s catch that fat, bearded, jolly man on camera!
Deep learning + Keras + Raspberry Pi results
In last week’s blog post we tested our Not Santa deep learning model using stock images gathered from the web.
But that’s no fun — and certainly not sufficient for this blog post.
I’ve always wanted to dress up like good ole’ St. Nicholas, so I ordered a cheap Santa Claus costume last week:
I’m a far cry from the real Santa, but the costume should do the trick.
I then pointed my camera attached to the Raspberry Pi at the Christmas tree in my apartment:
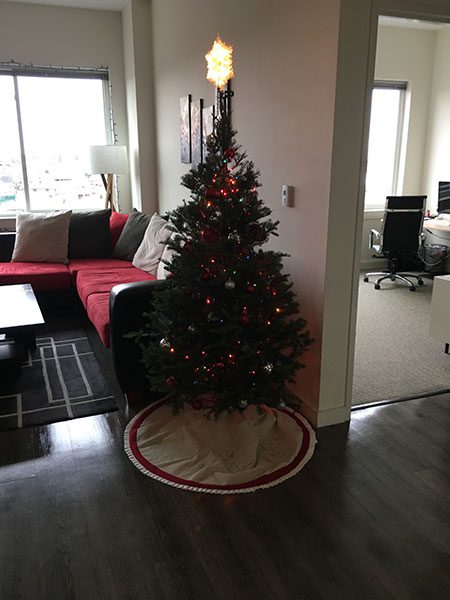
If Santa comes by to put out some presents for the good boys and girls I want to make sure he feels welcome by twinkling the 3D Christmas tree lights and playing some Christmas tunes.
I then started the Not Santa deep learning + Keras detector using the following command:
$ python not_santa_detector.py
To follow along, make sure you use “Downloads” section below to download the source code + pre-trained model + audio file used in this guide.
Once the Not Santa detector was up and running, I slipped into action:
Whenever Santa is detected the 3D Christmas tree lights up and music starts playing! (which you cannot hear since this is a sample GIF animation).
To see the full Not Santa detector (with sound), take a look at the video below:
Whenever Santa enters the scene you’ll see the 3D Christmas tree display turn on followed by a jolly laugh emitting from the Raspberry Pi speakers (audio credit to SoundBible).
Our deep learning model is surprisingly accurate and robust given the small network architecture.
I’ve been good this year, so I’m sure that Santa is stopping at my apartment.
I’m also more confident than I’ve ever been about seeing Santa bring some presents with my Not Santa detector.
Before Christmas, I’ll probably hack this script (with a call to cv2.imwrite
, or better yet, save the video clip) to make sure that I save some frames of Santa to disk, as proof. If it is someone else that puts presents under my tree, I’ll certainly know.
Dear Santa: If you’re reading this, just know that I’ve got my Pi on you!
What's next? I recommend PyImageSearch University.
30+ total classes • 39h 44m video • Last updated: 12/2021
★★★★★ 4.84 (128 Ratings) • 3,000+ Students Enrolled
I strongly believe that if you had the right teacher you could master computer vision and deep learning.
Do you think learning computer vision and deep learning has to be time-consuming, overwhelming, and complicated? Or has to involve complex mathematics and equations? Or requires a degree in computer science?
That’s not the case.
All you need to master computer vision and deep learning is for someone to explain things to you in simple, intuitive terms. And that’s exactly what I do. My mission is to change education and how complex Artificial Intelligence topics are taught.
If you're serious about learning computer vision, your next stop should be PyImageSearch University, the most comprehensive computer vision, deep learning, and OpenCV course online today. Here you’ll learn how to successfully and confidently apply computer vision to your work, research, and projects. Join me in computer vision mastery.
Inside PyImageSearch University you'll find:
- ✓ 30+ courses on essential computer vision, deep learning, and OpenCV topics
- ✓ 30+ Certificates of Completion
- ✓ 39h 44m on-demand video
- ✓ Brand new courses released every month, ensuring you can keep up with state-of-the-art techniques
- ✓ Pre-configured Jupyter Notebooks in Google Colab
- ✓ Run all code examples in your web browser — works on Windows, macOS, and Linux (no dev environment configuration required!)
- ✓ Access to centralized code repos for all 500+ tutorials on PyImageSearch
- ✓ Easy one-click downloads for code, datasets, pre-trained models, etc.
- ✓ Access on mobile, laptop, desktop, etc.
Summary
In today’s blog post you learned how to run a Keras deep learning model on the Raspberry Pi.
To accomplish this, we first trained our Keras deep learning model to detect if an image contains “Santa” or “Not Santa” on our laptop/desktop.
We then installed TensorFlow and Keras on our Raspberry Pi, enabling us to take our trained deep learning image classifier and then deploy it to our Raspberry Pi. While the Raspberry Pi isn’t suitable for training deep neural networks, it can be used for deploying them — and provided the network architecture is simplistic enough, we can even run our models in real-time.
To demonstrate this, we created a Not Santa detector on our Raspberry Pi that classifies each individual input frame from a video stream.
If Santa is detected, we access our GPIO pins to light up a 3D Christmas tree and play holiday tunes.
What now?
I hope you had fun learning how to build a Not Santa app using deep learning!
If you want to continue studying deep learning and:
- Master the fundamentals of machine learning and neural networks…
- Study deep learning in more detail…
- Train your own Convolutional Neural Networks from scratch…
…then you’ll want to take a look at my new book, Deep Learning for Computer Vision with Python.
Inside my book you’ll find:
- Super practical walkthroughs.
- Hands-on tutorials (with lots of code).
- Detailed, thorough guides to help you replicate state-of-the-art results from popular deep learning publications.
To learn more about my new book (and start your journey to deep learning mastery), just click here.
Otherwise, be sure to enter your email address in the form below to be notified when new deep learning post are published here on PyImageSearch.
Download the Source Code and FREE 17-page Resource Guide
Enter your email address below to get a .zip of the code and a FREE 17-page Resource Guide on Computer Vision, OpenCV, and Deep Learning. Inside you'll find my hand-picked tutorials, books, courses, and libraries to help you master CV and DL!
Wow, thank you for the christmas gift..merry christmas…!!
Merry Christmas to you as well, Barath!
hahaha, I have laughed very much!!!, because my daughters were planning to hunt Santa Claus this year, I hope they do not read the post for the sake of Santa!!! 😉
Otherwise you might have to dress up as Santa 😉 Merry Christmas and Happy Holidays to you and your daughters.
Thank you Adrian! Merry Chrismas to you as well!
Really AWESOME, enjoyed reading your blog. Merry Christmas !
I’m glad you enjoyed it Siddharth! A Merry Christmas to you as well.
its really awesome, keep it up.
and now I’m also making a sign detector so your blog is really helpful for me. 🙂
Great project Ravindra, I wish you the very best of luck with it 🙂
What a thoughtful gift. I really appreciate this!
you keep feeding me.
your biggest fan down here in Africa
Thank you!
Adrian, you keep giving us surprise after surprise. This post is a wonderful Christmas gift..
(I was thinking on modifying the project to detect my boss at the office… ehhrggg I mean a Grinch!!!)
Best Regards and Merry Christmas to you and all your fans!!!
Merry Christmas and Happy Holidays Carlos, thank you for the comment 🙂
Adrain you’re terrific !
This is exactly the kind of training children ( & adults ) need to get into technology.
I hope in 2018 we can see you on Udemy or other platforms.
Have a merry Xmas
( dig the ‘pi on you’ joke )
behram
I also hope to see him on Udemy =}
Out of curiosity, why would you like to see me on Udemy versus publishing my content here on PyImageSearch?
Would you mind share your souce code which train the model on desktop/laptop ?
Absolutely. Please see my previous post. I also cover how to train your model models inside my book, Deep Learning for Computer Vision with Python.
No word for the blog. if international banking was accepted in my country i will definitely donate for it.
In this post what I really know is how can I proceed with my real world project in deep learning. that is all, thank you for real
I think Keras implementation of SSD or YOLO like what you did in LeNet is very important if you consider them in your next blogs because they are new and efficient object detection architectures.
I agree. I also cover object detection implementations using deep learning inside Deep Learning for Computer Vision with Python. I’ll be doing more object detection tutorials in the future as well, so stay tuned 🙂
Hi Adrian, it’s a very nice tutorial with clear explanation. How can I extend this and show where exactly the Santa is in the video frame? I am new to Keras.
What you are referring to is “object detection”. I would suggest starting with this blog post to familiarize yourself with object detection + deep learning. I cover object detection and deep learning in more detail inside my book, Deep Learning for Computer Vision with Python. This book will also help if you are new to Keras. I hope that helps!
I made one. 3Q
I need to count how many times Santa came to my house in 2 hours for example. but I do not have internet access, is there any time library to do this?
Ggreat tutorial but what about if it gets the answer wrong, could we tell it yes/no and it updates and learns so it gets it correct next time?
You could potentially fine-tuning over time but I wouldn’t recommend it using this model. Instead it would be best to gather additional training data and use a more robust model with higher resolution images.
Hi Adrian
I’m curious that if it is possible to throw the real-time streaming to your own PC and can supervise remotely on website or somewhere. Will you make that post? I would appreciate if you have that tutorial.
Hey Reed — I do not have any tutorials on streaming the output of a particular script to a PC or website, but I’ll make sure to cover that in a future blog post.
Adrian, a great tutorial as always.
This tutorial is used to distinguish between only “Santa” and “Not Santa”, what if we have more than one class? How much code needs to be changed or is it even possible in this tutorial?
Thank you for all your time.
Change “binary_crossentropy” to “categorical_crossentropy” in the loss function. Provided you use the same directory structure as me nothing else needs to be changed. If you’re interested in learning more about training your own custom CNNs, take a look at Deep Learning for Computer Vision with Python.
Adrian, thank you for another fantastic article. I hope you’ve had a good Christmas. I have setup my OpenCV environment on my Pi3, but have accidentally used Python 3 before I read down further to see you say to use Python 2.7. Can I just run something like mkvirtualenv cv2 -p python2 and setup another environment or will there be any issues going forward? Am I better to just start over?
You can either:
1. Delete your original Python virtual environment via
rmvirtualenv your_env_name
2. Create a new Python virtual environment
Either will work.
Adrian, I have just completed the Python 2.7 setup of open CV and then worked through this article as far as the “test your configuration”. I couldn’t import “gpiozero”, despite running “sudo pip install RPi.GPIO gpiozero” whist in the virtualenv. I checked the site-packages and couldn’t see it in there. When I re-ran the command, I left of “sudo” and that seemed to install it correctly ->”pip install RPi.GPIO gpiozero”. My OpenCV version is 3.4.0 and Keras is 2.1.2 . Not sure why other people haven’t run into this yet? Is there something wrong with my setup possibly?
If you use “sudo pip install” then your packages will be installed into the system version of Python and not your Python virtual environment. Make sure you use the “workon” command to access your Python virtual environment and then install:
bro , every steps are fine but while installing gpiozero using this command
“sudo pip install RPi.GPIO gpiozero”
has a problem i don`t know why so use this command as well, after that command
“pip install RPi.GPIO gpiozero”
What is the FPS of 1 Raspberry Pi 3 if the picture is 1080P? My company want to find a low-cost solution for object detection. Given tensorflow have published tensorflow lit and your post, maybe this is a way to go.
The Pi would certainly be low cost, but it’s not really fast enough for object detection as I discuss in this post.
hey adrian,
i think by using sudo-apt get install we can drastically reduce the time to install scipy and h5py
I do not recommend using
sudo apt-get install
. In most cases you’ll install older versions of the library. Furthermore, this method will not work if you use Python virtual environments (which we do extensively on the PyImageSearch blog). In newer versions of Raspbian Python wheels are being pre-built and cached so they can be installed faster. I highly recommending usingpip install
.Sir,i need an approach to detect fruits and vegetables using open cv convolutional neural networks…. can you please send me the code for it…it will be really helpfull
Thanks in advance…
To start you would need to gather your dataset. The data you gather will determine if this project is successful. Have you gathered your fruits + vegetables dataset yet? I would recommend 500-1,000 images per class to get started.
Does it activate if you enter the picture without the santa clothes? What if you enter the picture with a red shirt on? Just wondering 🙂
Also, do you think Keras would work for face recognition? Like would I be able to train a model to recognize my face? I’m thinking it would be cool to experiment with some kind of door-lock 🙂
The architecture we are using here, LeNet, accepts only 28×28 pixel inputs. It will have a higher false-positive rate for images that contain a lot of red. I provide suggestions on how to remedy this in previous post in the series.
You can use Keras for face recognition if you wish (you’ll just need example images of your face). I cover face recognition inside the PyImageSearch Gurus course. You can learn how to train your own custom Keras models on your own custom datasets inside Deep Learning for Computer Vision with Python.
Awesome, thanks for the answer 🙂
Hey adrian was gonna fo the same but to detect if people are smoking or not smoking in the frame for final year project
Q1. Will just changing input dataset and using leNet work?
Q2. If i have a terminal error output which i cannot understand and need your help to “decipher” do I post here or where?
Q3. How many images and what google image search query like “person smoking” will be the best acc to you for grabbing data?
Thankyou for the posts.
1. That really depends on your input dataset. The LeNet architecture only accepts 28×28 input images. You may need larger spatial dimensions for your images in which case a different architecture may be required. I would suggest working through Deep Learning for Computer Vision with Python where I discuss how to work with your own custom datasets and train your own networks.
2. I do my best to help readers for free on this blog but please do not abuse the privilege. If your question can be answered by another blog post, tutorial, or book I have written I’ll likely point you towards those in that situation. If you have a significant number of questions you’re asking I’ll ask you to kindly work through my book to (1) help support the PyImageSearch blog and (2) address your questions with deep learning.
3. I would recommend starting with 300-500 images and increasing if necessary.
Hi Adrian,
I need to create a bounding box around the detection in real-time. How can I do that?
Anas.
I would suggest using real-time object detectors. I demonstrate how to train your own custom real-time object detectors with deep learning inside Deep Learning for Computer Vision with Python. However, on the Raspberry Pi you’ll likely be limited to ~1 FPS. It’s just not fast enough unless you’re using a Movidius, which you may get up to 8 FPS.
The way a lot of the object detection neural networks work is they split the image up into many cells and perform a classification on each cell. So as Adrian pointed out it is many times slower than doing just one classification on the original image, especially if you resize the original image.
Other method to speed up neural networks is to quantize them (compress the floating point values to 8 bit). To do that with a Tensorflow model you must use what is called Tensorflow Lite. I have done that to my model but still have a latency of 200ms on a RPi 3 B+. I am wondering how OP got such high frame rates?
Traceback (most recent call last):
…
(h, w) = image.shape[:2]
AttributeError: ‘NoneType’ object has no attribute ‘shape’
when I run ,I got this ,whatshould I do?
See my reply to “HARD-soft” on February 17, 2018.
Hi Adrian we have this error while running your code after setting up our environment well.
can you please check this out.
[INFO] loading model…
[INFO] starting video stream…
Traceback (most recent call last):
File “not_santa_detector.py”, line 70, in
frame = imutils.resize(frame, width=400)
File “/home/pi/.virtualenvs/not_santa/local/lib/python2.7/site-packages/imutils/convenience.py”, line 69, in resize
(h, w) = image.shape[:2]
AttributeError: ‘NoneType’ object has no attribute ‘shape’
It looks like OpenCV cannot read the frames from your Raspberry Pi camera module/USB webcam. Double-check that OpenCV can access the video stream. Additionally, take a look at this blog post where I discuss “NoneType” errors (and how to resolve them) in more detail.
Thank you Adrian, yes we also came to the same answer and it was occurred due to UV4l library which was at the autostart hence reserving the camera port and making it unavailable to not_santa…py. we used uv4l for audio streaming.
so we have completely removed uv4l.
Now is there any way for adding a 2 way real-time audio conferencing package/module while running not-santa-detector.py on autostart.
I’m not familiar with real-time audio streaming. Unfortunately I’m not sure on the best way to accomplish this. I’m sorry I couldn’t help more!
During the install of scipyI keep getting an error. I believe it is tied to my numpy install but I am not sure what I am doing wrong. My numpy says it is up-to-date. It looks as though some packages have not been installed that scipy depends on in the numpy download. I get errors like Error: library dfftpack has Fortran sources but no Fortran compiler found.
and Libraries mkl_rt not found in …..
Any suggestions on how to fix this?
Thank you for your help.
Hey Caleb — I haven’t encountered that particular error before. Can you please share a link to a GitHub Gist that includes the full terminal output?
https://github.com/CalebRolandWilkinson/ImageRecognition/issues/1
Here is a link to the issue. Let me know if this is enough. The error went outside the amount command line would let me copy. If you know how to get more history I can go get more of the error.
Thanks
As I have gone down the path of trying to figure it out I was lead to this web page
https://stackoverflow.com/questions/26575587/cant-install-scipy-through-pip
which indicated that I needed to install sudo apt-get install libatlas-base-dev gfortran
however when I run this code it ends in a 404 mirror can’t be found.
Hi Caleb — thank you for passing along the additional information. To be totally honest, I’m not sure what the error is. It sounds like there may even be a problem with the apt-get package manager. Try updating it first and then installing gfortran:
I’m sorry I could not be of more help here!
hello.
this code works with opencv 3.1?
because the raspian image (I bought your practical opencv course) uses that version.
thanks
Hey Claudio — yes, this code will work with OpenCV 3.1. The Raspbian .img file was also updated to use OpenCV 3.4.
Hello Adrian,
I followed your tutorials, and I can successfully recognize the object I specialized it for except not from very far away. When moving about three feet away from the object, it is no longer recognized. Any idea how to improve this or what I may have done wrong?
Also, thank you for all your blog posts. They’ve really helped me to become more familiar with Tensorflow and neural nets!
The model used in this blog post (LeNet) only accepts images that are 28×28 pixels which is very small. It’s likely that once you are 3 feet away from your object that the object is essentially “invisible” due to the small image. I would suggest using a model architecture that accepts larger input images, perhaps 64×64, 128×128, or 224×224 input images. I cover how to code, build, and train these larger networks inside Deep Learning for Computer Vision with Python.
Hello Adrian,
Your project is very interesting and I am planning to customize it for my final year project. In your project, you made the camera detect Santa based on a set of images that the model has been trained for. What if I customize the model to detect insects? Would that work if I just change the images to those of insects to train the model to detect insects instead? Keeping aside the fact that insects can very small or fast-moving. Because on the video recording, I might point a pic to an insect and see if the camera detects it as an insect. I have checked out your post https://www.pyimagesearch.com/2017/10/16/raspberry-pi-deep-learning-object-detection-with-opencv/ but considering the frame rate, I don’t think I would go for that.
Correct, you would just change the directory structure to include a directory named “ant”, “beetle”, etc. and then have example images for each insect inside of their respective directories.
hello adrian ı want to work eye blink detection with tensorflow on raspberry pi can you help me ? or can you share example project ?
You don’t actually need TensorFlow for blink detection. For a sample blink detection project, see this post.
It is very helpful for me .Thanks ! …Which line to be changed to control a relay? instead of speaker and Xmas tree
That depends on any microcontrollers you are working with. You would need to read the docs for your specific relay. In any case, Lines 97-106 would be were you would want to pass any information on to your relay.
Ya! I got. It’s working!!
Congrats!
Hi Adrian,
When I try to install tensorflow with this command :
pip install tensorflow-1.1.0-cp27-none-linux_armv7l.whl
I get the following output in the terminal
tensorflow-1.1.0-cp27-none-linux_armv7l.whl is not a supported wheel on this platform.
Could you please tell me what do I have to do. If it helps I run raspbian stretch on a pi3 model b
Hey Huna — I’m not sure what the error may be here. You should contact the GitHub user who put together the .whl file.
hey Adrian, I am a huge fan. Keep up the great work.
I tried running the code but I got an error because cv2.putText() function(line no. 116) returned None object. when I went through the documentation (https://docs.opencv.org/2.4/modules/core/doc/drawing_functions.html) of the function It was clearly stated that it returns None. So I removed the LHS of the assignment and the code ran perfectly.
Can you please look into it??
Anyways great tutorial …helped me tonnes.
Hey Ankur — can you clarify which version of OpenCV + Python you are using? I’m wondering if there is a difference with the LHS assignment for the drawing functions between OpenCV versions.
hey adrian, i tried to use ip webcam app from android as camera, it’s very slow.
Do you know how to solve this?
Thank you.
Sorry, I have not worked with streaming frames from an Android camera before. You might want to look into how to more efficiently stream the frames, perhaps some sort of optimization on the Android system.
All these commands are written on Raspberry Pi terminal ? right?
since the pertained network is stored on the laptop, then how can I load it to raspberry pi?
Correct, these commands are executed via the Raspberry Pi terminal. I would recommend using SFTP to transfer the code + model to the Pi. You could also email the files to yourself. Whatever file transfer method you find easiest 🙂
Hey, I was trying to use ModelCheckPoint to save the intermediate checkpoints. But I am getting an error: TypeError: fit_generator() got an unexpected keyword argument ‘callback’. Do you have any idea regarding it ?
The keyword argument is “callbacks” not “callback”. Make sure you check the Keras docs if you run into keyword argument errors.
Thanks for your post Adrian. I want to display the number of detected Santas in a WebApp (assuming we are getting more Santas in Chrismas LOL ) . I need to log the the count to a simple database ( ex: XML file) so I can read the data from it and display it in the WebApp. How should I modify your code for that. Sorry I’m totally new to this. Thanks..
It’s awesome that you are interested in studying deep learning and computer vision — I really believe you are making a wise decision, Umaria. That said, I would encourage you to develop your programming skills so you can take on projects like these. The additions you are mentioning have very little to do with computer vision and more so with general logic flow, knowledge over libraries, and programming skills. Invest in your programming skills and over time you will be able to build your app.
Hi, Adrian
I’m trying to install scipy to my Raspberry Pi Zero W but it’s taking forever. How much times usually it takes In this board?
I’m installing in my virtualenv using pip install scipy.
Thanks and congratulations for your awesome work
I really don’t recommend using a Pi Zero W for deep learning. That said, installing SciPy on a Pi Zero W could easily run overnight.
hi Adrian,
when you run the code, it takes about 20s for raspberry pi to load the model, this is quit slow process, is there any way which i can integrate the model to the virtual environment so that it’s loaded with the enviroments, so that it doest has to be load every single time.
There is an unavoidable TensorFlow/Keras initialization and model loading at the beginning of the script. This initialization/loading only needs to be performed once and it does not have anything to do with Python virtual environments. You will not be able to get around this process.
Hi Adrian,
I have installed Keras + TF along with dependencies as mentioned here but after running my trained model in RBPi3, I keep getting an error
“softmax() got an unexpected keyword argument ‘axis'”…
My guess is that you may be confusing the Softmax layer with function? Or perhaps the combination of Keras + TensorFlow you used to train your model is too new (or too old, depending on your version) for the pre-compiled version of Keras + TensorFlow for the Pi.
I get the same error before, i downgrade my keras to 2.1 and it works now
Hello,
I want to do something like this but with a thin-client server model. Can you think of a way I might be able to have my webcam plugged into the Raspberry Pi setup as a PiNet LTSP client and run OpenCV, Keras, Tensorflor on the server?
My concern is that if I just install them through PiNet I won’t get any benefits in speed increase because my server is x64 and the Pi is ARM.
I have also signed up to googles new TPU clould.
I’m not really familiar with PiNet. Depending on the size of the network and the FPS throughput of the model you might be able to get away with running the network on the Pi, but most likely you’ll want to push the computation to a separate system or the TPU cloud. Google should provide an API to do that (I’ve never used that TPU cloud before). Otherwise, take a look at message passing libraries such as ZeroMQ and RabbitMQ so you can send frames from the Pi to a server with more processing power.
Hello, will this tutorial work for python 2.7.9?
Yes, it will work with Python 2.7.
It looks like Google has made it easier to install Tesorflow on the Pi…
“Thanks to a collaboration with the Raspberry Pi Foundation, we’re now happy to say that the latest 1.9 release of TensorFlow can be installed from pre-built binaries using Python’s pip package system,”
https://www.zdnet.com/article/google-ai-on-raspberry-pi-now-you-get-official-tensorflow-support
Yep! It’s certainly great news! 🙂
Hi,
I am following the instructions of this blog post to replicate the Santa Detector on my Raspberry Pi 3 B+ with Raspbian Stretch (desktop version). I already compiled the optimized OpenCV version as mentioned in this post: https://www.pyimagesearch.com/2017/10/09/optimizing-opencv-on-the-raspberry-pi/
I installed the imutils, scipy, atlas, everything ok, and I’m at the Tensorflow installation step. As Kaisar Khatak said, Tensorflow 1.9.0 can now be directly installed with “pip install tensorflow”, so skipped the manual installation and now I’m at the Keras installation step.
On this page it says that starting from Keras 2, the API will be integrated into TensorFlow starting from 1.2 version: https://blog.keras.io/introducing-keras-2.html
So, since I have Tensorflow 1.9.0 installed, can I also skip the Keras installation step and directly use the “tf.keras” API to continue with the Santa Detector setup?
Additionally, do this updated compatibilities make possible to use Python 3 for the whole project?
Many thanks!
1. Yes, now that TensorFlow is pip installable you can now use Python 3 for the entire project.
2. You could use “tf.keras” but I highly recommend you install Keras as well and use the Keras package as I have done in this tutorial.
Perfect, thank you very much Adrian!
Just as a side note, I finished installing TF + Keras with PIP using a Python 2.7 virtual environment and when I launch your not_santa_detector.py with your pre-trained model, these warning are displayed:
(not_santa) pi@raspberrypi:~/Projects/not_santa $ python not_santa_detector.py
Using TensorFlow backend.
/home/pi/.virtualenvs/not_santa/local/lib/python2.7/site-packages/tensorflow/python/framework/tensor_util.py:32: RuntimeWarning: numpy.dtype size changed, may indicate binary incompatibility. Expected 56, got 52
from tensorflow.python.framework import fast_tensor_util
[INFO] loading model…
/home/pi/.virtualenvs/not_santa/local/lib/python2.7/site-packages/keras/engine/saving.py:304: UserWarning: Error in loading the saved optimizer state. As a result, your model is starting with a freshly initialized optimizer.
warnings.warn(‘Error in loading the saved optimizer ‘
[INFO] starting video stream…
I don’t think they are critical, the rest is working fine, it was just to update you!
Today I will try to create a Python 3 virtual environment and see if everything is working fine, too.
Have a nice day!
Those are just warnings. They can be safely ignored.
Hi Adrien, thanks for the awesome posts, your website has made computer vision a hobby for me.
I’ve purchased a Raspberry Pi 4 4G, so I’d have enough resources for the deep learning. (BTW do I still need the extra swap?) However, I’m working on my PC with Python 3, then just running the final code on the Pi. Plus I’m very new to Python. (I’ve only been using Python 3 for 2 months now)
Is there any way you could update the post considering what our friend said about being able to use Python 3 on the Pi, now that the “ts.keras” API is available? This way it would be possible to continue with python 3 (on PC) and just run the code on the Pi.
(PS I’m on the 4th email of the crash course, and I’m still new. If I’m horribly wrong and the codes are interchangeable, and what I’m saying is irrelevant, then please excuse my low base of knowledge.)
Hey Adrian, nice tutorial!! Have you ever tried to use the tensorflow API for object detection in raspberry? I just did it to load the mobilenet using the Coco labels to process snapshots from an IP camera connected to the same network. It works fine, 1,5 sec per image. But after a while, a red thermometer appears in the screen and after a while again the raspberry freezes and I have to restart it.. do you have any tips on making the raspberry handle this task and not freezing? I thought it could handle a mobilenet…
The “red thermometer” means your Pi is overheating and ultimately shutting itself off. Try to cool your Pi.
Hello Adrian. First of all thanks for a great tutorial.
But i have a problem with this part:
pip install scipy –no-cache-dir
It have been 6 hours since i started downloading/installing scipy and its been freezing in:
“Running setup.py install for scipy…/”
Is it normal?
After a while it goes of to screensaver mode and if i click on the mouse it shows me the screen but if i try to move the cursor then nothing happens.
Should i start over?
Can i restart the virtualenv or should i start over completly?
The last time I Installed SciPy on my Raspberry Pi from scratch it took at least 6 hours. I don’t remember the actual hour count as I let it run overnight. However, SciPy should be on PiWheels so you shouldn’t have to install it from scratch. What version of pip and Raspbian are you using?
I have left it for more the 12 hours and i think my Rpi just froze or something. Anyway.. the next morning i restarted the Raspberry and the installation of SciPy and it took about 1-2 hours. So something spooky was going on i guess.
My pip version is 18.1 and im using Stretch as you mention in your tutorials. And it works now!!!
Thank you for this great tutorial! You should be a teacher in some school! 🙂
Awesome, I’m glad that worked for you!
LOVE LOVE LOVE. Merry Christmas Adrian – you make it fun.
I had errors on this part
from gpiozero import LEDBoard
from gpiozero.tools import random_values
For some reason the only way I got it working was when I didn’t install using SUDO … which I can’t quite understand. But if someone comes across it. I was in the NOT_SANTA virtual env. When I tried to run the command, with SUDO it said it was installed … but the import wouldn’t work.
How do I set the condition when using the pickle to collect labels? To show the sound output according to the detected object
Hi, Adrian. Is that possible to train the model with Keras 2.2.4 and deploy it in Raspberry Pi with Keras 2.1.5?
Keras 2.2 marked a significant update in the Keras library and while Keras does an incredible job with backwards compatibility I’d be a bit cautious.
Hi Adrian, First of all great tutorial! I just wanted to know if there is a way to get a bounding box around the santa once detected in the frame? Can you please help me with this?
This tutorial covers image classification. What you need is object detection.
I cover object detection inside the PyImageSearch Gurus course and Deep Learning for Computer Vision with Python.
Hi Adrian,
when i load the model into memory
model = load_model(“mobilenetv2(trained).h5”)
I get this error:
Fatal Python error: Segmentation fault
could you please help me!
It sounds like your RPi is running out of memory. Also, you’re not using the model utilized in this tutorial either.
Thank you for your answer. Yes I am using my own model trained on other data and other classes.Is this error is here because I am using other model(using keras2.2 during the training) but here you are using keras2.1 . Is there a solution to perform this on my own model?
I still think it’s a memory issue. Check your memory usage on the Pi when loading the model.
hello Adrian . First of all thank you for all your work .i have a simple question to ask if you dont mind .I had a problem when i tried ti link keras and opencv because each of them have a seperate virtualenv so i think to erase everything and start over and install keras and open cv without virtualenv .what do you thnik about that ? it s gonna work or not knowing that i need my rpi for only one project (my graduation project )
thank you for replying .
Just create a new Python virtual environment and install both Keras and OpenCV into the same virtual environment.
Hi Adrian,
I want to work with deep learning but does it work in real time with raspberry pi ? I want to learn this .
The method in this post? Yes, it will run in real-time on the RPi.
thanks 🙂
You are welcome!
What is the achived FPS in video? its seems good for real time detetction
I don’t have the exact FPS info but it was real-time (~20-30 FPS).