
In this tutorial, you will learn how to perform semantic segmentation using OpenCV, deep learning, and the ENet architecture. After reading today’s guide, you will be able to apply semantic segmentation to images and video using OpenCV.
Deep learning has helped facilitate unprecedented accuracy in computer vision, including image classification, object detection, and now even segmentation.
Traditional segmentation involves partitioning an image into parts (Normalized Cuts, Graph Cuts, Grab Cuts, superpixels, etc.); however, the algorithm has no actual understanding of what these parts represent.
Semantic segmentation algorithms on the other hand attempt to:
- Partition the image into meaningful parts
- While at the same time, associate every pixel in an input image with a class label (i.e., person, road, car, bus, etc.)
Semantic segmentation algorithms are super powerful and have many use cases, including self-driving cars — and in today’s post, I’ll be showing you how to apply semantic segmentation to road-scene images/video!
To learn how to apply semantic segmentation using OpenCV and deep learning, just keep reading!
Semantic segmentation with OpenCV and deep learning
In the first part of today’s blog post, we will discuss the ENet deep learning architecture.
From there, I’ll demonstrate how to use ENet to apply semantic segmentation to both images and video streams.
Along the way, I’ll be sharing example outputs from the segmentation so you can get a feel for what to expect when applying semantic segmentation to your own projects.
The ENet semantic segmentation architecture

The semantic segmentation architecture we’re using for this tutorial is ENet, which is based on Paszke et al.’s 2016 publication, ENet: A Deep Neural Network Architecture for Real-Time Semantic Segmentation.
One of the primary benefits of ENet is that it’s fast — up to 18x faster and requiring 79x fewer parameters with similar or better accuracy than larger models. The model size itself is only 3.2MB!
A single forward pass on a CPU took 0.2 seconds on my machine — if I were to use a GPU this segmentation network could run even faster. Paszke et al. trained that dataset on The Cityscapes Dataset, a semantic, instance-wise, dense pixel annotation of 20-30 classes (depending on which model you’re using).
As the name suggests, the Cityscapes dataset includes examples of images that can be used for urban scene understanding, including self- driving vehicles.
The particular model we’re using is trained on 20 classes, including:
- Unlabeled (i.e., background)
- Road
- Sidewalk
- Building
- Wall
- Fence
- Pole
- TrafficLight
- TrafficSign
- Vegetation
- Terrain
- Sky
- Person
- Rider
- Car
- Truck
- Bus
- Train
- Motorcycle
- Bicycle
In the rest of this blog post, you’ll learn how to apply semantic segmentation to extract a dense, pixel-wise map of each of these classes in both images and video streams.
If you’re interested in training your own ENet models for segmentation on your own custom datasets, be sure to refer to this page where the authors have provided a tutorial on how to do so.
Project structure
Today’s project can be obtained from the “Downloads” section of this blog post. Let’s take a look at our project structure using the tree command:
$ tree --dirsfirst
.
├── enet-cityscapes
│   ├── enet-classes.txt
│   ├── enet-colors.txt
│   └── enet-model.net
├── images
│   ├── example_01.png
│   ├── example_02.jpg
│   ├── example_03.jpg
│   └── example_04.png
├── videos
│   ├── massachusetts.mp4
│   └── toronto.mp4
├── output
├── segment.py
└── segment_video.py

4 directories, 11 files
Our project has four directories:
enet-cityscapes/: Contains our pre-trained deep learning model, classes list, and color labels to correspond with the classes.images/: A selection of four sample images to test our image segmentation script.videos/: Includes two sample videos for testing our deep learning segmentation video script. Credits for these videos are listed in the “Video segmentation results” section.output/: For organizational purposes, I like to have my script save the processed videos to theoutputfolder. I’m not including the output images/videos in the downloads as the file sizes are quite larger. You’ll need to use today’s code to generate them on your own.
Today we’ll be reviewing two Python scripts:
segment.py: Performs deep learning semantic segmentation on a single image. We’ll walk through this script to learn how segmentation works and then test it on single images before moving on to video.segment_video.py: As the name suggests, this script will perform semantic segmentation on video.
Semantic segmentation in images with OpenCV
Let’s go ahead and get started — open up the segment.py file and insert the following code:
# import the necessary packages
import numpy as np
import argparse
import imutils
import time
import cv2
We begin by importing necessary packages.
For this script, I recommend OpenCV 3.4.1 or higher. You can follow one of my installation tutorials — just be sure to specify which version of OpenCV you want to download and install as you follow the steps.
You’ll also need to install my package of OpenCV convenience functions, imutils — just use pip to install the package:
$ pip install --upgrade imutils
If you are using Python virtual environments don’t forget to use the workon command before using pip to install imutils !
Moving on, let’s parse our command line arguments:
# construct the argument parse and parse the arguments
ap = argparse.ArgumentParser()
ap.add_argument("-m", "--model", required=True,
	help="path to deep learning segmentation model")
ap.add_argument("-c", "--classes", required=True,
	help="path to .txt file containing class labels")
ap.add_argument("-i", "--image", required=True,
	help="path to input image")
ap.add_argument("-l", "--colors", type=str,
	help="path to .txt file containing colors for labels")
ap.add_argument("-w", "--width", type=int, default=500,
	help="desired width (in pixels) of input image")
args = vars(ap.parse_args())
This script has five command line arguments, two of which are optional:
--model: The path to our deep learning semantic segmentation model.--classes: The path to a text file containing class labels.--image: Our input image file path.--colors: Optional path to a colors text file. If no file is specified, random colors will be assigned to each class.--width: Optional desired image width. By default the value is500pixels.
If you aren’t familiar with the concept of argparse and command line arguments, definitely review this blog post which covers command line arguments in-depth.
Let’s handle our parsing our class labels files and colors next:
# load the class label names
CLASSES = open(args["classes"]).read().strip().split("\n")

# if a colors file was supplied, load it from disk
if args["colors"]:
	COLORS = open(args["colors"]).read().strip().split("\n")
	COLORS = [np.array(c.split(",")).astype("int") for c in COLORS]
	COLORS = np.array(COLORS, dtype="uint8")

# otherwise, we need to randomly generate RGB colors for each class
# label
else:
	# initialize a list of colors to represent each class label in
	# the mask (starting with 'black' for the background/unlabeled
	# regions)
	np.random.seed(42)
	COLORS = np.random.randint(0, 255, size=(len(CLASSES) - 1, 3),
		dtype="uint8")
	COLORS = np.vstack([[0, 0, 0], COLORS]).astype("uint8")
We load our CLASSES into memory from the supplied text file where the path is contained in the command line args dictionary (Line 23).
If a pre-specified set of COLORS for each class label is provided in a text file (one per line), we load them into memory (Lines 26-29). Otherwise, we randomly generate COLORS for each label (Lines 33-40).
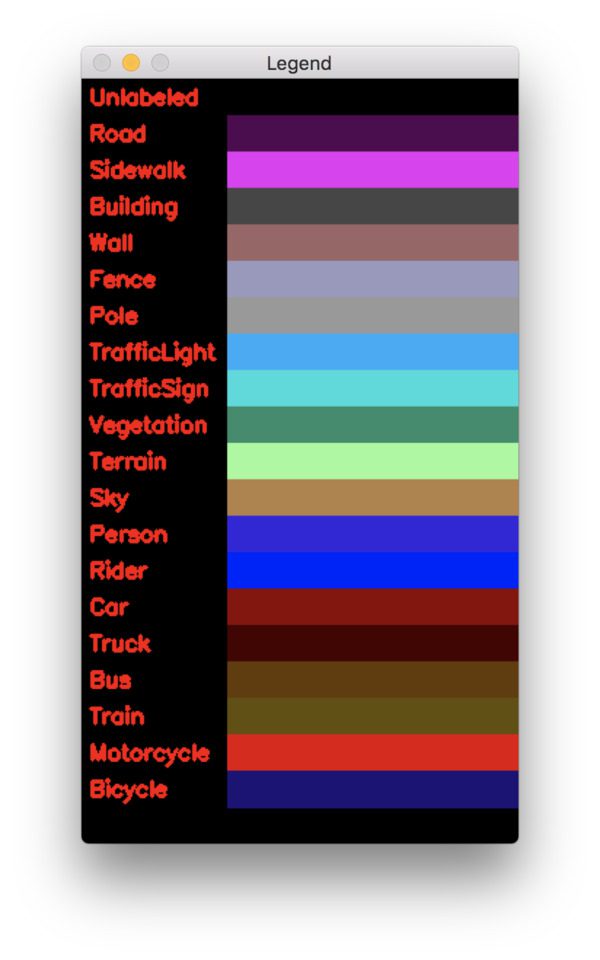
For testing purposes (and since we have 20 classes), let’s create a pretty color lookup legend using OpenCV drawing functions:
# initialize the legend visualization
legend = np.zeros(((len(CLASSES) * 25) + 25, 300, 3), dtype="uint8")

# loop over the class names + colors
for (i, (className, color)) in enumerate(zip(CLASSES, COLORS)):
	# draw the class name + color on the legend
	color = [int(c) for c in color]
	cv2.putText(legend, className, (5, (i * 25) + 17),
		cv2.FONT_HERSHEY_SIMPLEX, 0.5, (0, 0, 255), 2)
	cv2.rectangle(legend, (100, (i * 25)), (300, (i * 25) + 25),
		tuple(color), -1)
Here we generate a legend visualization so we can easily visually associate a class label with a color. The legend consists of the class label and a colored rectangle next to it. This is quickly created by creating a canvas (Line 43) and dynamically building the legend with a loop (Lines 46-52). Drawing basics are covered in this blog post.
Here’s the result:
The deep learning segmentation heavy lifting takes place in the next block:
# load our serialized model from disk
print("[INFO] loading model...")
net = cv2.dnn.readNet(args["model"])

# load the input image, resize it, and construct a blob from it,
# but keeping mind mind that the original input image dimensions
# ENet was trained on was 1024x512
image = cv2.imread(args["image"])
image = imutils.resize(image, width=args["width"])
blob = cv2.dnn.blobFromImage(image, 1 / 255.0, (1024, 512), 0,
	swapRB=True, crop=False)

# perform a forward pass using the segmentation model
net.setInput(blob)
start = time.time()
output = net.forward()
end = time.time()

# show the amount of time inference took
print("[INFO] inference took {:.4f} seconds".format(end - start))
To perform deep learning semantic segmentation of an image with Python and OpenCV, we:
- Load the model (Line 56).
- Construct a
blob(Lines 61-64).The ENet model we are using in this blog post was trained on input images with 1024×512 resolution — we’ll use the same here. You can learn more about how OpenCV’s blobFromImage works here. - Set the
blobas input to the network (Line 67) and perform a forward pass through the neural network (Line 69).
I surrounded the forward pass statement with timestamps. The elapsed time is printed to the terminal on Line 73.
Our work isn’t done yet — now it’s time to take steps to visualize our results. In the remaining lines of the script, we’ll be generating a color map to overlay on the original image. Each pixel has a corresponding class label index, enabling us to see the results of semantic segmentation on our screen visually.
To begin, we need to extract volume dimension information from our output, followed by calculating the class map and color mask:
# infer the total number of classes along with the spatial dimensions
# of the mask image via the shape of the output array
(numClasses, height, width) = output.shape[1:4]

# our output class ID map will be num_classes x height x width in
# size, so we take the argmax to find the class label with the
# largest probability for each and every (x, y)-coordinate in the
# image
classMap = np.argmax(output[0], axis=0)

# given the class ID map, we can map each of the class IDs to its
# corresponding color
mask = COLORS[classMap]
We determine the spatial dimensions of the output volume on Line 77.
Next, let’s find the class label index with the largest probability for each and every (x, y)-coordinate of the output volume (Line 83). This is known now as our classMap and contains a class index for each pixel.
Given the class ID indexes, we can use NumPy array indexing to “magically” (and not to mention, super efficiently) lookup the corresponding visualization color for each pixel (Line 87). Our color mask will be overlayed transparently on the original image.
Let’s finish the script:
# resize the mask and class map such that its dimensions match the
# original size of the input image (we're not using the class map
# here for anything else but this is how you would resize it just in
# case you wanted to extract specific pixels/classes)
mask = cv2.resize(mask, (image.shape[1], image.shape[0]),
	interpolation=cv2.INTER_NEAREST)
classMap = cv2.resize(classMap, (image.shape[1], image.shape[0]),
	interpolation=cv2.INTER_NEAREST)

# perform a weighted combination of the input image with the mask to
# form an output visualization
output = ((0.4 * image) + (0.6 * mask)).astype("uint8")

# show the input and output images
cv2.imshow("Legend", legend)
cv2.imshow("Input", image)
cv2.imshow("Output", output)
cv2.waitKey(0)
We resize the mask and classMap such that they have the exact same dimensions as our input image (Lines 93-96). It is critical that we apply nearest neighbor interpolation rather than cubic, bicubic, etc. interpolation as we want to maintain the original class IDs/mask values.
Now that sizing is correct, we create a “transparent color overlay” by overlaying the mask on our original image (Line 100). This enables us to easily visualize the output of the segmentation. More information on transparent overlays, and how to construct them, can be found in this post.
Finally, the legend and original + output images are shown to the screen on Lines 103-105.
Single-image segmentation results
Be sure to grab the “Downloads” to this blog post before using the commands in this section. I’ve provided the model + associated files, images, and Python scripts in a zip file for your convenience.
The command line arguments that you supply in your terminal are important to replicate my results. Learn about command line arguments here if you are new to them.
When you’re ready, open up a terminal + navigate to the project, and execute the following command:
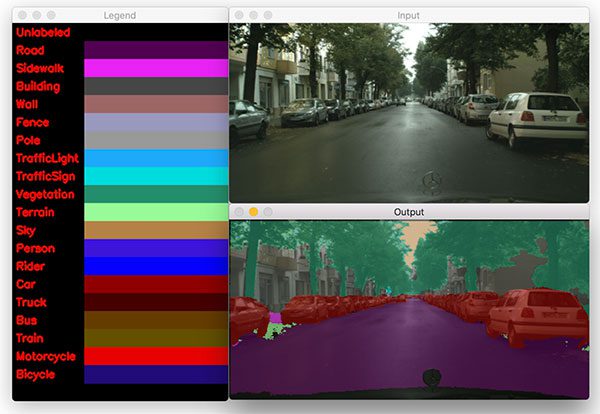
$ python segment.py --model enet-cityscapes/enet-model.net \
	--classes enet-cityscapes/enet-classes.txt \
	--colors enet-cityscapes/enet-colors.txt \
	--image images/example_01.png
[INFO] loading model...
[INFO] inference took 0.2100 seconds

Notice how accurate the segmentation is — it clearly segments classes and accurately identifies the person and bicycle (a safety issue for self-driving cars). The road, sidewalk, cars, and even foliage are identified.
Let’s try another example simply by changing the --image command line argument to be a different image:
$ python segment.py --model enet-cityscapes/enet-model.net \
	--classes enet-cityscapes/enet-classes.txt \
	--colors enet-cityscapes/enet-colors.txt \
	--image images/example_02.jpg
[INFO] loading model...
[INFO] inference took 0.1989 seconds
The result in Figure 4 demonstrates the accuracy and clarity of this semantic segmentation model. The cars, road, trees, and sky are clearly marked.
Here’s another example:
$ python segment.py --model enet-cityscapes/enet-model.net \
	--classes enet-cityscapes/enet-classes.txt \
	--colors enet-cityscapes/enet-colors.txt \
	--image images/example_03.png
[INFO] loading model...
[INFO] inference took 0.1992 seconds
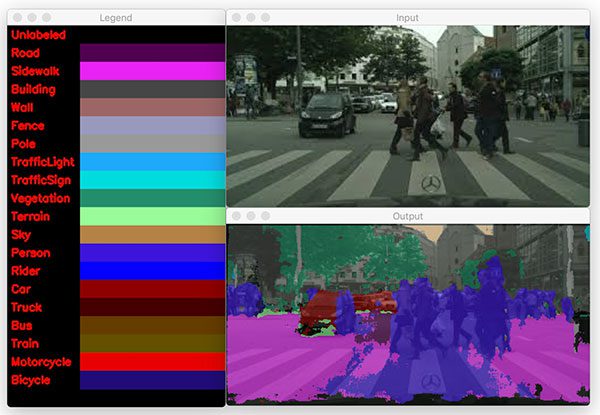
The above figure is a more complex scene, but ENet can still segment the people walking in front of the car. Unfortunately, the model incorrectly classifies the road as sidewalk, but could be due to the fact that people are walking on it.
A final example:
$ python segment.py --model enet-cityscapes/enet-model.net \
	--classes enet-cityscapes/enet-classes.txt \
	--colors enet-cityscapes/enet-colors.txt \
	--image images/example_04.png
[INFO] loading model...
[INFO] inference took 0.1916 seconds
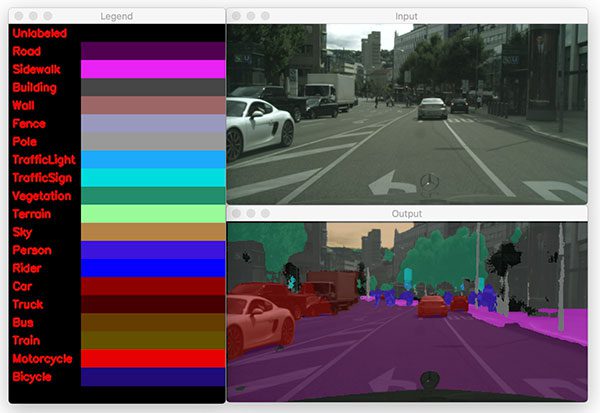
The final image that we’ve sent through ENet shows how the model can clearly segment a truck from a car among other scene classes such as road, sidewalk, foliage, person, etc.
Implementing semantic segmentation in video with OpenCV
Let’s continue on and apply semantic segmentation to video. Semantic segmentation in video follows the same concept as on a single image — this time we’ll loop over all frames in a video stream and process each one. I recommend a GPU if you need to process frames in real-time.
Open up the segment_video.py file and insert the following code:
# import the necessary packages
import numpy as np
import argparse
import imutils
import time
import cv2

# construct the argument parse and parse the arguments
ap = argparse.ArgumentParser()
ap.add_argument("-m", "--model", required=True,
	help="path to deep learning segmentation model")
ap.add_argument("-c", "--classes", required=True,
	help="path to .txt file containing class labels")
ap.add_argument("-v", "--video", required=True,
	help="path to input video file")
ap.add_argument("-o", "--output", required=True,
	help="path to output video file")
ap.add_argument("-s", "--show", type=int, default=1,
	help="whether or not to display frame to screen")
ap.add_argument("-l", "--colors", type=str,
	help="path to .txt file containing colors for labels")
ap.add_argument("-w", "--width", type=int, default=500,
	help="desired width (in pixels) of input image")
args = vars(ap.parse_args())
Here we import our required packages and parse command line arguments with argparse. Imports are the same as the previous script. With the exception of the following two command line arguments, the other five are the same as well:
--video: The path to the input video file.--show: Whether or not to show the video on the screen while processing. You’ll achieve higher FPS throughput if you set this value to0.
The following lines load our classes and associated colors data (or generate random colors). These lines are identical to the previous script:
# load the class label names
CLASSES = open(args["classes"]).read().strip().split("\n")

# if a colors file was supplied, load it from disk
if args["colors"]:
	COLORS = open(args["colors"]).read().strip().split("\n")
	COLORS = [np.array(c.split(",")).astype("int") for c in COLORS]
	COLORS = np.array(COLORS, dtype="uint8")

# otherwise, we need to randomly generate RGB colors for each class
# label
else:
	# initialize a list of colors to represent each class label in
	# the mask (starting with 'black' for the background/unlabeled
	# regions)
	np.random.seed(42)
	COLORS = np.random.randint(0, 255, size=(len(CLASSES) - 1, 3),
		dtype="uint8")
	COLORS = np.vstack([[0, 0, 0], COLORS]).astype("uint8")
After loading classes and associating a color with each class for visualization, we’ll load the model and initialize the video stream:
# load our serialized model from disk
print("[INFO] loading model...")
net = cv2.dnn.readNet(args["model"])

# initialize the video stream and pointer to output video file
vs = cv2.VideoCapture(args["video"])
writer = None

# try to determine the total number of frames in the video file
try:
	prop =  cv2.cv.CV_CAP_PROP_FRAME_COUNT if imutils.is_cv2() \
		else cv2.CAP_PROP_FRAME_COUNT
	total = int(vs.get(prop))
	print("[INFO] {} total frames in video".format(total))

# an error occurred while trying to determine the total
# number of frames in the video file
except:
	print("[INFO] could not determine # of frames in video")
	total = -1
Our model only needs to be loaded once on Line 48 — we’ll use that same model to process each and every frame.
From there we open a video stream pointer to input video file on and initialize our video writer object (Lines 51 and 52).
Lines 55-59 attempt to determine the total number of frames in the video, otherwise a message is printed indicating that the value could not be determined via Lines 63 and 64. The total value will be used later to calculate the approximate runtime of this video processing script.
Let’s begin looping over video frames:
# loop over frames from the video file stream
while True:
	# read the next frame from the file
	(grabbed, frame) = vs.read()

	# if the frame was not grabbed, then we have reached the end
	# of the stream
	if not grabbed:
		break

	# construct a blob from the frame and perform a forward pass
	# using the segmentation model
	frame = imutils.resize(frame, width=args["width"])
	blob = cv2.dnn.blobFromImage(frame, 1 / 255.0, (1024, 512), 0,
		swapRB=True, crop=False)
	net.setInput(blob)
	start = time.time()
	output = net.forward()
	end = time.time()
Our while loop begins on Line 68.
We grab a frame on Line 70 and subsequently check that it is valid on Line 74. If it was not grabbed properly, we’ve likely reached the end of the video, so we break out of the frame processing loop (Line 75).
The next set of lines mimic what we accomplished previously with a single image, but this time we are operating on a video frame . Inference occurs here, so don’t overlook these steps where we:
- Construct a
blobfrom a resizedframe(Lines 79-81). The ENet model we are using in this blog post was trained on input images with 1024×512 resolution — we’ll use the same here. Learn about how OpenCV’s blobFromImage works here. - Set the
blobas input (Line 82) and perform aforwardpass through the neural network (Line 84).
Segmentation inference is now complete, but we want to post process the data in order to visualize + output the results. The remainder of the loop handles this process over three code blocks:
	# infer the total number of classes along with the spatial
	# dimensions of the mask image via the shape of the output array
	(numClasses, height, width) = output.shape[1:4]

	# our output class ID map will be num_classes x height x width in
	# size, so we take the argmax to find the class label with the
	# largest probability for each and every (x, y)-coordinate in the
	# image
	classMap = np.argmax(output[0], axis=0)

	# given the class ID map, we can map each of the class IDs to its
	# corresponding color
	mask = COLORS[classMap]

	# resize the mask such that its dimensions match the original size
	# of the input frame
	mask = cv2.resize(mask, (frame.shape[1], frame.shape[0]),
		interpolation=cv2.INTER_NEAREST)

	# perform a weighted combination of the input frame with the mask
	# to form an output visualization
	output = ((0.3 * frame) + (0.7 * mask)).astype("uint8")
Just as before:
- We extract the spatial dimensions of the
outputvolume on Line 89. - Generate our
classMapby finding the class label index with the largest probability for each and every pixel of theoutputimage array (Line 95). - Compute our color
maskfrom theCOLORSassociated with each class label index in theclassMap(Line 99). - Resize the
maskto match theframedimensions (Lines 103 and 104). - And finally, overlay the mask on the frame transparently (Line 108).
Let’s write the output frames to disk:
	# check if the video writer is None
	if writer is None:
		# initialize our video writer
		fourcc = cv2.VideoWriter_fourcc(*"MJPG")
		writer = cv2.VideoWriter(args["output"], fourcc, 30,
			(output.shape[1], output.shape[0]), True)

		# some information on processing single frame
		if total > 0:
			elap = (end - start)
			print("[INFO] single frame took {:.4f} seconds".format(elap))
			print("[INFO] estimated total time: {:.4f}".format(
				elap * total))

	# write the output frame to disk
	writer.write(output)
The first time the loop runs, the writer is None , so we need to instantiate it on Lines 111-115. Learn more about writing video to disk with OpenCV.
Using the total video frame count, we can estimate how long it will take to process the video (Lines 118-122).
Finally, we actually write the output to disk on Line 125.
Let’s display the frame (if needed) and clean up:
	# check to see if we should display the output frame to our screen
	if args["show"] > 0:
		cv2.imshow("Frame", output)
		key = cv2.waitKey(1) & 0xFF

		# if the `q` key was pressed, break from the loop
		if key == ord("q"):
			break

# release the file pointers
print("[INFO] cleaning up...")
writer.release()
vs.release()
In the last block, we check to see if we should display the output frame and take action accordingly (Lines 128 and 129). While we’re showing the frames in a window on the screen, if “q” is pressed, we’ll “quit” the frame processing loop (Lines 130-134). Finally we cleanup by releasing pointers.
Video segmentation results
To perform semantic segmentation in video, grab the “Downloads” for this blog post.
Then, open up a terminal and execute the following command:
$ python segment_video.py --model enet-cityscapes/enet-model.net \
	--classes enet-cityscapes/enet-classes.txt \
	--colors enet-cityscapes/enet-colors.txt \
	--video videos/massachusetts.mp4 \
	--output output/massachusetts_output.avi
[INFO] loading model...
[INFO] 4235 total frames in video
[INFO] single frame took 0.2491 seconds
[INFO] estimated total time: 1077.3574
[INFO] cleaning up...
I’ve included a sample of my output below:
Credits: Thank you to Davis King from dlib for putting together a dataset of front/rear views of vehicles. Davis included the videos in his dataset which I then used for this example. Thank you J Utah and Massachusetts Dash Cam for the example videos. Audio credit to BenSound.
What if I want to train my own segmentation networks?
At this point, if you reviewed both scripts, you learned that deep learning semantic segmentation with a pretrained model is quite easy for both images and video. Python and OpenCV make the process straightforward for us, but don’t be fooled by the low line count of the scripts — there are a ton of computations going on under the hood of the segmentation model.
Training a model isn’t as difficult as you’d imagine. If you would like to train your own segmentation networks on your own custom datasets, make sure you refer to the following tutorial provided by the ENet authors.
Please note that I have not trained a network from scratch using ENet but I wanted to provide it in this post as (1) a matter of completeness and (2) just in case you may want to give it a try.
Keep in mind though — labeling image data requires a ton of time and resources. The ENet authors were able to train their model thanks to the hard work of the Cityscapes team who graciously have made their efforts available for learning and research.
Note: The Cityscapes data is for non-commercial use (i.e. academic, research, and learning). Only use the ENet model accordingly.
What's next? I recommend PyImageSearch University.

30+ total classes • 39h 44m video • Last updated: 12/2021
★★★★★ 4.84 (128 Ratings) • 3,000+ Students Enrolled
I strongly believe that if you had the right teacher you could master computer vision and deep learning.
Do you think learning computer vision and deep learning has to be time-consuming, overwhelming, and complicated? Or has to involve complex mathematics and equations? Or requires a degree in computer science?
That’s not the case.
All you need to master computer vision and deep learning is for someone to explain things to you in simple, intuitive terms. And that’s exactly what I do. My mission is to change education and how complex Artificial Intelligence topics are taught.
If you're serious about learning computer vision, your next stop should be PyImageSearch University, the most comprehensive computer vision, deep learning, and OpenCV course online today. Here you’ll learn how to successfully and confidently apply computer vision to your work, research, and projects. Join me in computer vision mastery.
Inside PyImageSearch University you'll find:
- ✓ 30+ courses on essential computer vision, deep learning, and OpenCV topics
- ✓ 30+ Certificates of Completion
- ✓ 39h 44m on-demand video
- ✓ Brand new courses released every month, ensuring you can keep up with state-of-the-art techniques
- ✓ Pre-configured Jupyter Notebooks in Google Colab
- ✓ Run all code examples in your web browser — works on Windows, macOS, and Linux (no dev environment configuration required!)
- ✓ Access to centralized code repos for all 500+ tutorials on PyImageSearch
- ✓ Easy one-click downloads for code, datasets, pre-trained models, etc.
- ✓ Access on mobile, laptop, desktop, etc.
Summary
In today’s blog post we learned how to apply semantic segmentation using OpenCV, deep learning, and the ENet architecture.
Using the pre-trained ENet model on the Cityscapes dataset, we were able to segment both images and video streams into 20 classes in the context of self-driving cars and road scene segmentation, including people (both walking and riding bicycles), vehicles (cars, trucks, buses, motorcycles, etc.), construction (building, walls, fences, etc.), as well as vegetation, terrain, and the ground itself.
If you enjoyed today’s blog post, be sure to share it!
And to download the code to this guide, just enter your email address in the form below — I’ll be sure to notify you when new posts are published here on PyImageSearch as well.
Download the Source Code and FREE 17-page Resource Guide
Enter your email address below to get a .zip of the code and a FREE 17-page Resource Guide on Computer Vision, OpenCV, and Deep Learning. Inside you'll find my hand-picked tutorials, books, courses, and libraries to help you master CV and DL!

