In this tutorial, you will learn how to perform image stitching using Python, OpenCV, and the cv2.createStitcher and cv2.Stitcher_create functions. Using today’s code you’ll be able to stitch multiple images together, creating a panorama of stitched images.
Just under two years ago I published two guides on image stitching and panorama construction:
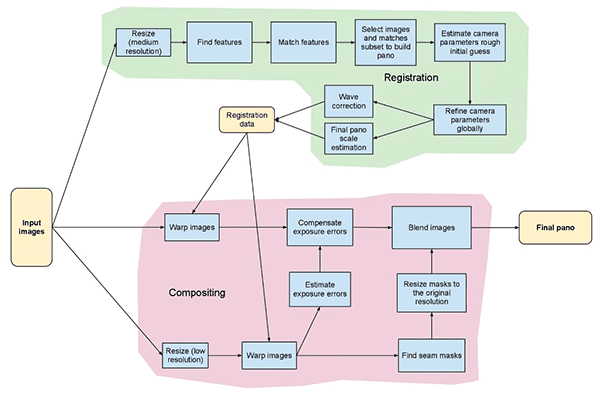
Both of these tutorials covered the fundamentals of the typical image stitching algorithm, which, at a bare minimum, require four key steps:
- Detecting keypoints (DoG, Harris, etc.) and extracting local invariant descriptors (SIFT, SURF, etc.) from two input images
- Matching the descriptors between the images
- Using the RANSAC algorithm to estimate a homography matrix using our matched feature vectors
- Applying a warping transformation using the homography matrix obtained from Step #3
However, the biggest problem with my original implementations is that they were not capable of handling more than two input images.
In today’s tutorial, we’ll be revisiting image stitching with OpenCV, including how to stitch more than two images together into a panoramic image.
To learn how to stitch images with OpenCV and Python, just keep reading!
Image Stitching with OpenCV and Python
In the first part of today’s tutorial, we’ll briefly review OpenCV’s image stitching algorithm that is baked into the OpenCV library itself via cv2.createStitcher and cv2.Stitcher_create functions.
From there we’ll review our project structure and implement a Python script that can be used for image stitching.
We’ll review the results of this first script, note its limitations, and then implement a second Python script that can be used for more aesthetically pleasing image stitching results.
Finally, we’ll review the results of our second script and again note any limitations or drawbacks.
OpenCV’s image stitching algorithm
The algorithm we’ll be using here today is similar to the method proposed by Brown and Lowe in their 2007 paper, Automatic Panoramic Image Stitching with Invariant Features.
Unlike previous image stitching algorithms which are sensitive to the ordering of input images, the Brown and Lowe method is more robust, making it insensitive to:
- Ordering of images
- Orientation of images
- Illumination changes
- Noisy images that are not actually part of the panorama
Furthermore, their image stitching method is capable of producing more aesthetically pleasing output panorama images through the use of gain compensation and image blending.
A complete, detailed review of the algorithm is outside the scope of this post, so if you’re interested in learning more, please refer to the original publication.
Project structure
Let’s see how this project is organized with the tree command:
$ tree --dirsfirst
.
├── images
│   └── scottsdale
│       ├── IMG_1786-2.jpg
│       ├── IMG_1787-2.jpg
│       └── IMG_1788-2.jpg
├── image_stitching.py
├── image_stitching_simple.py
└── output.png

2 directories, 6 files
The input images go in the images/ folder. I opted to make a subfolder for my scottsdale/ set of images in case I wanted to add additional subfolders here later.
Today we’ll be reviewing two Python scripts:
image_stitching_simple.py: Our simple version of image stitching can be completed in less than 50 lines of Python code!image_stitching.py: This script includes my hack to extract an ROI of the stitched image for an aesthetically pleasing result.
The last file, output.png , is the name of the resulting stitched image. Using command line arguments, you can easily change the filename + path of the output image.
The cv2.createStitcher and cv2.Stitcher_create functions
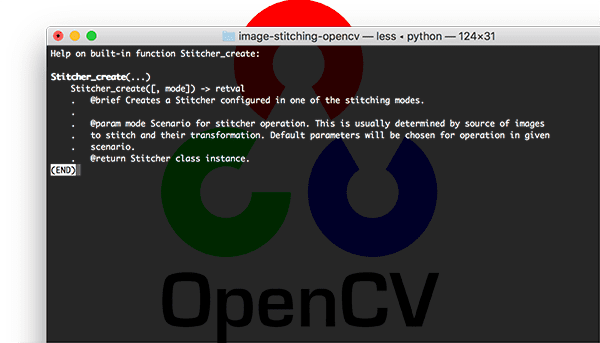
OpenCV has already implemented a method similar to Brown and Lowe’s paper via the cv2.createStitcher (OpenCV 3.x) and cv2.Stitcher_create (OpenCV 4) functions.
Assuming you have OpenCV properly configured and installed you’ll be able to investigate the function signature of cv2.createStitcher for OpenCV 3.x:
createStitcher(...)
    createStitcher([, try_use_gpu]) -> retval
Notice how this function has only a single parameter, try_gpu which can be used to improve your the throughout of your image stitching pipeline. OpenCV’s GPU support is limited and I’ve never been able to get this parameter to work so I recommend always leaving it as False .
The cv2.Stitcher_create function for OpenCV 4 has a similar signature:
Stitcher_create(...)
    Stitcher_create([, mode]) -> retval
    .   @brief Creates a Stitcher configured in one of the stitching
    .	modes.
    .
    .   @param mode Scenario for stitcher operation. This is usually
    .	determined by source of images to stitch and their transformation.
    .	Default parameters will be chosen for operation in given scenario.
    .   @return Stitcher class instance.
To perform the actual image stitching we’ll need to call the .stitch method:
OpenCV 3.x:
stitch(...) method of cv2.Stitcher instance
    stitch(images[, pano]) -> retval, pano

OpenCV 4.x:
stitch(...) method of cv2.Stitcher instance
    stitch(images, masks[, pano]) -> retval, pano
    .   @brief These functions try to stitch the given images.
    .
    .   @param images Input images.
    .   @param masks Masks for each input image specifying where to
    .	look for keypoints (optional).
    .   @param pano Final pano.
    .   @return Status code.
This method accepts a list of input images , and then attempts to stitch them into a panorama, returning the output panorama image to the calling function.
The status variable indicates whether or not the image stitching was a success and can be one of four variables:
OK = 0: The image stitching was a success.ERR_NEED_MORE_IMGS = 1: In the event you receive this status code, you will need more input images to construct your panorama. Typically this error occurs if there are not enough keypoints detected in your input images.ERR_HOMOGRAPHY_EST_FAIL = 2: This error occurs when the RANSAC homography estimation fails. Again, you may need more images or your images don’t have enough distinguishing, unique texture/objects for keypoints to be accurately matched.ERR_CAMERA_PARAMS_ADJUST_FAIL = 3: I have never encountered this error before so I don’t have much knowledge about it, but the gist is that it is related to failing to properly estimate camera intrinsics/extrinsics from the input images. If you encounter this error you may need to refer to the OpenCV documentation or even dive into the OpenCV C++ code.
Now that we’ve reviewed the cv2.createStitcher , cv2.Stitcher_create , and .stitch methods, let’s move on to actually implementing image stitching with OpenCV and Python.
Implementing image stitching with Python
Let’s go ahead and get started implementing our image stitching algorithm!
Open up the image_stitching_simple.py file and insert the following code:
# import the necessary packages
from imutils import paths
import numpy as np
import argparse
import imutils
import cv2

# construct the argument parser and parse the arguments
ap = argparse.ArgumentParser()
ap.add_argument("-i", "--images", type=str, required=True,
	help="path to input directory of images to stitch")
ap.add_argument("-o", "--output", type=str, required=True,
	help="path to the output image")
args = vars(ap.parse_args())
Our required packages are imported on Lines 2-6. Notably, we’ll be using OpenCV and imutils. If you haven’t already, go ahead and install them:
- To install OpenCV, just follow one of my OpenCV installation guides.
- The imutils package can be installed/updated with pip:
pip install --upgrade imutils. Be sure to upgrade it as new features are often added.
From there we’ll parse two command line arguments on Lines 9-14:
--images: The path to the directory of input images to stitch.--output: The path to the output image where the result will be saved.
If you aren’t familiar with the concepts of argparse and command line arguments then read this blog post.
Let’s load our input images:
# grab the paths to the input images and initialize our images list
print("[INFO] loading images...")
imagePaths = sorted(list(paths.list_images(args["images"])))
images = []

# loop over the image paths, load each one, and add them to our
# images to stitch list
for imagePath in imagePaths:
	image = cv2.imread(imagePath)
	images.append(image)
Here we grab our imagePaths (Line 18).
Then for each imagePath , we’ll load the image and add it to the images list (Lines 19-25).
Now that the images are in memory, let’s go ahead and stitch them together into a panorama using OpenCV’s built-in capability:
# initialize OpenCV's image stitcher object and then perform the image
# stitching
print("[INFO] stitching images...")
stitcher = cv2.createStitcher() if imutils.is_cv3() else cv2.Stitcher_create()
(status, stitched) = stitcher.stitch(images)
The stitcher object is created on Line 30. Notice that depending on whether you’re using OpenCV 3 or 4, a different constructor is called.
Subsequently, we can pass our images to the .stitch method (Line 31). The call to .stitch returns both a status and our stitched image (assuming the stitching was successful).
Finally, we’ll both (1) write the stitched image to disk and (2) display it on the screen:
# if the status is '0', then OpenCV successfully performed image
# stitching
if status == 0:
	# write the output stitched image to disk
	cv2.imwrite(args["output"], stitched)

	# display the output stitched image to our screen
	cv2.imshow("Stitched", stitched)
	cv2.waitKey(0)

# otherwise the stitching failed, likely due to not enough keypoints)
# being detected
else:
	print("[INFO] image stitching failed ({})".format(status))
Assuming our status flag indicates success (Line 35), we write the stitched image to disk (Line 37) and display it until a key is pressed (Lines 40 and 41).
Otherwise, we’ll simply print a failure message (Lines 45 and 46).
Basic image stitching results
To give our image stitching script a try, make sure you use the “Downloads” section of the tutorial to download the source code and example images.
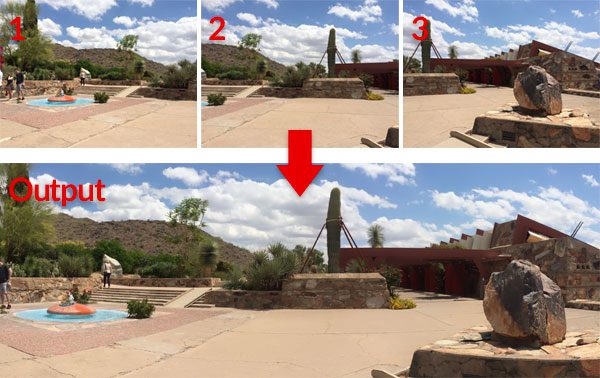
Inside the images/scottsdale/ directory you will find three photos that I took when visiting Frank Lloyd Wright’s famous Taliesin West house in Scottsdale, AZ:
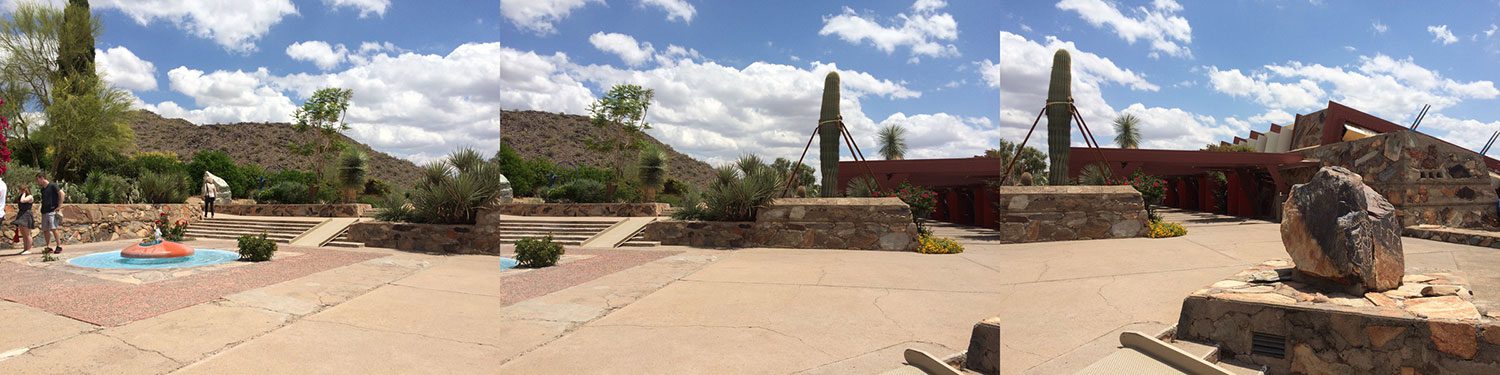
Our goal is to stitch these three images into a single panoramic image. To perform the stitching, open up a terminal, navigate to where you downloaded the code + images, and execute the following command:
$ python image_stitching_simple.py --images images/scottsdale --output output.png
[INFO] loading images...
[INFO] stitching images...

Notice how we have successfully performed image stitching!
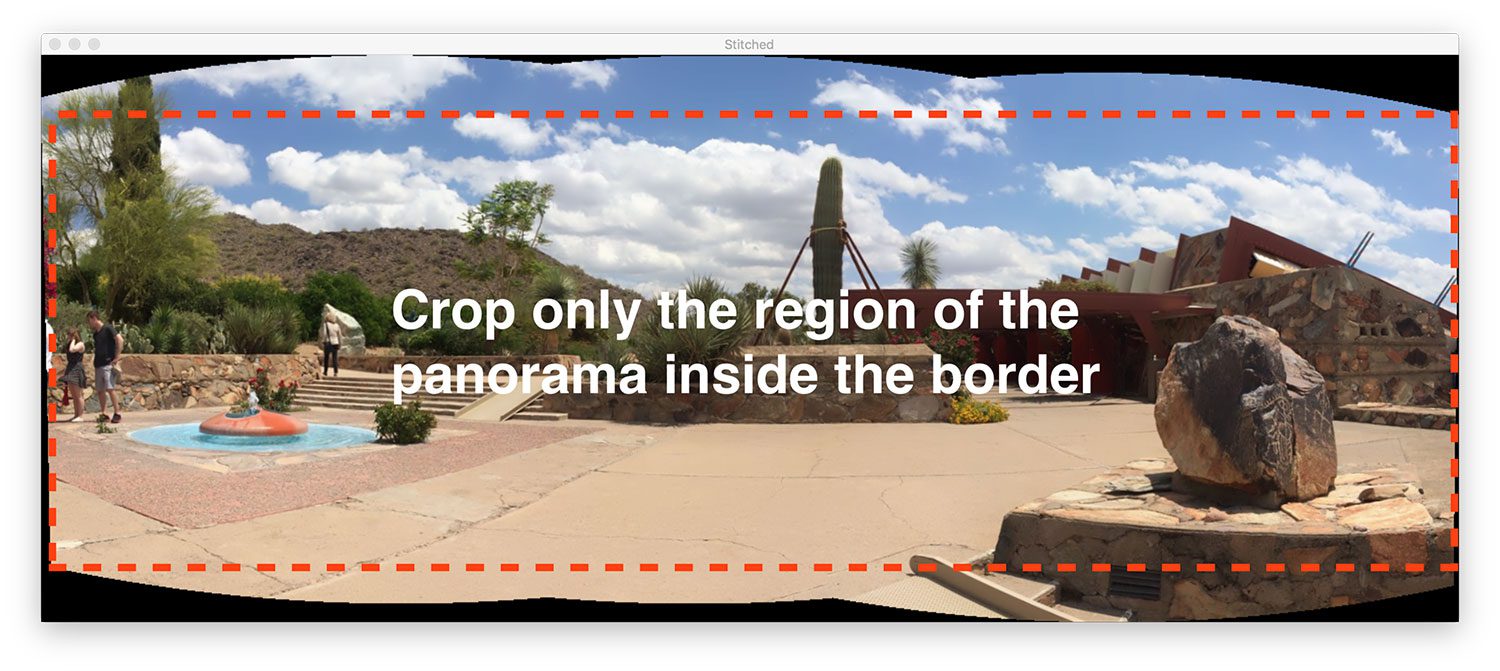
But what about those black regions surrounding the panorama? What are those?
Those regions are from performing the perspective warps required to construct the panorama.
There is a way to get rid of them…but we’ll need to implement some additional logic in the next section.
A better image stitcher with OpenCV and Python
Our first image stitching script was a good start but those black regions surrounding the panorama itself are not something we would call “aesthetically pleasing”.
And more to the point, you wouldn’t see such an output image from popular image stitching applications built into iOS, Android, etc.
Therefore, we’re going to hack our script a bit and include some additional logic to create more aesthetically pleasing panoramas.
I’m going to again reiterate that this method is a hack.
We’ll be reviewing basic image processing operations including threshold, contour extraction, morphological operations, etc. in order to obtain our desired result.
To my knowledge, OpenCV’s Python bindings do not provide us with the required information to manually extract the maximum inner rectangular region of the panorama. If OpenCV does, please let me know in the comments as I would love to know.
Let’s go ahead and get started — open up the image_stitching.py script and insert the following code:
# import the necessary packages
from imutils import paths
import numpy as np
import argparse
import imutils
import cv2

# construct the argument parser and parse the arguments
ap = argparse.ArgumentParser()
ap.add_argument("-i", "--images", type=str, required=True,
	help="path to input directory of images to stitch")
ap.add_argument("-o", "--output", type=str, required=True,
	help="path to the output image")
ap.add_argument("-c", "--crop", type=int, default=0,
	help="whether to crop out largest rectangular region")
args = vars(ap.parse_args())

# grab the paths to the input images and initialize our images list
print("[INFO] loading images...")
imagePaths = sorted(list(paths.list_images(args["images"])))
images = []

# loop over the image paths, load each one, and add them to our
# images to stich list
for imagePath in imagePaths:
	image = cv2.imread(imagePath)
	images.append(image)

# initialize OpenCV's image sticher object and then perform the image
# stitching
print("[INFO] stitching images...")
stitcher = cv2.createStitcher() if imutils.is_cv3() else cv2.Stitcher_create()
(status, stitched) = stitcher.stitch(images)
All of this code is identical to our previous script with one exception.
The --crop command line argument has been added. When a 1 is provided for this argument in the terminal, we’ll go ahead and perform our cropping hack.
The next step is where we start implementing additional functionality:
# if the status is '0', then OpenCV successfully performed image
# stitching
if status == 0:
	# check to see if we supposed to crop out the largest rectangular
	# region from the stitched image
	if args["crop"] > 0:
		# create a 10 pixel border surrounding the stitched image
		print("[INFO] cropping...")
		stitched = cv2.copyMakeBorder(stitched, 10, 10, 10, 10,
			cv2.BORDER_CONSTANT, (0, 0, 0))

		# convert the stitched image to grayscale and threshold it
		# such that all pixels greater than zero are set to 255
		# (foreground) while all others remain 0 (background)
		gray = cv2.cvtColor(stitched, cv2.COLOR_BGR2GRAY)
		thresh = cv2.threshold(gray, 0, 255, cv2.THRESH_BINARY)[1]
Notice how I’ve made a new block for when the --crop flag is set on Line 40. Let’s begin going through this block:
- First, we’ll add a
10pixel border to all sides of ourstitchedimage (Lines 43 and 44), ensuring we’ll be able to find contours of the complete panorama outline later in this section. - Then we’re going to create a
grayversion of ourstitchedimage (Line 49). - And from there we threshold the
grayimage (Line 50).
Here is the result (thresh ) of those three steps:

We now have a binary image of our panorama where white pixels (255) are the foreground and black pixels (0) are the background.
Given our thresholded image we can apply contour extraction, compute the bounding box of the largest contour (i.e., the outline of the panorama itself), and draw the bounding box:
		# find all external contours in the threshold image then find
		# the *largest* contour which will be the contour/outline of
		# the stitched image
		cnts = cv2.findContours(thresh.copy(), cv2.RETR_EXTERNAL,
			cv2.CHAIN_APPROX_SIMPLE)
		cnts = imutils.grab_contours(cnts)
		c = max(cnts, key=cv2.contourArea)

		# allocate memory for the mask which will contain the
		# rectangular bounding box of the stitched image region
		mask = np.zeros(thresh.shape, dtype="uint8")
		(x, y, w, h) = cv2.boundingRect(c)
		cv2.rectangle(mask, (x, y), (x + w, y + h), 255, -1)
Contours are extracted and parsed on Lines 55-57. Line 58 then grabs the contour with the largest area (i.e., the outline of the stitched image itself).
Note: The imutils.grab_contours function is new in imutils==0.5.2 to accommodate OpenCV 2.4, OpenCV 3, and OpenCV 4 and their different return signatures for cv2.findContours .
Line 62 allocates memory for our new rectangular mask. Line 63 then calculates the bounding box of our largest contour. Using the bounding rectangle information, on Line 64, we draw a solid white rectangle on the mask.
The output of the above code block would look like the following:
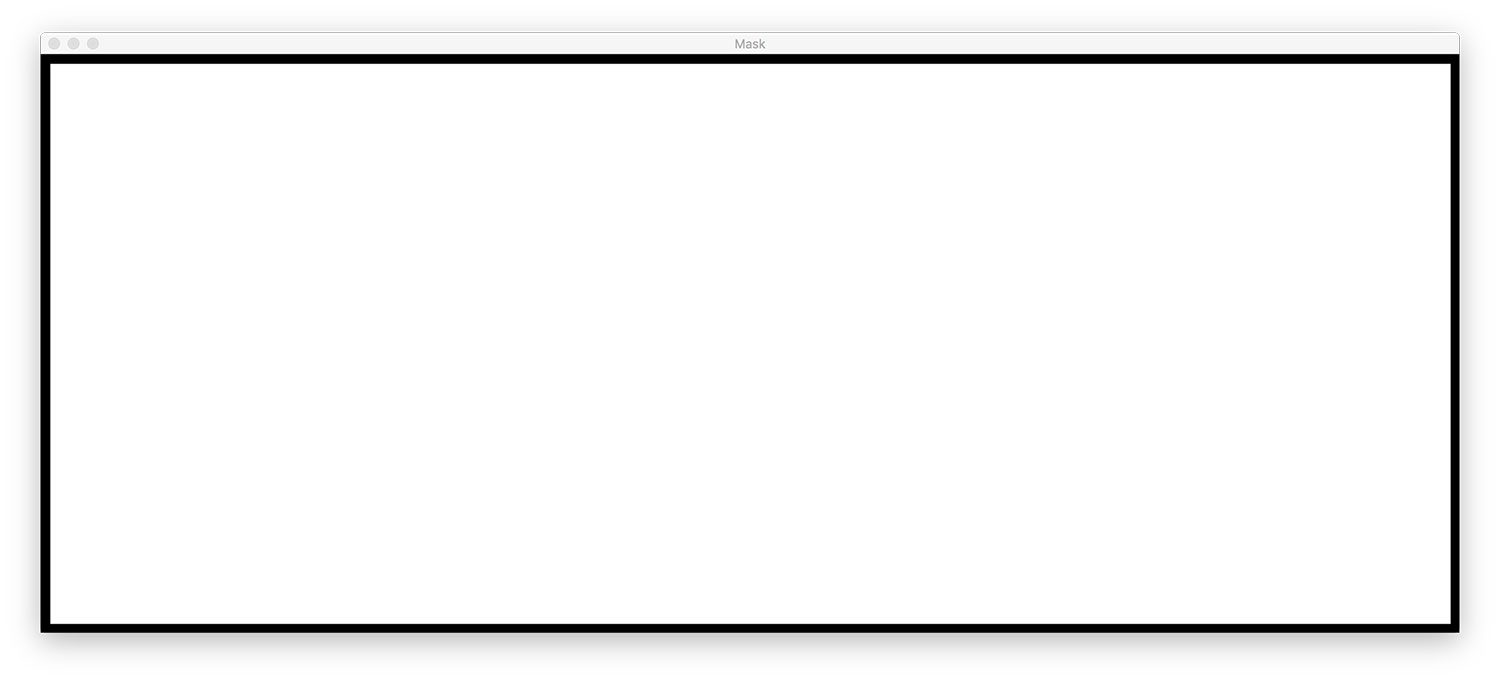
This bounding box is the smallest rectangular region that the entire panorama can fit in.
Now, here comes one of the biggest hacks I’ve ever put together for a blog post:
		# create two copies of the mask: one to serve as our actual
		# minimum rectangular region and another to serve as a counter
		# for how many pixels need to be removed to form the minimum
		# rectangular region
		minRect = mask.copy()
		sub = mask.copy()

		# keep looping until there are no non-zero pixels left in the
		# subtracted image
		while cv2.countNonZero(sub) > 0:
			# erode the minimum rectangular mask and then subtract
			# the thresholded image from the minimum rectangular mask
			# so we can count if there are any non-zero pixels left
			minRect = cv2.erode(minRect, None)
			sub = cv2.subtract(minRect, thresh)
On Lines 70 and 71 we create two copies of our mask image:
- The first mask,
minMask, will be slowly reduced in size until it can fit inside the inner part of the panorama (see Figure 5 at the top of this section). - The second mask,
sub, will be used to determine if we need to keep reducing the size ofminMask.
Line 75 starts a while loop that will continue looping until there are no more foreground pixels in sub .
Line 79 performs an erosion morphological operation to reduce the size of minRect .
Line 80 then subtracts thresh from minRect — once there are no more foreground pixels in minRect then we can break from the loop.
I have included an animation of the hack below:

minRect region of the OpenCV panorama image, making for an aesthetically pleasing stitched imageOn the top, we have our sub image and on the bottom we have the minRect image.
Notice how the size of minRect is progressively reduced until there are no more foreground pixels left in sub — at this point we know we have found the smallest rectangular mask that can fit into the largest rectangular region of the panorama.
Given the minimum inner rectangle we can again find contours and compute the bounding box, but this time we’ll simply extract the ROI from the stitched image:
		# find contours in the minimum rectangular mask and then
		# extract the bounding box (x, y)-coordinates
		cnts = cv2.findContours(minRect.copy(), cv2.RETR_EXTERNAL,
			cv2.CHAIN_APPROX_SIMPLE)
		cnts = imutils.grab_contours(cnts)
		c = max(cnts, key=cv2.contourArea)
		(x, y, w, h) = cv2.boundingRect(c)

		# use the bounding box coordinates to extract the our final
		# stitched image
		stitched = stitched[y:y + h, x:x + w]
Here we have:
- Found contours in
minRect(Lines 84 and 85). - Handled parsing contours for multiple OpenCV versions (Line 86). You’ll need
imutils>=0.5.2to use this function. - Grabbed the largest contour (Line 87).
- Computed the bounding box of the largest contour (Line 88).
- Extracted the ROI from our
stitchedusing the bounding box information (Line 92).
The final stitched image can be displayed to our screen and then saved to disk:
	# write the output stitched image to disk
	cv2.imwrite(args["output"], stitched)

	# display the output stitched image to our screen
	cv2.imshow("Stitched", stitched)
	cv2.waitKey(0)

# otherwise the stitching failed, likely due to not enough keypoints)
# being detected
else:
	print("[INFO] image stitching failed ({})".format(status))
Lines 95-99 handle saving and displaying the image regardless of whether or not our cropping hack is performed.
Just as before, if the status flag didn’t come back as a success, we’ll print an error message (Lines 103 and 104).
Let’s go ahead and check out the results of our improved image stitching + OpenCV pipeline.
Improved image stitching results
Again, make sure you have used the “Downloads” section of today’s tutorial to download the source code and example images.
From there, open up a terminal and execute the following command:
$ python image_stitching.py --images images/scottsdale --output output.png \
	--crop 1
[INFO] loading images...
[INFO] stitching images...
[INFO] cropping...

Notice how this time we have removed the black regions from the output stitched images (caused by the warping transformations) by applying our hack detailed in the section above.
Limitations and drawbacks
In a previous tutorial, I demonstrated how you could build a real-time panorama and image stitching algorithm — this tutorial hinged on the fact that we were manually performing keypoint detection, feature extraction, and keypoint matching, giving us access to the homography matrix used to warp our two input images into a panorama.
And while OpenCV’s built-in cv2.createStitcher and cv2.Stitcher_create functions are certainly capable of constructing accurate, aesthetically pleasing panoramas, one of the primary drawbacks of the method is that it abstracts away any access to the homography matrices.
One of the assumptions of real-time panorama construction is that the scene itself is not changing much in terms of content.
Once we compute the initial homography estimation we should only have to occasionally recompute the matrix.
Not having to perform a full-blown keypoint matching and RANSAC estimation gives us a tremendous boost of speed when building our panorama, so without access to the raw homography matrices, it would be challenging to take OpenCV’s built-in image stitching algorithm and convert it to real-time.
Running into errors when performing image stitching using OpenCV?
It is possible that you may run into errors when trying to use either the cv2.createStitcher function or cv2.Stitcher_create functions.
The two “easy to resolve” errors I see people encounter is forgetting what version of OpenCV they are using.
For example, if you are using OpenCV 4 but try to call cv2.createSticher you will encounter the following error message:
>>> cv2.createStitcher
Traceback (most recent call last):
  File "<stdin>", line 1, in <module>
AttributeError: module 'cv2' has no attribute 'createStitcher'
You should instead be using the cv2.Stitcher_create function.
Similarly, if you are using OpenCV 3 and you try to call cv2.Sticher_create you will receive this error:
>>> cv2.Stitcher_create
Traceback (most recent call last):
  File "<stdin>", line 1, in <module>
AttributeError: module 'cv2' has no attribute 'Stitcher_create'
Instead, use the cv2.createSticher function.
If you are unsure which OpenCV version you are using you can check using cv2.__version__ :
>>> cv2.__version__
'4.0.0'
Here you can see that I am using OpenCV 4.0.0.
You can perform the same check on your system.
The final error that you can encounter, and arguably the most common, is related to OpenCV (1) not having contrib support and (2) being compiled without the OPENCV_ENABLE_NONFREE=ON option enabled.
To resolve this error you must have the opencv_contrib modules installed along with the OPENCV_ENABLE_NONFREE option set to ON .
If you are encountering an error related to OpenCV’s non-free and contrib modules, make sure you refer to my OpenCV install guides to ensure you have the full install of OpenCV.
Note: Please note that I cannot help debug your own OpenCV install if you did not follow one of my install guides so please make sure you’re using my OpenCV install guides when configuring your system.
What's next? I recommend PyImageSearch University.

30+ total classes • 39h 44m video • Last updated: 12/2021
★★★★★ 4.84 (128 Ratings) • 3,000+ Students Enrolled
I strongly believe that if you had the right teacher you could master computer vision and deep learning.
Do you think learning computer vision and deep learning has to be time-consuming, overwhelming, and complicated? Or has to involve complex mathematics and equations? Or requires a degree in computer science?
That’s not the case.
All you need to master computer vision and deep learning is for someone to explain things to you in simple, intuitive terms. And that’s exactly what I do. My mission is to change education and how complex Artificial Intelligence topics are taught.
If you're serious about learning computer vision, your next stop should be PyImageSearch University, the most comprehensive computer vision, deep learning, and OpenCV course online today. Here you’ll learn how to successfully and confidently apply computer vision to your work, research, and projects. Join me in computer vision mastery.
Inside PyImageSearch University you'll find:
- ✓ 30+ courses on essential computer vision, deep learning, and OpenCV topics
- ✓ 30+ Certificates of Completion
- ✓ 39h 44m on-demand video
- ✓ Brand new courses released every month, ensuring you can keep up with state-of-the-art techniques
- ✓ Pre-configured Jupyter Notebooks in Google Colab
- ✓ Run all code examples in your web browser — works on Windows, macOS, and Linux (no dev environment configuration required!)
- ✓ Access to centralized code repos for all 500+ tutorials on PyImageSearch
- ✓ Easy one-click downloads for code, datasets, pre-trained models, etc.
- ✓ Access on mobile, laptop, desktop, etc.
Summary
In today’s tutorial you learned how to perform multiple image stitching using OpenCV and Python.
Using both OpenCV and Python we were able to stitch multiple images together and create panoramic images.
Our output panoramic images were not only accurate in their stitching placement but also aesthetically pleasing as well.
However, one of the biggest drawbacks of using OpenCV’s built-in image stitching class is that it abstracts away much of the internal computation, including the resulting homography matrices themselves.
If you are trying to perform real-time image stitching, as we did in a previous post, you may find it beneficial to cache the homography matrix and only occasionally perform keypoint detection, feature extraction, and feature matching.
Skipping these steps and using the cached matrix to perform perspective warping can reduce the computational burden of your pipeline and ultimately speed-up the real-time image stitching algorithm, but unfortunately, OpenCV’s cv2.createStitcher Python bindings do not provide us with access to the raw matrices.
If you are interested in learning more about real-time panorama construction, please refer to my previous post.
I hope you enjoyed today’s tutorial on image stitching!
To download the source code to today’s post, and be notified tutorials are published here on PyImageSearch, just enter your email address in the form below!

Download the Source Code and FREE 17-page Resource Guide
Enter your email address below to get a .zip of the code and a FREE 17-page Resource Guide on Computer Vision, OpenCV, and Deep Learning. Inside you'll find my hand-picked tutorials, books, courses, and libraries to help you master CV and DL!

